HP ML150 HP ProLiant ML150 G6 Server Maintenance and Service Guide - Page 52
Removing an expansion card, reverse steps 1 through 10 of Installing an expansion card.
 |
UPC - 884420743644
View all HP ML150 manuals
Add to My Manuals
Save this manual to your list of manuals |
Page 52 highlights
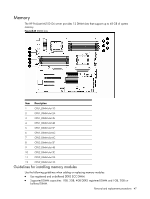
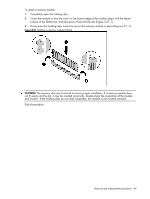
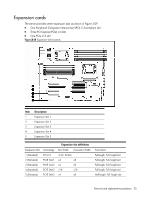
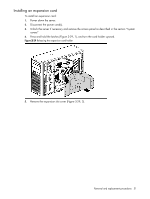
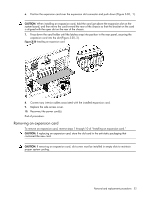
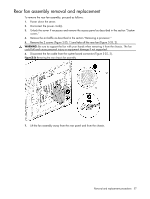
6. Position the expansion card over the expansion slot connector and push down (Figure 3-30, 1). CAUTION: When installing an expansion card, hold the card just above the expansion slot on the system board, and then move the card toward the rear of the chassis so that the bracket on the card is aligned with the open slot on the rear of the chassis. 7. Press down the card holder until the latches snap into position in the rear panel, securing the expansion card into the slot (Figure 3-30, 2). Figure 3-30 Installing an expansion card 8. Connect any interior cables associated with the installed expansion card. 9. Replace the side access cover. 10. Reconnect the power cord(s). End of procedure. Removing an expansion card To remove an expansion card, reverse steps 1 through 10 of "Installing an expansion card." CAUTION: If replacing an expansion card, store the old card in the anti-static packaging that contained the new card. CAUTION: If removing an expansion card, slot covers must be installed in empty slots to maintain proper system cooling. Removal and replacement procedures 52
-
 1
1 -
2
-
3
-
4
-
5
-
6
-
7
-
8
-
9
-
10
-
11
-
12
-
13
-
14
-
15
-
16
-
17
-
18
-
19
-
20
-
21
-
22
-
23
-
24
-
25
-
26
-
27
-
28
-
29
-
30
-
31
-
32
-
33
-
34
-
35
-
36
-
37
-
38
-
39
-
40
-
41
-
42
-
43
-
44
-
45
-
46
-
 47
47 -
 48
48 -
 49
49 -
 50
50 -
 51
51 -
 52
52 -
 53
53 -
 54
54 -
 55
55 -
 56
56 -
 57
57 -
58
-
59
-
60
-
61
-
62
-
63
-
64
-
65
-
66
-
67
-
68
-
69
-
70
-
71
-
72
-
73
-
74
-
75
-
76
-
77
-
78
-
79
-
80
-
81
-
82
-
83
-
84
-
85
-
86
-
87
-
88
-
89
-
90
-
91
-
92
-
93
-
94
-
95
-
96
-
97
-
98
-
99
-
100
-
101
-
102
-
103
-
104
-
105
-
106
 |
 |
