HP ML150 HP ProLiant ML150 G6 Server Maintenance and Service Guide - Page 39
the hard drive cage.
 |
UPC - 884420743644
View all HP ML150 manuals
Add to My Manuals
Save this manual to your list of manuals |
Page 39 highlights
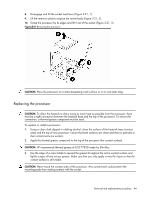
3. If replacing a hot-plug drive, remove the hot-plug drive to be replaced: a. Push in the thumb release of the desired hard drive carrier (Figure 3-13, 1). b. Pull the cam latch upward (Figure 3-13, 2). c. Gently pull the hard drive carrier straight out from the drive bay (Figure 3-13, 3). Figure 3-13 Removing a hot-plug hard drive 4. Slide the hot-plug HDD drive into the drive bay until resistance is felt (Figure 3-14, 1). 5. Verify that the hooks behind the pivot end of the cam latch will engage the hole in the edge of the hard drive cage. 6. Rotate the cam latch down to fully seat the drive carrier into the backplane and press in until it clicks into place (Figure 3-14, 2). Figure 3-14 Installing a hot-plug hard drive 7. Replace and close the front bezel. End of procedure. Removal and replacement procedures 39
-
 1
1 -
2
-
3
-
4
-
5
-
6
-
7
-
8
-
9
-
10
-
11
-
12
-
13
-
14
-
15
-
16
-
17
-
18
-
19
-
20
-
21
-
22
-
23
-
24
-
25
-
26
-
27
-
28
-
29
-
30
-
31
-
32
-
33
-
 34
34 -
 35
35 -
 36
36 -
 37
37 -
 38
38 -
 39
39 -
 40
40 -
 41
41 -
 42
42 -
 43
43 -
 44
44 -
45
-
46
-
47
-
48
-
49
-
50
-
51
-
52
-
53
-
54
-
55
-
56
-
57
-
58
-
59
-
60
-
61
-
62
-
63
-
64
-
65
-
66
-
67
-
68
-
69
-
70
-
71
-
72
-
73
-
74
-
75
-
76
-
77
-
78
-
79
-
80
-
81
-
82
-
83
-
84
-
85
-
86
-
87
-
88
-
89
-
90
-
91
-
92
-
93
-
94
-
95
-
96
-
97
-
98
-
99
-
100
-
101
-
102
-
103
-
104
-
105
-
106
 |
 |
