HP Officejet 5600 User Guide - Page 102
Fax setup troubleshooting, The fax test failed, Reinstall, Applications, HP All-in-One Software
 |
View all HP Officejet 5600 manuals
Add to My Manuals
Save this manual to your list of manuals |
Page 102 highlights
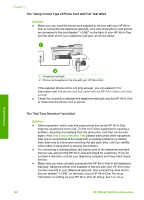
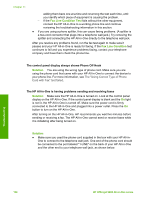
3. Disconnect your HP All-in-One from your computer. 4. Restart your computer. Note It is important that you disconnect your HP All-in-One before restarting your computer. Do not connect the HP All-in-One to your computer until after you have reinstalled the software. 5. Start the Setup program for your HP All-in-One again. 6. Select Reinstall. 7. Follow the onscreen instructions and the instructions provided in the Setup Guide that came with your HP All-in-One. To uninstall from a Mac 1. Disconnect the HP All-in-One from your Mac. 2. Double-click the Applications: HP All-in-One Software folder. 3. Double-click HP Uninstaller. Follow the onscreen instructions. 4. After the software is uninstalled, disconnect your HP All-in-One, and then restart your computer. Note It is important that you disconnect your HP All-in-One before restarting your computer. Do not connect the HP All-in-One to your computer until after you have reinstalled the software. 5. To reinstall the software, insert the HP All-in-One CD-ROM into your computer's CD-ROM drive. 6. On the desktop, open the CD-ROM and then double-click HP All-in-One Installer. 7. Follow the onscreen instructions and the instructions provided in the Setup Guide that came with your HP All-in-One. Fax setup troubleshooting This section contains fax setup troubleshooting information for the HP All-in-One. If your HP All-in-One is not set up properly for faxing, you might experience problems when sending faxes, receiving faxes, or both. This section contains only setup-related troubleshooting. For additional fax troubleshooting topics, such as problems with your printouts or slow fax reception, see the 5600 series Troubleshooting section in the onscreen HP Image Zone Help. For more information, see Use the onscreen Help. If you are having faxing problems, you can print a fax test report to check the status of your HP All-in-One. The test will fail if your HP All-in-One is not set up properly for faxing. Perform this test after you have completed setting up your HP All-in-One for faxing. For more information, see Test your fax setup. If the test fails, review the report for information on how to fix any problems found. For more information, you can also see the next section, The fax test failed. Troubleshooting User Guide 99
-
 1
1 -
2
-
3
-
4
-
5
-
6
-
7
-
8
-
9
-
10
-
11
-
12
-
13
-
14
-
15
-
16
-
17
-
18
-
19
-
20
-
21
-
22
-
23
-
24
-
25
-
26
-
27
-
28
-
29
-
30
-
31
-
32
-
33
-
34
-
35
-
36
-
37
-
38
-
39
-
40
-
41
-
42
-
43
-
44
-
45
-
46
-
47
-
48
-
49
-
50
-
51
-
52
-
53
-
54
-
55
-
56
-
57
-
58
-
59
-
60
-
61
-
62
-
63
-
64
-
65
-
66
-
67
-
68
-
69
-
70
-
71
-
72
-
73
-
74
-
75
-
76
-
77
-
78
-
79
-
80
-
81
-
82
-
83
-
84
-
85
-
86
-
87
-
88
-
89
-
90
-
91
-
92
-
93
-
94
-
95
-
96
-
 97
97 -
 98
98 -
 99
99 -
 100
100 -
 101
101 -
 102
102 -
 103
103 -
 104
104 -
 105
105 -
 106
106 -
 107
107 -
108
-
109
-
110
-
111
-
112
-
113
-
114
-
115
-
116
-
117
-
118
-
119
-
120
-
121
-
122
-
123
-
124
-
125
-
126
-
127
-
128
-
129
-
130
-
131
-
132
-
133
-
134
-
135
-
136
-
137
-
138
-
139
-
140
-
141
-
142
 |
 |