HP Officejet 5600 User Guide - Page 80
Clean the exterior, Print a self-test report - cartridge
 |
View all HP Officejet 5600 manuals
Add to My Manuals
Save this manual to your list of manuals |
Page 80 highlights
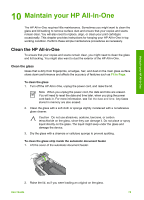
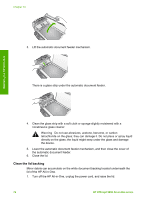
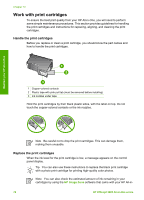
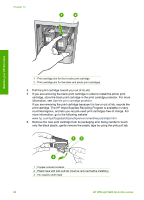
Maintain your HP All-in-One 2. Clean the white document backing with a soft cloth or sponge slightly moistened with a mild soap and warm water. Wash the backing gently to loosen debris. Do not scrub the backing. 3. Dry the backing with a chamois or soft cloth. Caution Do not use paper-based wipes, as these might scratch the backing. 4. If further cleaning is needed, repeat the previous steps using isopropyl (rubbing) alcohol, and wipe the backing thoroughly with a damp cloth to remove any residual alcohol. Caution Be careful not to spill alcohol on the glass or painted parts of the HP All-in-One, as this might damage the device. Clean the exterior Use a soft cloth or slightly moistened sponge to wipe dust, smudges, and stains off the case. The interior of the HP All-in-One does not require cleaning. Keep fluids away from the control panel and the interior of the HP All-in-One. Caution To avoid damage to painted parts of the HP All-in-One, do not use alcohol or alcohol-based cleaning products on the control panel, document feeder tray, lid, or other painted parts of the device. Print a self-test report If you are experiencing problems with printing, print a self-test report before you replace the print cartridges. This report provides useful information on several aspects of your device, including your print cartridges. 1. Load letter, A4, or legal unused plain white paper into the input tray. 2. Press Setup. 3. Press 2, then press 6. This selects Print Report and then selects Self-Test Report. The HP All-in-One prints a self-test report, which might indicate the source of the printing problem. 4. Make sure the lines of color extend across the page. If the black line is missing, faded, streaked, or shows lines, this might indicate a problem with the black or photo print cartridge in the right slot. If any of the remaining three lines are missing, faded, streaked, or show lines, this might indicate a problem with the tri-color print cartridge in the left slot. If the color bars do not appear as black, cyan, magenta and yellow, you might need to clean the print cartridges. For more information, see Clean the print cartridges. If the problem is not resolved, you might need to replace the print cartridge. For more information on replacing print cartridges, see Replace the print cartridges. Note For examples of test patterns from normal and malfunctioning print cartridges, see the onscreen HP Image Zone Help that came with your software. User Guide 77
-
 1
1 -
2
-
3
-
4
-
5
-
6
-
7
-
8
-
9
-
10
-
11
-
12
-
13
-
14
-
15
-
16
-
17
-
18
-
19
-
20
-
21
-
22
-
23
-
24
-
25
-
26
-
27
-
28
-
29
-
30
-
31
-
32
-
33
-
34
-
35
-
36
-
37
-
38
-
39
-
40
-
41
-
42
-
43
-
44
-
45
-
46
-
47
-
48
-
49
-
50
-
51
-
52
-
53
-
54
-
55
-
56
-
57
-
58
-
59
-
60
-
61
-
62
-
63
-
64
-
65
-
66
-
67
-
68
-
69
-
70
-
71
-
72
-
73
-
74
-
 75
75 -
 76
76 -
 77
77 -
 78
78 -
 79
79 -
 80
80 -
 81
81 -
 82
82 -
 83
83 -
 84
84 -
 85
85 -
86
-
87
-
88
-
89
-
90
-
91
-
92
-
93
-
94
-
95
-
96
-
97
-
98
-
99
-
100
-
101
-
102
-
103
-
104
-
105
-
106
-
107
-
108
-
109
-
110
-
111
-
112
-
113
-
114
-
115
-
116
-
117
-
118
-
119
-
120
-
121
-
122
-
123
-
124
-
125
-
126
-
127
-
128
-
129
-
130
-
131
-
132
-
133
-
134
-
135
-
136
-
137
-
138
-
139
-
140
-
141
-
142
 |
 |