HP Officejet 5600 User Guide - Page 126
Remove the control panel faceplate, Caution 1
 |
View all HP Officejet 5600 manuals
Add to My Manuals
Save this manual to your list of manuals |
Page 126 highlights
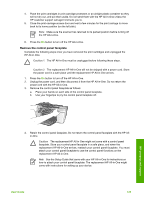
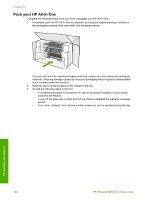
4. Place the print cartridges in print cartridge protectors or an airtight plastic container so they will not dry out, and put them aside. Do not send them with the HP All-in-One unless the HP customer support call agent instructs you to. 5. Close the print-carriage access door and wait a few minutes for the print carriage to move back to its home position (on the left side). Note Make sure the scanner has returned to its parked position before turning off the HP All-in-One. 6. Press the On button to turn off the HP All-in-One. Remove the control panel faceplate Complete the following steps once you have removed the print cartridges and unplugged the HP All-in-One. Caution 1 The HP All-in-One must be unplugged before following these steps. Caution 2 The replacement HP All-in-One will not be shipped with a power cord. Store the power cord in a safe place until the replacement HP All-in-One arrives. 1. Press the On button to turn off the HP All-in-One. 2. Unplug the power cord, and then disconnect it from the HP All-in-One. Do not return the power cord with the HP All-in-One. 3. Remove the control panel faceplate as follows: a. Place your hands on each side of the control panel faceplate. b. Use your fingertips to pry the control panel faceplate off. HP warranty and support 4. Retain the control panel faceplate. Do not return the control panel faceplate with the HP Allin-One. Caution The replacement HP All-in-One might not come with a control panel faceplate. Store your control panel faceplate in a safe place, and when the replacement HP All-in-One arrives, reattach your control panel faceplate. You must attach your control panel faceplate to use the control panel functions on the replacement HP All-in-One. Note See the Setup Guide that came with your HP All-in-One for instructions on how to attach your control panel faceplate. The replacement HP All-in-One might come with instructions for setting up your device. User Guide 123
-
 1
1 -
2
-
3
-
4
-
5
-
6
-
7
-
8
-
9
-
10
-
11
-
12
-
13
-
14
-
15
-
16
-
17
-
18
-
19
-
20
-
21
-
22
-
23
-
24
-
25
-
26
-
27
-
28
-
29
-
30
-
31
-
32
-
33
-
34
-
35
-
36
-
37
-
38
-
39
-
40
-
41
-
42
-
43
-
44
-
45
-
46
-
47
-
48
-
49
-
50
-
51
-
52
-
53
-
54
-
55
-
56
-
57
-
58
-
59
-
60
-
61
-
62
-
63
-
64
-
65
-
66
-
67
-
68
-
69
-
70
-
71
-
72
-
73
-
74
-
75
-
76
-
77
-
78
-
79
-
80
-
81
-
82
-
83
-
84
-
85
-
86
-
87
-
88
-
89
-
90
-
91
-
92
-
93
-
94
-
95
-
96
-
97
-
98
-
99
-
100
-
101
-
102
-
103
-
104
-
105
-
106
-
107
-
108
-
109
-
110
-
111
-
112
-
113
-
114
-
115
-
116
-
117
-
118
-
119
-
120
-
 121
121 -
 122
122 -
 123
123 -
 124
124 -
 125
125 -
 126
126 -
 127
127 -
 128
128 -
 129
129 -
 130
130 -
 131
131 -
132
-
133
-
134
-
135
-
136
-
137
-
138
-
139
-
140
-
141
-
142
 |
 |
