HP Scanjet Enterprise 8500 HP Scanjet Enterprise 8500 fn1 - User Guide - Page 35
Con Quick Sets, Con general security settings
 |
View all HP Scanjet Enterprise 8500 manuals
Add to My Manuals
Save this manual to your list of manuals |
Page 35 highlights
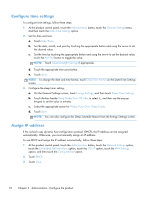
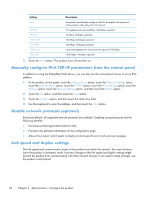
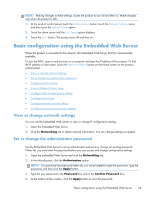
3. On the left navigation menu, click the Save to USB Setup entry. 4. Select the Enable Save to USB checkbox. 5. Set the default settings you want. 6. Click the Apply button. Configure Quick Sets 1. Open the Embedded Web Server. 2. Click the General tab. 3. On the left navigation menu, click the Quick Sets Setup entry. 4. Click the Add button, and then follow the onscreen instructions in the Quick Set Wizard. 5. When you are done, click the Apply button. TIP: You can also configure Quick Sets on other setup pages in the Embedded Web Server. Configure general security settings 1. Open the Embedded Web Server. 2. Click the Security tab, and then click General Security. 3. Type a new password and then type the password again to verify. 4. Select Enable Host USB plug and play if you wish to enable the covered USB port on the front of the product. 5. Click Apply. Configure access control security settings Completing each step may take you to multiple screens. 1. Open the Embedded Web Server. 2. Specify and configure the security method to be used (LDAP or Windows). a. Click the Security tab, and then click Access Control. b. Under Enable and Configure Sign In Methods, click Setup to configure the desired sign-in method (LDAP or Windows). c. Follow the onscreen instructions on the selected sign-in method setup screen; when setup is complete, click OK. 3. Under Sign In and Permission Policies on the Access Control screen, set device feature access settings for each level of user, and then select a Manage Permission Sets... option. 4. Under Relationships Between Network Users or Groups and Device Permissions, select the default permission set for each type of sign in method. 5. (Optional): Under Device User Accounts, set up individual user accounts if you are not using users and groups to grant device access. Basic configuration using the Embedded Web Server 27
-
 1
1 -
2
-
3
-
4
-
5
-
6
-
7
-
8
-
9
-
10
-
11
-
12
-
13
-
14
-
15
-
16
-
17
-
18
-
19
-
20
-
21
-
22
-
23
-
24
-
25
-
26
-
27
-
28
-
29
-
 30
30 -
 31
31 -
 32
32 -
 33
33 -
 34
34 -
 35
35 -
 36
36 -
 37
37 -
 38
38 -
 39
39 -
 40
40 -
41
-
42
-
43
-
44
-
45
-
46
-
47
-
48
-
49
-
50
-
51
-
52
-
53
-
54
-
55
-
56
-
57
-
58
-
59
-
60
-
61
-
62
-
63
-
64
-
65
-
66
-
67
-
68
-
69
-
70
-
71
-
72
-
73
-
74
-
75
-
76
-
77
-
78
-
79
-
80
-
81
-
82
-
83
-
84
-
85
-
86
-
87
-
88
-
89
-
90
-
91
-
92
-
93
-
94
-
95
-
96
-
97
-
98
-
99
-
100
-
101
-
102
-
103
 |
 |