HP Scanjet Enterprise 8500 HP Scanjet Enterprise 8500 fn1 - User Guide - Page 72
Invert the front panel, hold it firmly with one hand, disconnect the ribbon cable 1, and then
 |
View all HP Scanjet Enterprise 8500 manuals
Add to My Manuals
Save this manual to your list of manuals |
Page 72 highlights
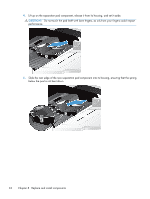
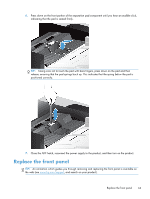
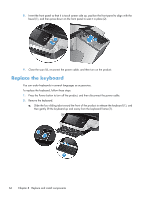
To replace the front panel, follow these steps: 1. Press the Power button to turn off the product, and then disconnect the power cable. 2. Raise the scan lid. 3. Locate the indents on the underside of the front panel, press in at the location shown, and then lift the front panel gently as it releases. 4. Invert the front panel, hold it firmly with one hand, disconnect the ribbon cable (1), and then gently pull the ribbon cable through the cable restraint (2). 64 Chapter 8 Replace and install components
-
 1
1 -
2
-
3
-
4
-
5
-
6
-
7
-
8
-
9
-
10
-
11
-
12
-
13
-
14
-
15
-
16
-
17
-
18
-
19
-
20
-
21
-
22
-
23
-
24
-
25
-
26
-
27
-
28
-
29
-
30
-
31
-
32
-
33
-
34
-
35
-
36
-
37
-
38
-
39
-
40
-
41
-
42
-
43
-
44
-
45
-
46
-
47
-
48
-
49
-
50
-
51
-
52
-
53
-
54
-
55
-
56
-
57
-
58
-
59
-
60
-
61
-
62
-
63
-
64
-
65
-
66
-
 67
67 -
 68
68 -
 69
69 -
 70
70 -
 71
71 -
 72
72 -
 73
73 -
 74
74 -
 75
75 -
 76
76 -
 77
77 -
78
-
79
-
80
-
81
-
82
-
83
-
84
-
85
-
86
-
87
-
88
-
89
-
90
-
91
-
92
-
93
-
94
-
95
-
96
-
97
-
98
-
99
-
100
-
101
-
102
-
103
 |
 |

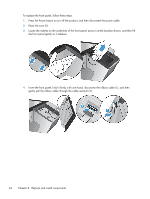
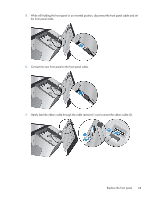
To replace the front panel, follow these steps:
1.
Press the Power button to turn off the product, and then disconnect the power cable.
2.
Raise the scan lid.
3.
Locate the indents on the underside of the front panel, press in at the location shown, and then lift
the front panel gently as it releases.
4.
Invert the front panel, hold it firmly with one hand, disconnect the ribbon cable (1), and then
gently pull the ribbon cable through the cable restraint (2).
64
Chapter 8
Replace and install components