HP Scanjet Enterprise 8500 HP Scanjet Enterprise 8500 fn1 - User Guide - Page 69
Open the automatic document feeder ADF hatch.
 |
View all HP Scanjet Enterprise 8500 manuals
Add to My Manuals
Save this manual to your list of manuals |
Page 69 highlights
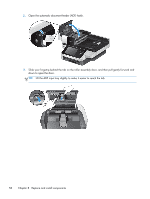
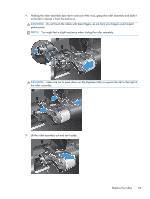
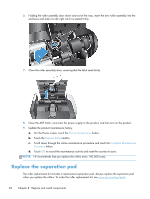
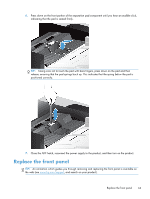
TIP: An animation which guides you through removing and replacing the separation pad is available on the web (see www.hp.com/support, and search on your product). To replace the separation pad, follow these steps: 1. Press the Power button to turn off the product, and then disconnect the power cable. 2. Open the automatic document feeder (ADF) hatch. 3. Press forward (toward the rear of the ADF) on the separation pad latch to release the separation pad. TIP: This is easier to do if you raise the ADF input tray slightly. Replace the separation pad 61
-
 1
1 -
2
-
3
-
4
-
5
-
6
-
7
-
8
-
9
-
10
-
11
-
12
-
13
-
14
-
15
-
16
-
17
-
18
-
19
-
20
-
21
-
22
-
23
-
24
-
25
-
26
-
27
-
28
-
29
-
30
-
31
-
32
-
33
-
34
-
35
-
36
-
37
-
38
-
39
-
40
-
41
-
42
-
43
-
44
-
45
-
46
-
47
-
48
-
49
-
50
-
51
-
52
-
53
-
54
-
55
-
56
-
57
-
58
-
59
-
60
-
61
-
62
-
63
-
 64
64 -
 65
65 -
 66
66 -
 67
67 -
 68
68 -
 69
69 -
 70
70 -
 71
71 -
 72
72 -
 73
73 -
 74
74 -
75
-
76
-
77
-
78
-
79
-
80
-
81
-
82
-
83
-
84
-
85
-
86
-
87
-
88
-
89
-
90
-
91
-
92
-
93
-
94
-
95
-
96
-
97
-
98
-
99
-
100
-
101
-
102
-
103
 |
 |

TIP:
An animation which guides you through removing and replacing the separation pad is available
on the web (see
www.hp.com/
support
, and search on your product).
To replace the separation pad, follow these steps:
1.
Press the Power button to turn off the product, and then disconnect the power cable.
2.
Open the automatic document feeder (ADF) hatch.
3.
Press forward (toward the rear of the ADF) on the separation pad latch to release the separation
pad.
TIP:
This is easier to do if you raise the ADF input tray slightly.
Replace the separation pad
61