HP Scanjet Enterprise 8500 HP Scanjet Enterprise 8500 fn1 - User Guide - Page 55
Add entries to the Personal or Shared Contacts address books
 |
View all HP Scanjet Enterprise 8500 manuals
Add to My Manuals
Save this manual to your list of manuals |
Page 55 highlights
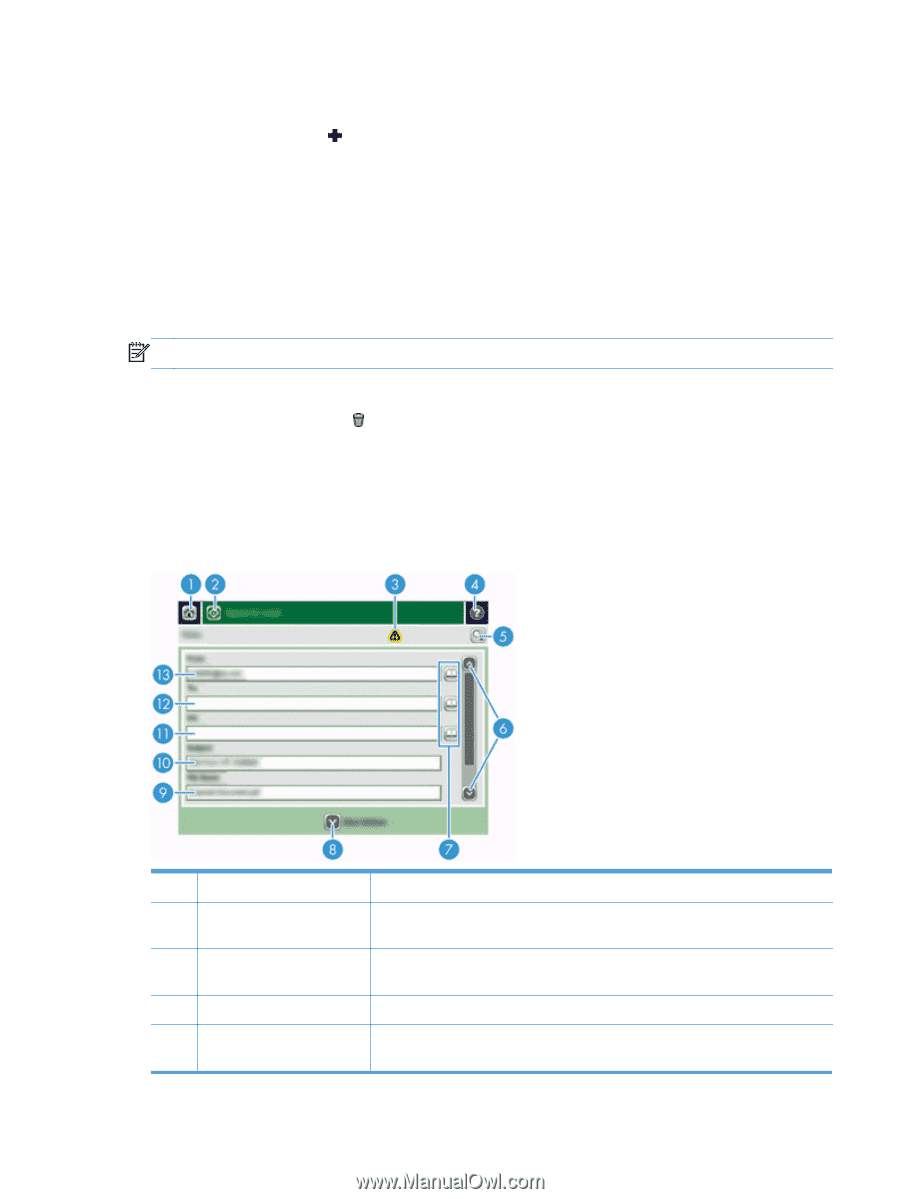
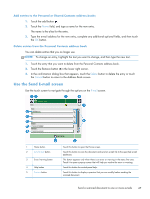
Add entries to the Personal or Shared Contacts address books 1. Touch the add button . 2. Touch the Name field, and type a name for the new entry. The name is the alias for the entry. 3. Type the e-mail address for the new entry, complete any additional optional fields, and then touch the OK button. Delete entries from the Personal Contacts address book You can delete entries that you no longer use. NOTE: To change an entry, highlight the text you want to change, and then type the new text. 1. Touch the entry that you want to delete from the Personal Contacts address book. 2. Touch the Remove button in the lower right corner. 3. In the confirmation dialog box that appears, touch the Delete button to delete the entry or touch the Cancel button to return to the Address Book screen. Use the Send E-mail screen Use the touch screen to navigate through the options on the E-mail screen. 1 Home button 2 Send E-mail button 3 Error/warning button 4 Help button 5 Preview button Touch this button to open the Home screen. Touch this button to scan the document and send an e-mail file to the specified e-mail addresses. This button appears only when there is an error or warning in the status line area. Touch it to open a pop-up screen that will help you resolve the error or warning. Touch this button for control-panel help. Touch this button to display a preview that you can modify before sending the scanned document. Send a scanned document to one or more e-mails 47
-
 1
1 -
2
-
3
-
4
-
5
-
6
-
7
-
8
-
9
-
10
-
11
-
12
-
13
-
14
-
15
-
16
-
17
-
18
-
19
-
20
-
21
-
22
-
23
-
24
-
25
-
26
-
27
-
28
-
29
-
30
-
31
-
32
-
33
-
34
-
35
-
36
-
37
-
38
-
39
-
40
-
41
-
42
-
43
-
44
-
45
-
46
-
47
-
48
-
49
-
 50
50 -
 51
51 -
 52
52 -
 53
53 -
 54
54 -
 55
55 -
 56
56 -
 57
57 -
 58
58 -
 59
59 -
 60
60 -
61
-
62
-
63
-
64
-
65
-
66
-
67
-
68
-
69
-
70
-
71
-
72
-
73
-
74
-
75
-
76
-
77
-
78
-
79
-
80
-
81
-
82
-
83
-
84
-
85
-
86
-
87
-
88
-
89
-
90
-
91
-
92
-
93
-
94
-
95
-
96
-
97
-
98
-
99
-
100
-
101
-
102
-
103
 |
 |