HP Scanjet Enterprise 8500 HP Scanjet Enterprise 8500 fn1 - User Guide - Page 68
Replace the separation pad
 |
View all HP Scanjet Enterprise 8500 manuals
Add to My Manuals
Save this manual to your list of manuals |
Page 68 highlights
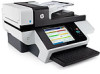
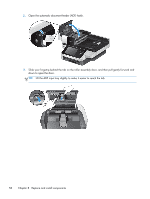
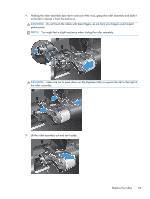
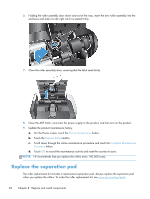
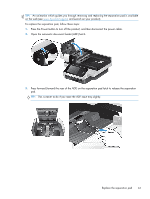
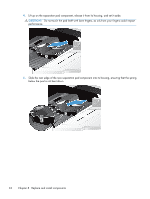
6. Holding the roller assembly door down and out of the way, insert the new roller assembly into the enclosure and slide it to the right until it is seated firmly. 7. Close the roller assembly door, ensuring that the latch seats firmly. 8. Close the ADF hatch, reconnect the power supply to the product, and then turn on the product. 9. Update the product maintenance history. a. On the Home screen, touch the Device Maintenance button. b. Touch the Replace Rollers button. c. Scroll down through the online maintenance procedure and touch the Complete Maintenance Procedure button. d. Touch OK to record the maintenance activity and reset the counters to zero. NOTE: HP recommends that you replace the rollers every 100,000 scans. Replace the separation pad The roller replacement kit includes a replacement separation pad. Always replace the separation pad when you replace the rollers. To order the roller replacement kit, see www.hp.com/buy/parts. 60 Chapter 8 Replace and install components
-
 1
1 -
2
-
3
-
4
-
5
-
6
-
7
-
8
-
9
-
10
-
11
-
12
-
13
-
14
-
15
-
16
-
17
-
18
-
19
-
20
-
21
-
22
-
23
-
24
-
25
-
26
-
27
-
28
-
29
-
30
-
31
-
32
-
33
-
34
-
35
-
36
-
37
-
38
-
39
-
40
-
41
-
42
-
43
-
44
-
45
-
46
-
47
-
48
-
49
-
50
-
51
-
52
-
53
-
54
-
55
-
56
-
57
-
58
-
59
-
60
-
61
-
62
-
 63
63 -
 64
64 -
 65
65 -
 66
66 -
 67
67 -
 68
68 -
 69
69 -
 70
70 -
 71
71 -
 72
72 -
 73
73 -
74
-
75
-
76
-
77
-
78
-
79
-
80
-
81
-
82
-
83
-
84
-
85
-
86
-
87
-
88
-
89
-
90
-
91
-
92
-
93
-
94
-
95
-
96
-
97
-
98
-
99
-
100
-
101
-
102
-
103
 |
 |