HP Scanjet Enterprise 8500 HP Scanjet Enterprise 8500 fn1 - User Guide - Page 82
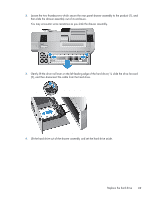
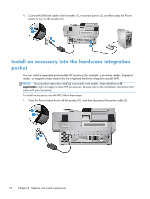
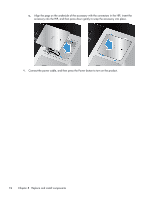
accessory into the HIP, and then press down gently to snap the accessory into place.
 |
View all HP Scanjet Enterprise 8500 manuals
Add to My Manuals
Save this manual to your list of manuals |
Page 82 highlights
c. Align the pegs on the underside of the accessory with the connectors in the HIP, insert the accessory into the HIP, and then press down gently to snap the accessory into place. 4. Connect the power cable, and then press the Power button to turn on the product. 74 Chapter 8 Replace and install components
-
 1
1 -
2
-
3
-
4
-
5
-
6
-
7
-
8
-
9
-
10
-
11
-
12
-
13
-
14
-
15
-
16
-
17
-
18
-
19
-
20
-
21
-
22
-
23
-
24
-
25
-
26
-
27
-
28
-
29
-
30
-
31
-
32
-
33
-
34
-
35
-
36
-
37
-
38
-
39
-
40
-
41
-
42
-
43
-
44
-
45
-
46
-
47
-
48
-
49
-
50
-
51
-
52
-
53
-
54
-
55
-
56
-
57
-
58
-
59
-
60
-
61
-
62
-
63
-
64
-
65
-
66
-
67
-
68
-
69
-
70
-
71
-
72
-
73
-
74
-
75
-
76
-
 77
77 -
 78
78 -
 79
79 -
 80
80 -
 81
81 -
 82
82 -
 83
83 -
 84
84 -
 85
85 -
 86
86 -
 87
87 -
88
-
89
-
90
-
91
-
92
-
93
-
94
-
95
-
96
-
97
-
98
-
99
-
100
-
101
-
102
-
103
 |
 |

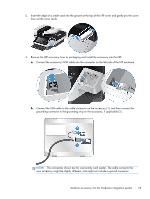
c.
Align the pegs on the underside of the accessory with the connectors in the HIP, insert the
accessory into the HIP, and then press down gently to snap the accessory into place.
4.
Connect the power cable, and then press the Power button to turn on the product.
74
Chapter 8
Replace and install components