IBM 7379E2U User Manual
IBM 7379E2U Manual
 |
View all IBM 7379E2U manuals
Add to My Manuals
Save this manual to your list of manuals |
IBM 7379E2U manual content summary:
- IBM 7379E2U | User Manual - Page 1
IBM System x3400 M3 Type 7378/7379 Installation and User's Guide - IBM 7379E2U | User Manual - Page 2
- IBM 7379E2U | User Manual - Page 3
IBM System x3400 M3 Type 7378/7379 Installation and User's Guide - IBM 7379E2U | User Manual - Page 4
Note: Before using this information and the product it supports, read the general information in Appendix B, "Notices," on page 121, and the IBM Safety Information, Environmental Notices and User Guide documents on the IBM Documentation CD, and the Warranty Information document that comes with the - IBM 7379E2U | User Manual - Page 5
the Documentation Browser 2 Related documentation 3 Notices and statements in this document 4 Features and specifications 6 What your server offers 7 Reliability, availability, and serviceability 10 IBM Systems Director 11 The UpdateXpress System Pack Installer 12 Server controls, LEDs, and - IBM 7379E2U | User Manual - Page 6
from the World Wide Web 119 Software service and support 120 Hardware service and support 120 IBM Taiwan product service 120 Appendix B. Notices 121 Trademarks 121 125 Germany Class A statement 125 Japan VCCI Class A statement 126 iv IBM System x3400 M3 Type 7378/7379: Installation and User - IBM 7379E2U | User Manual - Page 7
Japan Electronics and Information Technology Industries Association (JEITA) statement 126 Korea Communications Commission (KCC) statement 126 Russia Electromagnetic Interference (EMI) Class A statement 127 People's Republic of China Class A electronic emission statement . . . . 127 Taiwan Class A - IBM 7379E2U | User Manual - Page 8
vi IBM System x3400 M3 Type 7378/7379: Installation and User's Guide - IBM 7379E2U | User Manual - Page 9
, leggere le Informazioni sulla Sicurezza. Les sikkerhetsinformasjonen (Safety Information) før du installerer dette produktet. Antes de instalar este produto, leia as Informações sobre Segurança. © Copyright IBM Corp. 2010 vii - IBM 7379E2U | User Manual - Page 10
or danger statement with translated versions of the caution or danger statement in the IBM Safety Information document. For example, if a caution statement is labeled "Statement 1," or optional device before you install the device. viii IBM System x3400 M3 Type 7378/7379: Installation and User - IBM 7379E2U | User Manual - Page 11
damage. v Disconnect the attached power cords, telecommunications systems, networks, and modems before you open the device covers, unless instructed otherwise in the installation and configuration procedures. v Connect and disconnect cables as described in the following table when installing, moving - IBM 7379E2U | User Manual - Page 12
Statement 2: CAUTION: When replacing the lithium battery, use only IBM Part Number 33F8354 or an equivalent type battery recommended by the manufacturer or disassemble Dispose of the battery as required by local ordinances or regulations. x IBM System x3400 M3 Type 7378/7379: Installation and User - IBM 7379E2U | User Manual - Page 13
: v Do not remove the covers. Removing the covers of the laser product could result in exposure to hazardous laser radiation. There are no serviceable parts inside the device. v Use of controls or adjustments or performance of procedures other than those specified herein might result in hazardous - IBM 7379E2U | User Manual - Page 14
more than one power cord. To remove all electrical current from the device, ensure that all power cords are disconnected from the power source. 2 1 xii IBM System x3400 M3 Type 7378/7379: Installation and User - IBM 7379E2U | User Manual - Page 15
levels are present inside any component that has this label attached. There are no serviceable parts inside these components. If you suspect a problem with one of these parts, contact a service technician. Statement 11: CAUTION: The following label indicates sharp edges, corners, or joints nearby - IBM 7379E2U | User Manual - Page 16
requirements. Refer to the information that is provided with your device for electrical specifications. Statement 15: CAUTION: Make sure that the rack is secured properly to avoid voltage is 240 V under any distribution fault condition. xiv IBM System x3400 M3 Type 7378/7379: Installation and User - IBM 7379E2U | User Manual - Page 17
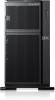
M3 Type 7378/7379 server, instructions for installing optional devices, and instructions for starting and configuring the server. For diagnostic and troubleshooting information, see the Problem Determination and Service Guide that is on the IBM Documentation CD. The IBM® System x3400 M3 Type 7378 - IBM 7379E2U | User Manual - Page 18
Note: Changes are made periodically to the IBM Web site. Procedures for locating firmware and Go to http://www.ibm.com/systems/support/. 2. Under Product support, click System x. IBM. Product name Machine type Model number Serial number Key serial number Key manufacturer Key phone number IBM - IBM 7379E2U | User Manual - Page 19
Guide contains general information about the server, including how to set up, install supported warranty and getting service and assistance. v Safety Information This document is in PDF on the IBM Documentation CD. Problem Determination and Service Guide Chapter 1. The System x3400 M3 server 3 - IBM 7379E2U | User Manual - Page 20
problems yourself, and it contains information for service technicians. v Environmental Notices and User's Guide This document is in PDF on the IBM Documentation CD. It contains translated environmental notices. v IBM to http://www.ibm.com/systems/support/. 2. Under Product support, click System x. - IBM 7379E2U | User Manual - Page 21
v Danger: These statements indicate situations that can be potentially lethal or extremely hazardous to you. A danger statement is placed just before the description of a potentially lethal or extremely hazardous procedure step or situation. Chapter 1. The System x3400 M3 server 5 - IBM 7379E2U | User Manual - Page 22
specifications Microprocessor: v Intel® Xeon® up to six-core with integrated memory controller and Quick Path Interconnect (QPI) architecture v Designed for LGA 1366 socket v Scalable up to twelve cores v 32 KB instruction a list of supported microprocessors, see http://www.ibm.com/servers/eserver/ - IBM 7379E2U | User Manual - Page 23
not support DOS. v Integrated management module The Integrated Management module (IMM) combines service processor the cause of the hang condition. v IBM Dynamic System Analysis Preboot diagnostics programs The information to aid in diagnosing server problems. The diagnostic programs collect the - IBM 7379E2U | User Manual - Page 24
and support. Additionally, you can view the information locally through a generated text report file. You can also copy the log to a removable media and view the log from a Web browser. For additional information about the DSA program, see the Problem Determination and Service Guide on the IBM - IBM 7379E2U | User Manual - Page 25
SAS expander card does not support 3 GB RAID adapters. v Light path diagnostics Light path diagnostics provides LEDs to help you diagnose problems. For more information, see the section about light path diagnostics in the Problem Determination and Service Guide on the IBM Documentation CD. v Memory - IBM 7379E2U | User Manual - Page 26
TOE. Note: As of the date of this document, the Linux operating system does not support TOE. Reliability, availability, and serviceability Three important server design features are reliability, availability, and serviceability (RAS). The RAS features help to ensure the integrity of the data that is - IBM 7379E2U | User Manual - Page 27
IBM Systems Director supports multiple operating systems and virtualization technologies in IBM and non-IBM x86 platforms. Through a single user interface, IBM resources v Notifying users of problems that occur on systems and the ability to isolate the sources of the problems v Notifying users when - IBM 7379E2U | User Manual - Page 28
xSeries Systems Management Web page at http://www.ibm.com/systems/management/, which presents an overview of IBM Systems Management and IBM Systems Director. The UpdateXpress System Pack Installer The UpdateXpress System Pack Installer detects supported and installed device drivers and firmware in - IBM 7379E2U | User Manual - Page 29
shown so that the drive bays are visible. Power control button and power-on LED Press this button to turn the server on and off manually or to wake the server from a reduced-power state. The states of the power-on LED are as follows: Off: AC power is not present - IBM 7379E2U | User Manual - Page 30
3). When the drive is removed, this LED also is visible on the SAS/SATA backplane, below the hot-swap hard disk drive activity LED. 14 IBM System x3400 M3 Type 7378/7379: Installation and User - IBM 7379E2U | User Manual - Page 31
Rear view The following illustration shows the connectors and LEDs on the rear of the server. AC power LED DC power LED Fault (error) LED Serial 1 (COM 1) Video System management Ethernet connector NMI button Ethernet 1 10/100/1000 USB 1 USB 2 USB 3 USB 4 Ethernet 2 10/100/1000 Power cord - IBM 7379E2U | User Manual - Page 32
Fault (error) LED Power cord connector The following table describes the problems that are indicated by various combinations of the power-supply LEDs and the detected problems. (See "Operator information panel" on page 27 for information about the operator information panel.) 16 IBM System x3400 M3 - IBM 7379E2U | User Manual - Page 33
3. Turn the server off and then turn the server back on. 4. If the problem remains, replace the power supply. This is a normal condition when no AC power is error (fault) LED is is not fully seated. lit, (Trained service technician only) replace the system board. Faulty power supply Replace the - IBM 7379E2U | User Manual - Page 34
to the server or a problem with the AC power source No AC power to the server or a problem with the AC power source and the power supply has detected an internal problem Faulty power supply Faulty power on in any of the following ways: 18 IBM System x3400 M3 Type 7378/7379: Installation and User - IBM 7379E2U | User Manual - Page 35
server can be turned off in any of the following ways: v You can turn off the server from the operating system, if your operating system supports this feature. After an orderly shutdown of the operating system, the server will be turned off automatically. v You can press the power-control button to - IBM 7379E2U | User Manual - Page 36
20 IBM System x3400 M3 Type 7378/7379: Installation and User's Guide - IBM 7379E2U | User Manual - Page 37
starts, if one is installed. If the server is not working correctly, see the Problem Determination and Service Guide for diagnostic information. This chapter provides detailed instructions for installing optional hardware devices in the server. Server components The following illustration shows the - IBM 7379E2U | User Manual - Page 38
available on the PCI Express extender card. The following illustration shows two additional PCI-X expansion slots that are available on the PCI-X extender card. 22 IBM System x3400 M3 Type 7378/7379: Installation and User - IBM 7379E2U | User Manual - Page 39
2: Physical presence to the TPM. Platform Module v Pins 2 and 3: No physical presence to the TPM (default). (TPM) Note: The physical presence requires manual setting on the server to change the TPM configuration. The TPM is enabled and physical presence is not asserted by default. The physical - IBM 7379E2U | User Manual - Page 40
System-board LEDs The following illustration shows the LEDs on the system board. System-board external connectors The following illustration shows the external input/output connectors and the NMI button on the system board. 24 IBM System x3400 M3 Type 7378/7379: Installation and User's Guide - IBM 7379E2U | User Manual - Page 41
Chapter 2. Installing optional devices 25 - IBM 7379E2U | User Manual - Page 42
SAS backplane connectors The following illustrations show the connectors on the SAS backplanes. Figure 1. 3.5-inch backplane connectors Figure 2. 2.5-inch backplane connectors 26 IBM System x3400 M3 Type 7378/7379: Installation and User's Guide - IBM 7379E2U | User Manual - Page 43
the suggested actions in the order in which they are listed in the Action column until the problem is solved. v See the Problem Determination and Service Guide on the IBM Documentation CD to determine which components are customer replaceable units (CRU) and which components are field replaceable - IBM 7379E2U | User Manual - Page 44
the following steps: 1. Go to http://www.ibm.com/systems/support/ 2. Under Product support, click System x. 3. Under Popular links, click the server is not working correctly, see the Problem Determination and Service Guide on the IBM Documentation CD for information about how to run diagnostics - IBM 7379E2U | User Manual - Page 45
support hot-swap capability, you can remove or install the component while the server is running. (Orange can also indicate touch points on hot-swap components.) See the instructions for removing or installing a specific supported optional devices for the server, see http://www.ibm problem, always - IBM 7379E2U | User Manual - Page 46
server cover or on a metal surface. v Take additional care when you handle devices during cold weather. Heating reduces indoor humidity and increases static electricity. 30 IBM System x3400 M3 Type 7378/7379: Installation and User - IBM 7379E2U | User Manual - Page 47
Internal cable routing and connectors The server uses cables to connect SATA attached, simple-swap SATA, hot-swap SATA, hot-swap SAS and DVD drive devices to the power supply and to the system board. Review the following information before connecting power and signal cables to internal drives: v The - IBM 7379E2U | User Manual - Page 48
comes with the server in the plastic bag with the drive rails. Power converter cable Connects to tape drive Connects to optical power cable 32 IBM System x3400 M3 Type 7378/7379: Installation and User - IBM 7379E2U | User Manual - Page 49
Optical power cable SATA connector Power converter cable Tape drive Chapter 2. Installing optional devices 33 - IBM 7379E2U | User Manual - Page 50
the system board. The following illustration shows the internal power cable routing and the connectors from the UltraSlim DVD drive to the system board. 34 IBM System x3400 M3 Type 7378/7379: Installation and User - IBM 7379E2U | User Manual - Page 51
The following illustration shows the internal SATA cable routing and the connectors from the UltraSlim DVD drive to the system board. Operator information panel cable connection The following illustration shows the internal cable routing and connectors from the operator information panel to the - IBM 7379E2U | User Manual - Page 52
36 IBM System x3400 M3 Type 7378/7379: Installation and User's Guide - IBM 7379E2U | User Manual - Page 53
Hard disk drive cable connection Review the following information before connecting power and signal cables to internal drives: 1. The following illustrations show the connectors on the 2.5-inch and 3.5-inch hard disk drive backplanes. Figure 3. Connectors on the 3.5-inch hard disk drive backplane - IBM 7379E2U | User Manual - Page 54
with battery backup module (for example, if a ServeRAID adapter with battery backup module is installed in slot 2, do not install any card in slot 3). 38 IBM System x3400 M3 Type 7378/7379: Installation and User - IBM 7379E2U | User Manual - Page 55
, you might have to reconfigure your disk arrays after you install drives. See the ServeRAID adapter documentation for additional information about RAID operation and complete instructions for using the ServeRAID adapter. Chapter 2. Installing optional devices 39 - IBM 7379E2U | User Manual - Page 56
cable routing. v The following illustration shows the internal configuration cable routing. v The following illustration shows the internal signal cable routing for installing a ServeRAID adapter. 40 IBM System x3400 M3 Type 7378/7379: Installation and User - IBM 7379E2U | User Manual - Page 57
Chapter 2. Installing optional devices 41 - IBM 7379E2U | User Manual - Page 58
cable routing. v The following illustration shows the internal configuration cable routing. v The following illustration shows the internal signal cable routing for installing a ServeRAID adapter. 42 IBM System x3400 M3 Type 7378/7379: Installation and User - IBM 7379E2U | User Manual - Page 59
Chapter 2. Installing optional devices 43 - IBM 7379E2U | User Manual - Page 60
cable routing. v The following illustration shows the internal configuration cable routing. v The following illustration shows the internal signal cable routing for installing a ServeRAID adapter. 44 IBM System x3400 M3 Type 7378/7379: Installation and User - IBM 7379E2U | User Manual - Page 61
Chapter 2. Installing optional devices 45 - IBM 7379E2U | User Manual - Page 62
4. For server models with sixteen 2.5-inch hot-swap hard disk drives. v The following illustration shows the internal power cable routing. v The following illustration shows the internal configuration cable routing. 46 IBM System x3400 M3 Type 7378/7379: Installation and User's Guide - IBM 7379E2U | User Manual - Page 63
v The following illustration shows the internal signal cable routing for installing a ServeRAID adapter and a ServeRAID expansion adapter. Note: SAS expander card does not support 3 GB RAID adapters. Chapter 2. Installing optional devices 47 - IBM 7379E2U | User Manual - Page 64
otherwise working correctly. If the server is not working correctly, see the Problem Determination and Service Guide for diagnostic information. To remove the cover, complete the following steps: Remove the left-side cover from the server. 48 IBM System x3400 M3 Type 7378/7379: Installation and User - IBM 7379E2U | User Manual - Page 65
Opening the bezel media door To open or remove the media door, complete the following steps: 1. Read the safety information that begins on page vii and "Installation guidelines" on page 28. 2. Unlock the left-side cover. Note: You must unlock the left-side cover to open or remove the bezel. When you - IBM 7379E2U | User Manual - Page 66
Note: To remove the media door from the bezel, push upward on the media door hinge to remove it from the bezel. 5. When the media door is unlocked, the icon on the side of the bezel will be in the unlocked position. Media door icon 50 IBM System x3400 M3 Type 7378/7379: Installation and User's Guide - IBM 7379E2U | User Manual - Page 67
Removing the air baffle To remove the air baffle, complete the following steps: 1. Read the safety information that begins on page vii and "Installation guidelines" on page 28. 2. Turn off the server and all attached devices. 3. Disconnect all external cables and power cords. 4. Remove the left-side - IBM 7379E2U | User Manual - Page 68
"Completing the installation" on page 96). 7. Reconnect the external cables and power cords; then, turn on the attached devices and turn on the server. 52 IBM System x3400 M3 Type 7378/7379: Installation and User - IBM 7379E2U | User Manual - Page 69
30 minutes with the left-side cover removed. To install the fan cage assembly, complete the following steps. 1. Align the fan cage assembly with the guide rails on the sides of the chassis. Note: Make sure that both release buttons click into place. 2. Slide the fan cage assembly into the chassis - IBM 7379E2U | User Manual - Page 70
54 IBM System x3400 M3 Type 7378/7379: Installation and User's Guide - IBM 7379E2U | User Manual - Page 71
Opening the power-supply cage Opening the power-supply cage allows access to the air baffle, microprocessors, and DIMMs. To open the power-supply cage, complete the following steps: 1. Read the safety information that begins on page vii, and "Handling static-sensitive devices" on page 30. 2. Turn - IBM 7379E2U | User Manual - Page 72
the rear side; then, push down on the release tab on the rear power-supply support bracket. Power supply support bracket Power supply release tab Attention: Be sure to move the cables out of the way tabs on the front latch bracket. 56 IBM System x3400 M3 Type 7378/7379: Installation and User - IBM 7379E2U | User Manual - Page 73
Power-supply cage Power-supply cage handle Power-supply cage front latch bracket Locating tabs Notch Locating tabs 3. Rotate the power-supply cage handle down until the handle tip engages the notch in the front latch bracket; then, lower the handle until it locks in place. Power supply cage - IBM 7379E2U | User Manual - Page 74
supports two full-length adapters. v PCI slots 1 and 5 support the RAID adapters. v PCI slot 2 supports a VGA adapter. v The PCI configuration: - Slot 1 is a PCI Express x8 slot with x8 links, PCI Express Base Specification . To avoid this potential problem, always use an electrostatic-discharge - IBM 7379E2U | User Manual - Page 75
information). 3. See the documentation that comes with the adapter for any cabling instructions and information about jumper or switch settings. (It might be easier for you installing a full-length adapter, remove the blue adapter guide (if any) from the end of the adapter. Otherwise, continue with the - IBM 7379E2U | User Manual - Page 76
to the adapter. If you have other devices to install or remove, do so now. Otherwise, go to "Completing the installation" on page 96. 60 IBM System x3400 M3 Type 7378/7379: Installation and User - IBM 7379E2U | User Manual - Page 77
Installing a DVD drive 1. To install a DVD drive on models with four 3.5-inch, eight 2.5-ich or sixteen 2.5-inch hard disk drives, complete the following steps: a. Read the safety information that begins on page vii and "Installation guidelines" on page 28. b. Turn off the server and peripheral - IBM 7379E2U | User Manual - Page 78
f. Remove the EMC shield from the bay in which you want to install the drive. Note: If you are installing a drive that contains a laser, observe the following safety precaution. 62 IBM System x3400 M3 Type 7378/7379: Installation and User's Guide - IBM 7379E2U | User Manual - Page 79
: v Do not remove the covers. Removing the covers of the laser product could result in exposure to hazardous laser radiation. There are no serviceable parts inside the device. v Use of controls or adjustments or performance of procedures other than those specified herein might result in hazardous - IBM 7379E2U | User Manual - Page 80
-supply cage assembly back into the server. Press the power-supply cage release tab and rotate the power-supply cage assembly into the chassis. 64 IBM System x3400 M3 Type 7378/7379: Installation and User - IBM 7379E2U | User Manual - Page 81
supports one ultra-slim SATA optical drive. a. If you are replacing a drive, make sure that: v You have all the cables and other equipment that are specified in the documentation that comes with the new drive. v You have checked the instructions . There are no serviceable parts inside the device - IBM 7379E2U | User Manual - Page 82
bezel by pressing the button on the left edge of the bezel, and rotate the left side of the bezel away from the server. 66 IBM System x3400 M3 Type 7378/7379: Installation and User - IBM 7379E2U | User Manual - Page 83
h. Rotate the power-supply cage assembly out of the chassis. Lift up the power-supply cage handle and pull the power-supply cage assembly all the way up until the retainer latch locks the cage in place on the chassis. i. Disconnect the power and signal cables of the DVD drive from the system board. - IBM 7379E2U | User Manual - Page 84
the upper opening of the server first. Make sure the cables are not stuck when you slide the disk drive cage into the server. 68 IBM System x3400 M3 Type 7378/7379: Installation and User - IBM 7379E2U | User Manual - Page 85
o. Secure the 3.5-inch disk drive cage with the screws. p. Reconnect the power and signal cables of the UltraSlim DVD drive to the system board. (See "Internal cable routing and connectors" on page 31 for more information.) q. Reinstall the air baffle. r. Reinstall the fan cage assembly. s. Rotate - IBM 7379E2U | User Manual - Page 86
v. Reconnect the external cables and power cords; then, turn on the attached devices and turn on the server. If you have other devices to install or remove, do so now. Otherwise, go to "Completing the installation" on page 96. 70 IBM System x3400 M3 Type 7378/7379: Installation and User's Guide - IBM 7379E2U | User Manual - Page 87
Installing a USB or SATA tape drive The server supports USB and SATA tape drives. When you install a tape drive, be sure to connect the internal tape cable to the correct connector on the system - IBM 7379E2U | User Manual - Page 88
more information). 12. Remove the air baffle (see "Removing the air baffle" on page 51 for more information). 13. Remove the fan cage assembly. 72 IBM System x3400 M3 Type 7378/7379: Installation and User - IBM 7379E2U | User Manual - Page 89
14. If the tape drive came with screws, secure the drive to the server chassis, using the supplied screws. 15. Connect one end of the tape drive cable to the USB or SATA connector on the system board, depending upon the type of tape drive that you are installing; then, route the cable through the - IBM 7379E2U | User Manual - Page 90
and power cords. If you have other devices to install or remove, do so now. Otherwise, go to "Completing the installation" on page 96. 74 IBM System x3400 M3 Type 7378/7379: Installation and User - IBM 7379E2U | User Manual - Page 91
list of supported optional devices for the server, see http://www.ibm.com/ servers/eserver/serverproven/compat/us/ . v Inspect the drive tray for signs of damage. v Make sure that the drive is correctly installed in the tray. v See the documentation for the ServeRAID adapter for instructions - IBM 7379E2U | User Manual - Page 92
Support CD for additional information about RAID operation and complete instructions for using ServeRAID Manager. If you have other devices to install or remove, do so now. Otherwise, go to "Completing the installation" on page 96. 76 IBM System x3400 M3 Type 7378/7379: Installation and User's Guide - IBM 7379E2U | User Manual - Page 93
Installing a simple-swap SATA hard disk drive Some server models come with four 3.5-inch simple-swap SATA hard disk drives that are accessible from the front of the server. You must turn off the server before installing simple-swap drives in the server. Before you install a simple-swap SATA hard - IBM 7379E2U | User Manual - Page 94
release the loops on the drive assembly until it is completely seated. 10. See the Problem Determination and Service Guide for cabling information, if needed. 11. Close the drive bay EMC shield. 12. Close connected to simple-swap models. 78 IBM System x3400 M3 Type 7378/7379: Installation and User - IBM 7379E2U | User Manual - Page 95
dynamic random-access memory (SDRAM) dual inline memory modules (DIMMs) with error correcting code (ECC). See http://www.ibm.com/servers/eserver/ serverproven/compat/us/ for a list of supported memory modules for the server. v At least one DIMM must be installed for the server to operate, but three - IBM 7379E2U | User Manual - Page 96
the server is determined by the slowest DIMM in the server. v The server can operate in two major modes: mirroring and independent channel modes. 80 IBM System x3400 M3 Type 7378/7379: Installation and User - IBM 7379E2U | User Manual - Page 97
Installing the virtual media key To install a virtual media key, complete the following steps: 1. Align the alignment bracket on the rear of the key with the retention tab on the system board; then, slide the key down into the virtual media key connector on the system board until it is firmly seated - IBM 7379E2U | User Manual - Page 98
in DIMM connector 3 on channel 0 and DIMM connector 6 on channel 1. DIMM connectors 7, 8, 15, and 16 on channel 2 are not used in memory-mirroring mode. 82 IBM System x3400 M3 Type 7378/7379: Installation and User - IBM 7379E2U | User Manual - Page 99
Figure 7. Memory channel interface layout The following table lists the DIMM connectors on each memory channel. Table 7. Connectors on each memory channel Memory channel Channel 0 DIMM connectors 1, 2, 3, 9, 10, 11 Channel 1 4, 5, 6, 12, 13, 14 Channel 2 (not used in memory mirroring) 7, 8, - IBM 7379E2U | User Manual - Page 100
the server to stop, which might result in the loss of data. To avoid this potential problem, always use an electrostatic-discharge wrist strap or other grounding system when you work inside the supply or power supplies from the server. 84 IBM System x3400 M3 Type 7378/7379: Installation and User - IBM 7379E2U | User Manual - Page 101
5. Pull up the power-supply cage handle, and then swing the power-supply cage out of the server (see "Opening the power-supply cage" on page 55 for more information). 6. Remove the air baffle from the server (see "Removing the air baffle" on page 51 for more information). 7. Open the retaining clip - IBM 7379E2U | User Manual - Page 102
5. Align the upgrade key with the connector on the ServeRAID adapter and push it into the connector until it is firmly seated. 6. Close the rear adapter-retention bracket. 86 IBM System x3400 M3 Type 7378/7379: Installation and User's Guide - IBM 7379E2U | User Manual - Page 103
7. Install and lock the left-side cover (see "Completing the installation" on page 96). 8. Reconnect the external cables and power cords; then, turn on the attached devices and turn on the server. Installing a USB embedded hypervisor flash device To install a hypervisor flash device, complete the - IBM 7379E2U | User Manual - Page 104
supports and other information that you must consider when you install a microprocessor: v The server supports ibm.com/servers/ eserver/serverproven/compat/us/ for a list of supported microprocessors. v The server supports ibm.com/systems/support/. 2. Under Product support call for service. v support - IBM 7379E2U | User Manual - Page 105
Attention: 1. A startup (boot) microprocessor must always be installed in microprocessor socket 1 on the system board. 2. To ensure correct server operation when you install an additional microprocessor, use microprocessors that are compatible and install at least one DIMM in a DIMM connector for - IBM 7379E2U | User Manual - Page 106
socket. Do not use excessive force when you press the microprocessor into the socket. Note: The microprocessor fits only one way on the socket. 90 IBM System x3400 M3 Type 7378/7379: Installation and User - IBM 7379E2U | User Manual - Page 107
will contaminate it. If the thermal grease is contaminated, call IBM service and support to request a replacement thermal grease kit. For information about installing the replacement thermal grease, see the Problem Determination and Service Guide. a. Make sure that the heat-sink release lever is in - IBM 7379E2U | User Manual - Page 108
and power cords. If you have other devices to install or remove, do so now. Otherwise, go to "Completing the installation" on page 96. 92 IBM System x3400 M3 Type 7378/7379: Installation and User - IBM 7379E2U | User Manual - Page 109
. Grasp the fan handle and pull the fan out of the fan cage assembly. Hot-swap fan 5. If you are instructed to return the hot-swap fan, follow all packaging instructions, and use any packaging materials for shipping that are supplied to you. 6. Touch the static-protective package that contains the - IBM 7379E2U | User Manual - Page 110
server to halt, which could result in the loss of data. To avoid this potential problem, always use an electrostatic-discharge wrist strap or other grounding system when working inside the server to a properly grounded electrical outlet. 94 IBM System x3400 M3 Type 7378/7379: Installation and User - IBM 7379E2U | User Manual - Page 111
13. Make sure that the AC power LED on the top of each power supply is lit, indicating that the power supply is operating correctly. If the server is turned on, make sure that the DC power LED on the top of the power supply is lit also. If you have other devices to install or remove, do so now. - IBM 7379E2U | User Manual - Page 112
to or disconnect any cables from the server or hot-plug adapter. 2. For additional cabling instructions, see the documentation that comes with the optional devices. It might be easier for you to disk drive cables are labeled "HDD option." 96 IBM System x3400 M3 Type 7378/7379: Installation and User - IBM 7379E2U | User Manual - Page 113
microprocessor is installed, the server can operate as a symmetric multiprocessing (SMP) server. You might have to upgrade the operating system to support SMP. For more information, see "Typical operating-system installation" on page 109 and the operating-system documentation. If the server has an - IBM 7379E2U | User Manual - Page 114
98 IBM System x3400 M3 Type 7378/7379: Installation and User's Guide - IBM 7379E2U | User Manual - Page 115
manage a network. For information about using the IMM, see "Using the integrated management module" on page 109 and the IMM User's Guide on the IBM Web Site. v Remote presence capability and blue-screen capture The remote presence and blue-screen capture feature are integrated into the Integrated - IBM 7379E2U | User Manual - Page 116
IBM and LSI basic and integrated RAID adapters IBM IBM and LSI basic and integrated RAID adapters IBM (MSM), Director v IBM Advanced Settings Utility ( information about using this program, see "IBM Advanced Settings Utility program" on page IBM System x3400 M3 Type 7378/7379: Installation and User - IBM 7379E2U | User Manual - Page 117
v Resolve configuration conflicts Starting the Setup utility To start the Setup utility, complete the following steps: 1. Turn on the server. Note: Approximately 20 seconds after the server is connected to AC power, the power-control button becomes active. 2. When the prompt Setup is displayed, - IBM 7379E2U | User Manual - Page 118
Select this choice to force INT video support, if the operating system does not support UEFI video output standards. - Rehook INT 19h Select this choice to enable or disable devices from taking control of the boot process. The default is Disable. 102 IBM System x3400 M3 Type 7378/7379: Installation - IBM 7379E2U | User Manual - Page 119
one-time boot. If the server has Wake on LAN hardware and software and the operating system supports Wake on LAN functions, you can specify a startup sequence for the WAKE on LAN functions. For , see "Event logs" in the Problem Determination and Service Guide. Chapter 3. Configuring the server 103 - IBM 7379E2U | User Manual - Page 120
replace the system board. - Clear Administrator Password Select this choice to clear an administrator password. For more information, see "Administrator password" on page 106. 104 IBM System x3400 M3 Type 7378/7379: Installation and User - IBM 7379E2U | User Manual - Page 121
Passwords v Save Settings Select this choice to save the changes that you have made in the settings. v Restore Settings Select this choice to cancel the changes that you have made in the settings and restore the previous settings. v Load Default Settings Select this choice to cancel the changes - IBM 7379E2U | User Manual - Page 122
v Remove the battery from the server and then reinstall it. See the Problem Determination and Service Guide on the IBM Documentation CD for instructions for removing the battery. v Change the position of the power-on password switch (enable switch 2 of the system board switch block (SW6)) to bypass - IBM 7379E2U | User Manual - Page 123
or purchase the CD from the ServerGuide fulfillment Web site at http://www.ibm.com/ systems/management/serverguide/sub.html. To download the free image, click IBM Service and Support Site. Note: Changes are made periodically to the IBM Web site. The actual procedure might vary slightly from what is - IBM 7379E2U | User Manual - Page 124
are supported on all server models. The ServerGuide program requires a supported IBM -free installation for supported Windows operating systems . You can use the CD to configure any supported IBM server model. The setup program provides a list IBM System x3400 M3 Type 7378/7379: Installation and User - IBM 7379E2U | User Manual - Page 125
For detailed information and instructions, go to https://www-947.ibm.com/systems/ support/supportsite.wss/docdisplay?lndocid= installation.) 2. The ServerGuide program stores information about the server model, service processor, hard disk drive controllers, and network adapters. Then, the program - IBM 7379E2U | User Manual - Page 126
support dump. ASR is supported by IPMI. v Boot Specification V2.0 and Intelligent Platform Management Bus (IPMB) support. v Invalid system configuration (CNFG) LED support PCI configuration data. v PECI 2 support. v Power/reset control (power- IBM System x3400 M3 Type 7378/7379: Installation and User - IBM 7379E2U | User Manual - Page 127
information and instructions, see the VMware ESXi Server 3i Embedded Setup Guide Using the remote presence capability and blue-screen capture The remote presence and blue-screen capture features are integrated functions of the integrated management module (IMM). When the optional IBM Virtual Media - IBM 7379E2U | User Manual - Page 128
to use the remote presence functions, complete the following steps: 1. Open a Web browser on a computer that connects to the server and in the address or URL field, type the IP address or server UEFI or from your network administrator. 112 IBM System x3400 M3 Type 7378/7379: Installation and User - IBM 7379E2U | User Manual - Page 129
Web site. The actual procedure might vary slightly from what is described in this document. 1. Go to http://www.ibm.com/systems/support/. 2. Under Product support, click System x. 3. Under Popular links, click Software and device drivers. 4. From the Product family menu, select System x3400 M3 and - IBM 7379E2U | User Manual - Page 130
with RAID capabilities supports RAID arrays. adapter, follow the instructions in the documentation that ibm.com/systems/support supports the following features: - Integrated Mirroring (IM) with hot-spare support hot-spare support (also known IBM System x3400 M3 Type 7378/7379: Installation and User - IBM 7379E2U | User Manual - Page 131
which you can download from the disk controller and RAID software matrix: a. Go to http://www.ibm.com/systems/support/. b. Under Product support, click System x. c. Under Popular links, click Storage Support Matrix. When you have finished changing settings, press Esc to exit from the program; select - IBM 7379E2U | User Manual - Page 132
supports scripting environments through a ibm.com/systems/support/. Updating IBM Systems Director If you plan to use IBM Systems Director to manage the server, you must check for the latest applicable IBM instructions on the Web page to download the latest version. 2. Install the IBM of the IBM Systems Director Web - IBM 7379E2U | User Manual - Page 133
Download the available updates. 7. Copy the downloaded files to the management server. 8. On the management server, on the Welcome page of the IBM Systems Director Web interface, click the Manage tab, and click Update Manager. 9. Click Import updates and specify the location of the downloaded files - IBM 7379E2U | User Manual - Page 134
118 IBM System x3400 M3 Type 7378/7379: Installation and User's Guide - IBM 7379E2U | User Manual - Page 135
v Use the troubleshooting information in your system documentation, and use the diagnostic tools that come with your system. Information about diagnostic tools is in the Problem Determination and Service Guide on the IBM Documentation CD that comes with your system. v Go to the IBM support Web site - IBM 7379E2U | User Manual - Page 136
You can find service information for IBM systems and optional devices at http://www.ibm.com/systems/support/. Software service and support Through IBM Support Line, you can get telephone assistance, for a fee, with usage, configuration, and software problems with System x and xSeries servers, - IBM 7379E2U | User Manual - Page 137
right may be used instead. However, it is the user's responsibility to evaluate and verify the operation of any non-IBM product, program, or service. IBM may have patents or pending patent applications covering subject matter described in this document. The furnishing of this document does not - IBM 7379E2U | User Manual - Page 138
of Sony Computer Entertainment, Inc service names may be trademarks or service supported drives that are available from IBM. Maximum memory might require replacement of the standard memory with an optional memory module. IBM makes no representation or warranties regarding non-IBM products and services - IBM 7379E2U | User Manual - Page 139
and might not include user manuals or all program functionality. to malfunction or cease functioning altogether. This specification sets forth limits for particulates and gases IBM determines that the levels of particulates or gases in your environment have caused damage to the server, IBM - IBM 7379E2U | User Manual - Page 140
title. When you send information to IBM, you grant IBM a nonexclusive right to use or distribute and used in accordance with the instruction manual, may cause harmful interference to in order to meet FCC emission limits. IBM is not responsible for any radio or IBM System x3400 M3 Type 7378/7379: - IBM 7379E2U | User Manual - Page 141
the laws of the Member States relating to electromagnetic compatibility. IBM cannot accept responsibility for any failure to satisfy the protection from a nonrecommended modification of the product, including the fitting of non-IBM option cards. Attention: This is an EN 55022 Class A product - IBM 7379E2U | User Manual - Page 142
EU ist: IBM Deutschland Technical Regulations, Department M456 IBM-Allee 1, 71137 Ehningen, Germany Telephone: 0049 (0) 7032 15-2937 E-mail: [email protected] Generelle A per phase) Korea Communications Commission (KCC) statement 126 IBM System x3400 M3 Type 7378/7379: Installation and User - IBM 7379E2U | User Manual - Page 143
Please note that this equipment has obtained EMC registration for commercial use. In the event that it has been mistakenly sold or purchased, please exchange it for equipment certified for home use. Russia Electromagnetic Interference (EMI) Class A statement People's Republic of China Class A - IBM 7379E2U | User Manual - Page 144
128 IBM System x3400 M3 Type 7378/7379: Installation and User's Guide - IBM 7379E2U | User Manual - Page 145
jumper 23 completing the installation 96 components 21 configuration cable routing 37 updating 97 updating server 99 with ServerGuide 108 © Copyright IBM Corp. 2010 configuration programs LSI Configuration Utility 100 connecting the cables 96 connector Ethernet 16 power cord 15 serial 1 15 video - IBM 7379E2U | User Manual - Page 146
77 types and installation information 75 hardware service and support 120 heat output 6 heat sink 91 IBM Advanced Settings Utility program, overview 116 IBM Support Line 120 IBM Systems Director overview 11 server feature 8 updating 116 IBM IBM System x3400 M3 Type 7378/7379: Installation and User - IBM 7379E2U | User Manual - Page 147
integrated (continued) network support 9 integrated functions 6 internal cable routing 31 IP address, obtaining hard disk drive status 14 operator information panel 27 power-supply 17 power-supply detected problems 16 rear of server 15 system board 24 system-error 13 legacy operating system - IBM 7379E2U | User Manual - Page 148
) LEDs and detected problems 16 power-supply cage 77 size 6 slots 6 SMP 10 software service and support 120 specifications 6 Standby mode 18 start options 103 starting systems-management features supported 109 T tape drive cable routing 31 TCP/IP offload engine (TOE) 10 132 IBM System x3400 M3 - IBM 7379E2U | User Manual - Page 149
notice 124 United States FCC Class A notice 124 UpdateXpress 12 updating IBM Systems Director 116 server configuration 97, 99 USB connectors front 14 rear address 112 web site publication ordering 119 ServerGuide 107 support 119 support line, telephone numbers 120 weight 6 working inside the server - IBM 7379E2U | User Manual - Page 150
134 IBM System x3400 M3 Type 7378/7379: Installation and User's Guide - IBM 7379E2U | User Manual - Page 151
- IBM 7379E2U | User Manual - Page 152
Part Number: 69Y4163 Printed in USA (1P) P/N: 69Y4163
-
 1
1 -
 2
2 -
 3
3 -
 4
4 -
 5
5 -
 6
6 -
 7
7 -
8
-
9
-
10
-
11
-
12
-
13
-
14
-
15
-
16
-
17
-
18
-
19
-
20
-
21
-
22
-
23
-
24
-
25
-
26
-
27
-
28
-
29
-
30
-
31
-
32
-
33
-
34
-
35
-
36
-
37
-
38
-
39
-
40
-
41
-
42
-
43
-
44
-
45
-
46
-
47
-
48
-
49
-
50
-
51
-
52
-
53
-
54
-
55
-
56
-
57
-
58
-
59
-
60
-
61
-
62
-
63
-
64
-
65
-
66
-
67
-
68
-
69
-
70
-
71
-
72
-
73
-
74
-
75
-
76
-
77
-
78
-
79
-
80
-
81
-
82
-
83
-
84
-
85
-
86
-
87
-
88
-
89
-
90
-
91
-
92
-
93
-
94
-
95
-
96
-
97
-
98
-
99
-
100
-
101
-
102
-
103
-
104
-
105
-
106
-
107
-
108
-
109
-
110
-
111
-
112
-
113
-
114
-
115
-
116
-
117
-
118
-
119
-
120
-
121
-
122
-
123
-
124
-
125
-
126
-
127
-
128
-
129
-
130
-
131
-
132
-
133
-
134
-
135
-
136
-
137
-
138
-
139
-
140
-
141
-
142
-
143
-
144
-
145
-
146
-
147
-
148
-
149
-
150
-
151
-
152
 |
 |

IBM System x3400 M3 Type 7378/7379
Installation and User's Guide
±²³