IBM 7379E2U User Manual - Page 107
Problem, Determination and Service Guide
 |
View all IBM 7379E2U manuals
Add to My Manuals
Save this manual to your list of manuals |
Page 107 highlights
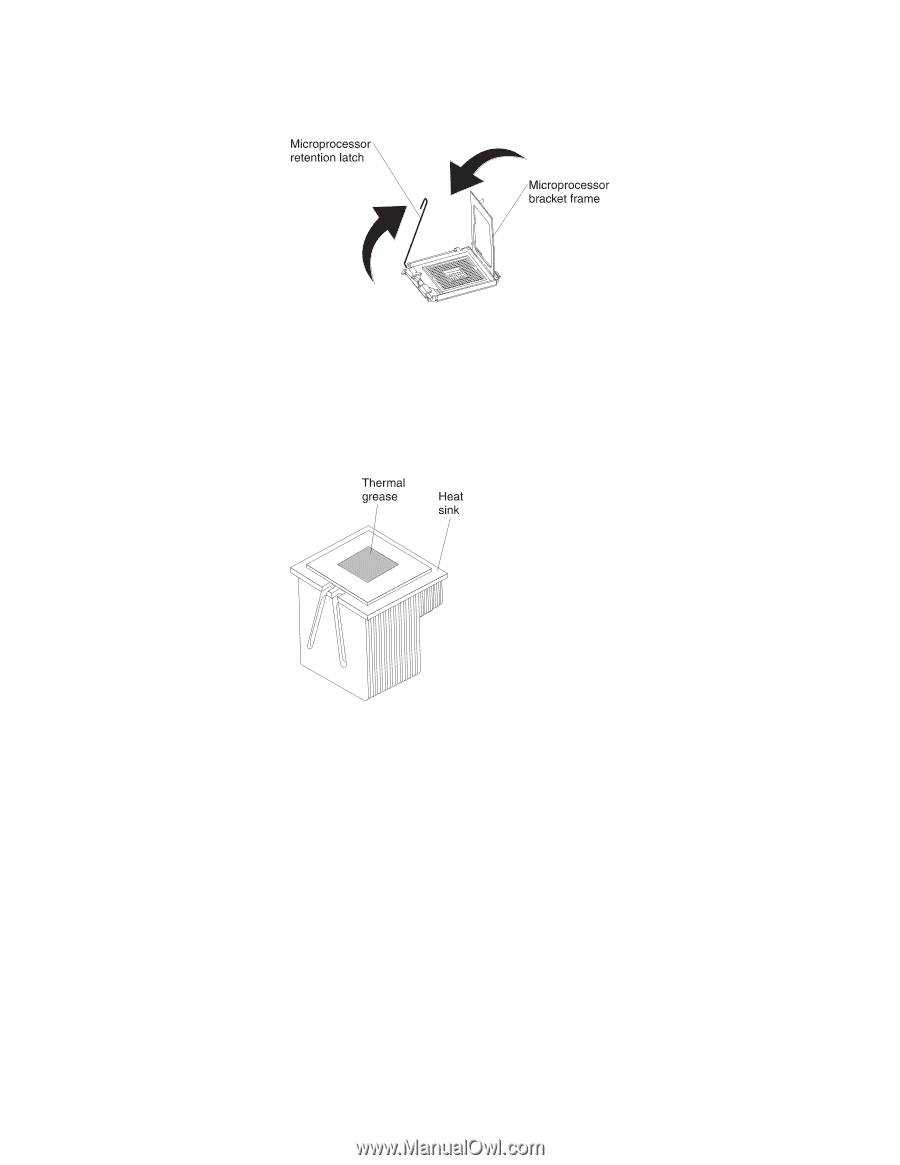
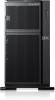
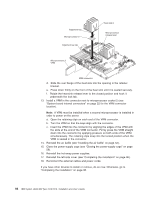
10. Close the microprocessor bracket frame; then, close the microprocessor retention latch and lock it securely in place. 11. Close the microprocessor-release lever to secure the microprocessor. 12. Install a heat sink on the microprocessor. Attention: Do not touch the thermal grease on the bottom of the heat sink or set down the heat sink after you remove the plastic cover. Touching the thermal grease will contaminate it. If the thermal grease is contaminated, call IBM service and support to request a replacement thermal grease kit. For information about installing the replacement thermal grease, see the Problem Determination and Service Guide. a. Make sure that the heat-sink release lever is in the fully open position. b. Remove the plastic protective cover from the bottom of the heat sink. c. Align the heat sink above the microprocessor, using the alignment key on the heat sink, with the thermal-grease side down. Chapter 2. Installing optional devices 91
-
 1
1 -
2
-
3
-
4
-
5
-
6
-
7
-
8
-
9
-
10
-
11
-
12
-
13
-
14
-
15
-
16
-
17
-
18
-
19
-
20
-
21
-
22
-
23
-
24
-
25
-
26
-
27
-
28
-
29
-
30
-
31
-
32
-
33
-
34
-
35
-
36
-
37
-
38
-
39
-
40
-
41
-
42
-
43
-
44
-
45
-
46
-
47
-
48
-
49
-
50
-
51
-
52
-
53
-
54
-
55
-
56
-
57
-
58
-
59
-
60
-
61
-
62
-
63
-
64
-
65
-
66
-
67
-
68
-
69
-
70
-
71
-
72
-
73
-
74
-
75
-
76
-
77
-
78
-
79
-
80
-
81
-
82
-
83
-
84
-
85
-
86
-
87
-
88
-
89
-
90
-
91
-
92
-
93
-
94
-
95
-
96
-
97
-
98
-
99
-
100
-
101
-
 102
102 -
 103
103 -
 104
104 -
 105
105 -
 106
106 -
 107
107 -
 108
108 -
 109
109 -
 110
110 -
 111
111 -
 112
112 -
113
-
114
-
115
-
116
-
117
-
118
-
119
-
120
-
121
-
122
-
123
-
124
-
125
-
126
-
127
-
128
-
129
-
130
-
131
-
132
-
133
-
134
-
135
-
136
-
137
-
138
-
139
-
140
-
141
-
142
-
143
-
144
-
145
-
146
-
147
-
148
-
149
-
150
-
151
-
152
 |
 |