IBM 7379E2U User Manual - Page 112
Completing the installation, Connecting the cables
 |
View all IBM 7379E2U manuals
Add to My Manuals
Save this manual to your list of manuals |
Page 112 highlights
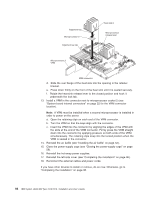
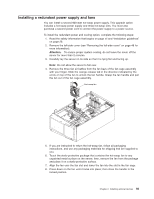
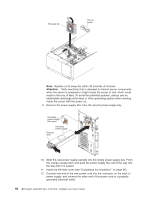
Completing the installation To complete the installation, complete the following steps: 1. If the bezel is open, insert the bezel hinges into the slots on the server chassis and close the bezel. 2. Position the left-side cover over the server. 3. Place the bottom edge of the cover onto the bottom edge of the server. 4. Rotate the top edge of left-side cover toward the server; then, press down on the cover handle until it clicks into place. 5. Rotate the bezel to its fully closed position. 6. Using the supplied key, lock the left-side cover and bezel. 7. Connect the cables and power cords. For more information, see "Connecting the cables." Connecting the cables Notes: 1. Be sure to turn off the server before you connect any cables to or disconnect any cables from the server or hot-plug adapter. 2. For additional cabling instructions, see the documentation that comes with the optional devices. It might be easier for you to route any cables before you install certain optional devices. 3. Cable identifiers are printed on the cables that come with the server and optional devices. Use these identifiers to connect the cables to the correct connectors. For example, the hard disk drive cables are labeled "HDD option." 96 IBM System x3400 M3 Type 7378/7379: Installation and User's Guide
-
 1
1 -
2
-
3
-
4
-
5
-
6
-
7
-
8
-
9
-
10
-
11
-
12
-
13
-
14
-
15
-
16
-
17
-
18
-
19
-
20
-
21
-
22
-
23
-
24
-
25
-
26
-
27
-
28
-
29
-
30
-
31
-
32
-
33
-
34
-
35
-
36
-
37
-
38
-
39
-
40
-
41
-
42
-
43
-
44
-
45
-
46
-
47
-
48
-
49
-
50
-
51
-
52
-
53
-
54
-
55
-
56
-
57
-
58
-
59
-
60
-
61
-
62
-
63
-
64
-
65
-
66
-
67
-
68
-
69
-
70
-
71
-
72
-
73
-
74
-
75
-
76
-
77
-
78
-
79
-
80
-
81
-
82
-
83
-
84
-
85
-
86
-
87
-
88
-
89
-
90
-
91
-
92
-
93
-
94
-
95
-
96
-
97
-
98
-
99
-
100
-
101
-
102
-
103
-
104
-
105
-
106
-
 107
107 -
 108
108 -
 109
109 -
 110
110 -
 111
111 -
 112
112 -
 113
113 -
 114
114 -
 115
115 -
 116
116 -
 117
117 -
118
-
119
-
120
-
121
-
122
-
123
-
124
-
125
-
126
-
127
-
128
-
129
-
130
-
131
-
132
-
133
-
134
-
135
-
136
-
137
-
138
-
139
-
140
-
141
-
142
-
143
-
144
-
145
-
146
-
147
-
148
-
149
-
150
-
151
-
152
 |
 |