IBM HC10 Service Guide - Page 33
Installing, blade, workstation, BladeCenter
 |
UPC - 883436017671
View all IBM HC10 manuals
Add to My Manuals
Save this manual to your list of manuals |
Page 33 highlights
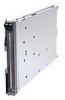
Installing the blade workstation in a BladeCenter unit To install a blade workstation in a BladeCenter unit, complete the following steps. The appearance of your BladeCenter unit might be different, see the documentation for your BladeCenter unit for additional information. Release handles (open) Statement 21: CAUTION: Hazardous energy is present when the blade workstation is connected to the power source. Always replace the blade cover before installing the blade workstation. 1. Read the safety information that begins on page vii and "Installation guidelines" on page 13. 2. Make sure that the release handles on the blade workstation are in the open position (perpendicular to the blade workstation). 3. If you installed a blade filler or another blade workstation in the bay from which you removed the blade workstation, remove it from the bay. Attention: You must install the blade workstation in the same blade bay from which you removed it. Some blade workstation configuration information and update options are established according to bay number. Reinstalling a blade workstation into a different blade bay from the one from which it was removed could have unintended consequences, and you might have to reconfigure the blade workstation. 4. Slide the blade workstation into the blade bay from which you removed it until it stops. 5. Push the release handles on the front of the blade workstation closed. 6. Turn on the blade workstation (see "Turning on the blade workstation" on page 6 for instructions). 7. Make sure that the power-on LED on the blade workstation control panel is lit continuously, indicating that the blade workstation is receiving power and is turned on. Chapter 4. Removing and replacing blade workstation components 17
-
 1
1 -
2
-
3
-
4
-
5
-
6
-
7
-
8
-
9
-
10
-
11
-
12
-
13
-
14
-
15
-
16
-
17
-
18
-
19
-
20
-
21
-
22
-
23
-
24
-
25
-
26
-
27
-
 28
28 -
 29
29 -
 30
30 -
 31
31 -
 32
32 -
 33
33 -
 34
34 -
 35
35 -
 36
36 -
 37
37 -
 38
38 -
39
-
40
-
41
-
42
-
43
-
44
-
45
-
46
-
47
-
48
-
49
-
50
-
51
-
52
-
53
-
54
-
55
-
56
-
57
-
58
-
59
-
60
-
61
-
62
-
63
-
64
-
65
-
66
-
67
-
68
-
69
-
70
-
71
-
72
-
73
-
74
-
75
-
76
-
77
-
78
-
79
-
80
-
81
-
82
-
83
-
84
-
85
-
86
-
87
-
88
-
89
-
90
-
91
-
92
-
93
-
94
-
95
-
96
-
97
-
98
-
99
-
100
-
101
-
102
-
103
-
104
-
105
-
106
-
107
-
108
-
109
-
110
-
111
-
112
-
113
-
114
 |
 |
