IBM HC10 Service Guide - Page 38
Removing, storage, drive
 |
UPC - 883436017671
View all IBM HC10 manuals
Add to My Manuals
Save this manual to your list of manuals |
Page 38 highlights
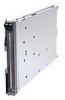
3. Carefully slide the bezel assembly onto the blade workstation until it clicks into place. 4. Install the cover onto the blade workstation. 5. Install the blade workstation into the BladeCenter unit. Removing a SATA storage drive To remove a SATA storage drive, complete the following steps. Hard disk drive Hard disk drive release lever 1. Read the safety information that begins on page vii and "Installation guidelines" on page 13. 2. If the blade workstation is installed in a BladeCenter unit, remove it (see "Removing the blade workstation from a BladeCenter unit" on page 16). 3. Remove the blade workstation cover (see "Removing the blade workstation cover" on page 19 for instructions). 4. Locate the SATA storage drive. Attention: Do not press on the top of the drive. Pressing the top might damage the drive. 5. Push the blue release lever at the front of the drive tray away from the storage drive; then, slide the drive forward to disengage it from the connector at the rear of the drive tray. 6. Lift the storage drive out of the drive tray. 7. To remove the drive tray, remove the four screws that secure it to the system board and lift it out of the blade workstation. 8. If you are instructed to return the storage drive, follow all packaging instructions, and use any packaging materials for shipping that are supplied to you. 22 BladeCenter HC10 Type 7996: Problem Determination and Service Guide
-
 1
1 -
2
-
3
-
4
-
5
-
6
-
7
-
8
-
9
-
10
-
11
-
12
-
13
-
14
-
15
-
16
-
17
-
18
-
19
-
20
-
21
-
22
-
23
-
24
-
25
-
26
-
27
-
28
-
29
-
30
-
31
-
32
-
 33
33 -
 34
34 -
 35
35 -
 36
36 -
 37
37 -
 38
38 -
 39
39 -
 40
40 -
 41
41 -
 42
42 -
 43
43 -
44
-
45
-
46
-
47
-
48
-
49
-
50
-
51
-
52
-
53
-
54
-
55
-
56
-
57
-
58
-
59
-
60
-
61
-
62
-
63
-
64
-
65
-
66
-
67
-
68
-
69
-
70
-
71
-
72
-
73
-
74
-
75
-
76
-
77
-
78
-
79
-
80
-
81
-
82
-
83
-
84
-
85
-
86
-
87
-
88
-
89
-
90
-
91
-
92
-
93
-
94
-
95
-
96
-
97
-
98
-
99
-
100
-
101
-
102
-
103
-
104
-
105
-
106
-
107
-
108
-
109
-
110
-
111
-
112
-
113
-
114
 |
 |
