IBM HC10 Service Guide - Page 39
Installing, storage, drive
 |
UPC - 883436017671
View all IBM HC10 manuals
Add to My Manuals
Save this manual to your list of manuals |
Page 39 highlights
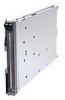
Installing a SATA storage drive To install a SATA storage drive, complete the following steps. Hard disk drive Hard disk drive release lever 1. Identify the location where the SATA storage drive will be installed. 2. Touch the static-protective package that contains the hard disk drive to any unpainted metal surface on the BladeCenter unit or any unpainted metal surface on any other grounded rack component; then, remove the hard disk drive from the package. Attention: Do not press on the top of the drive. Pressing the top might damage the drive. 3. Place the drive into the drive tray and push it toward the rear of the drive tray. The drive slides into the connector until the drive moves past the lever at the front of the tray. 4. Install the blade workstation cover (see "Installing the blade workstation cover" on page 20 for instructions). 5. Install the blade workstation into the BladeCenter unit (see "Installing the blade workstation in a BladeCenter unit" on page 17 for instructions). Chapter 4. Removing and replacing blade workstation components 23
-
 1
1 -
2
-
3
-
4
-
5
-
6
-
7
-
8
-
9
-
10
-
11
-
12
-
13
-
14
-
15
-
16
-
17
-
18
-
19
-
20
-
21
-
22
-
23
-
24
-
25
-
26
-
27
-
28
-
29
-
30
-
31
-
32
-
33
-
 34
34 -
 35
35 -
 36
36 -
 37
37 -
 38
38 -
 39
39 -
 40
40 -
 41
41 -
 42
42 -
 43
43 -
 44
44 -
45
-
46
-
47
-
48
-
49
-
50
-
51
-
52
-
53
-
54
-
55
-
56
-
57
-
58
-
59
-
60
-
61
-
62
-
63
-
64
-
65
-
66
-
67
-
68
-
69
-
70
-
71
-
72
-
73
-
74
-
75
-
76
-
77
-
78
-
79
-
80
-
81
-
82
-
83
-
84
-
85
-
86
-
87
-
88
-
89
-
90
-
91
-
92
-
93
-
94
-
95
-
96
-
97
-
98
-
99
-
100
-
101
-
102
-
103
-
104
-
105
-
106
-
107
-
108
-
109
-
110
-
111
-
112
-
113
-
114
 |
 |
