Konica Minolta Fujitsu fi-7160 Operation Guide - Page 73
Operational settings
 |
View all Konica Minolta Fujitsu fi-7160 manuals
Add to My Manuals
Save this manual to your list of manuals |
Page 73 highlights
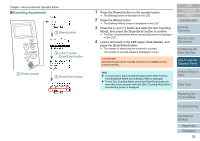
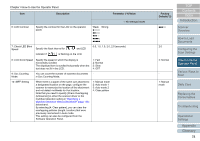
Chapter 4 How to Use the Operator Panel ■Operational settings Check Menu Stop/Clear Scan/Enter Power 1 [Power] button 2 [Menu] button 3 button [Scan/Enter] button 4 button [Scan/Enter] button 1 Press the [Power] button on the operator panel. The [Ready] screen is displayed on the LCD. 2 Press the [Menu] button. The [Settings Menu] screen is displayed on the LCD. 3 Press the [] or [] button and select a setting item, then press the [Scan/Enter] button to confirm. For more details about the setting items, refer to "Items Configurable in the Settings Menu" (page 76). The selected item is displayed on the LCD. 4 Press the [] or [] button and select a parameter, then press the [Scan/Enter] button to confirm. For more details about the setting parameters, refer to "Items Configurable in the Settings Menu" (page 76). HINT "*" is displayed for the factory default setting. When you select an item in the screen, the parameter currently selected is highlighted. If the [Settings Menu] screen is displayed on the LCD, it indicates that the setup has been completed. If the LCD displays a setting item, repeat step 4 until it shows the [Settings Menu] screen. TOP Contents Index Introduction Scanner Overview How to Load Documents Configuring the Scan Settings How to Use the Operator Panel Various Ways to Scan Daily Care Replacing the Consumables Troubleshooting Operational Settings Appendix Glossary 73
-
 1
1 -
2
-
3
-
4
-
5
-
6
-
7
-
8
-
9
-
10
-
11
-
12
-
13
-
14
-
15
-
16
-
17
-
18
-
19
-
20
-
21
-
22
-
23
-
24
-
25
-
26
-
27
-
28
-
29
-
30
-
31
-
32
-
33
-
34
-
35
-
36
-
37
-
38
-
39
-
40
-
41
-
42
-
43
-
44
-
45
-
46
-
47
-
48
-
49
-
50
-
51
-
52
-
53
-
54
-
55
-
56
-
57
-
58
-
59
-
60
-
61
-
62
-
63
-
64
-
65
-
66
-
67
-
 68
68 -
 69
69 -
 70
70 -
 71
71 -
 72
72 -
 73
73 -
 74
74 -
 75
75 -
 76
76 -
 77
77 -
 78
78 -
79
-
80
-
81
-
82
-
83
-
84
-
85
-
86
-
87
-
88
-
89
-
90
-
91
-
92
-
93
-
94
-
95
-
96
-
97
-
98
-
99
-
100
-
101
-
102
-
103
-
104
-
105
-
106
-
107
-
108
-
109
-
110
-
111
-
112
-
113
-
114
-
115
-
116
-
117
-
118
-
119
-
120
-
121
-
122
-
123
-
124
-
125
-
126
-
127
-
128
-
129
-
130
-
131
-
132
-
133
-
134
-
135
-
136
-
137
-
138
-
139
-
140
-
141
-
142
-
143
-
144
-
145
-
146
-
147
-
148
-
149
-
150
-
151
-
152
-
153
-
154
-
155
-
156
-
157
-
158
-
159
-
160
-
161
-
162
-
163
-
164
-
165
-
166
-
167
-
168
-
169
-
170
-
171
-
172
-
173
-
174
-
175
-
176
-
177
-
178
-
179
-
180
-
181
-
182
-
183
-
184
-
185
-
186
-
187
-
188
-
189
-
190
-
191
-
192
-
193
-
194
-
195
-
196
-
197
-
198
-
199
-
200
-
201
-
202
-
203
-
204
-
205
-
206
-
207
-
208
-
209
-
210
-
211
-
212
-
213
-
214
-
215
-
216
-
217
-
218
-
219
-
220
-
221
-
222
-
223
-
224
-
225
-
226
-
227
-
228
-
229
-
230
 |
 |
