Kyocera 9530DN Operation Guide - Page 160
RS-232C Cable Connection, Connecting the Printer to the Computer
 |
View all Kyocera 9530DN manuals
Add to My Manuals
Save this manual to your list of manuals |
Page 160 highlights
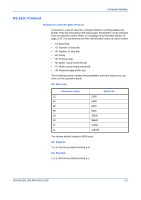
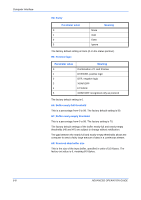
Computer Interface RS-232C Cable Connection Connecting the Printer to the Computer Check that the power of both the printer and the computer is switched off. 1 Discharge yourself of static electricity by touching a metal object such as a doorknob. 2 Remove the plastie cap from the printer's RS-232C interface connector. 3 Plug the printer end of the RS-232C interface cable into the printer's RS-232C connector and screw it in place. 4 Plug the other end of the cable into the computer's RS-232C interface connector. 5 Switch on the printer's power. 6 The printer's RS-232C parameters are factory-set to the following values: Baud rate=9600 bps, data bits (character length)=8 bits, stop bits=1, parity=none The two RS-232C protocols are XON/XOFF and DTR. The printer performs both of them simultaneously, using positive logic for DTR. If you are uncertain as to the printer's current parameter settings, you can reset them to the values listed above. 7 Set the computer to the same parameters as the printer. On many computers this can be done by setting DIP switches before the power is turned on. 5-10 ADVANCED OPERATION GUIDE
-
 1
1 -
2
-
3
-
4
-
5
-
6
-
7
-
8
-
9
-
10
-
11
-
12
-
13
-
14
-
15
-
16
-
17
-
18
-
19
-
20
-
21
-
22
-
23
-
24
-
25
-
26
-
27
-
28
-
29
-
30
-
31
-
32
-
33
-
34
-
35
-
36
-
37
-
38
-
39
-
40
-
41
-
42
-
43
-
44
-
45
-
46
-
47
-
48
-
49
-
50
-
51
-
52
-
53
-
54
-
55
-
56
-
57
-
58
-
59
-
60
-
61
-
62
-
63
-
64
-
65
-
66
-
67
-
68
-
69
-
70
-
71
-
72
-
73
-
74
-
75
-
76
-
77
-
78
-
79
-
80
-
81
-
82
-
83
-
84
-
85
-
86
-
87
-
88
-
89
-
90
-
91
-
92
-
93
-
94
-
95
-
96
-
97
-
98
-
99
-
100
-
101
-
102
-
103
-
104
-
105
-
106
-
107
-
108
-
109
-
110
-
111
-
112
-
113
-
114
-
115
-
116
-
117
-
118
-
119
-
120
-
121
-
122
-
123
-
124
-
125
-
126
-
127
-
128
-
129
-
130
-
131
-
132
-
133
-
134
-
135
-
136
-
137
-
138
-
139
-
140
-
141
-
142
-
143
-
144
-
145
-
146
-
147
-
148
-
149
-
150
-
151
-
152
-
153
-
154
-
 155
155 -
 156
156 -
 157
157 -
 158
158 -
 159
159 -
 160
160 -
 161
161 -
 162
162 -
 163
163 -
 164
164 -
 165
165 -
166
-
167
-
168
-
169
-
170
 |
 |