Kyocera 9530DN Operation Guide - Page 53
Using Quick Copy, Printing Additional Copies using Quick Copy, e-MPS, >Quick Copy, Harold, Arlen
 |
View all Kyocera 9530DN manuals
Add to My Manuals
Save this manual to your list of manuals |
Page 53 highlights
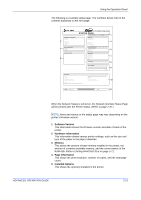
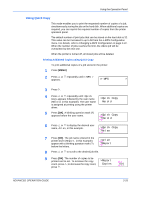
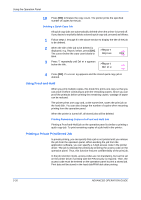
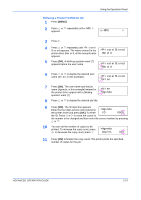
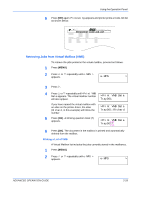
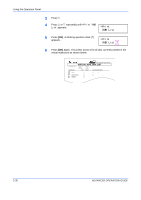
Using the Operation Panel Using Quick Copy This mode enables you to print the requested number of copies of a job, simultaneously storing the job on the hard disk. When additional copies are required, you can reprint the required number of copies from the printer operation panel. The default number of print jobs that can be stored on the hard disk is 32. This value can be increased to up to 50 from the e-MPS Configuration menu. For details, refer to Changing e-MPS Configuration on page 2-31. When the number of jobs reaches the limit, the oldest job will be overwritten by the new one. When the printer is turned off, all stored jobs will be deleted. Printing Additional Copies using Quick Copy To print additional copies of a job stored in the printer: 1 Press [MENU]. 2 Press U or V repeatedly until e-MPS > appears. e-MPS > 3 Press Z. 4 Press U or V repeatedly until >Quick Copy appears followed by the user name >Quick Copy (Harold, in this example). The user name Harold is assigned at printing using the printer driver. 5 Press [OK]. A blinking question mark (?) appears before the user name. >Quick Copy ?Harold 6 Press U or V to display the desired user name, Arlen, in this example. >Quick Copy ?Arlen 7 Press [OK]. The job name entered in the printer driver (Report, in this example) appear with a blinking question mark (?) before the letters. >Arlen ?Report 8 Press U or V to scroll to the desired job title. 9 Press [OK]. The number of copies to be printed can be set. To increase the copy >Report count, press U; to decrease the copy count, Copies press V. 001 ADVANCED OPERATION GUIDE 2-25
-
 1
1 -
2
-
3
-
4
-
5
-
6
-
7
-
8
-
9
-
10
-
11
-
12
-
13
-
14
-
15
-
16
-
17
-
18
-
19
-
20
-
21
-
22
-
23
-
24
-
25
-
26
-
27
-
28
-
29
-
30
-
31
-
32
-
33
-
34
-
35
-
36
-
37
-
38
-
39
-
40
-
41
-
42
-
43
-
44
-
45
-
46
-
47
-
 48
48 -
 49
49 -
 50
50 -
 51
51 -
 52
52 -
 53
53 -
 54
54 -
 55
55 -
 56
56 -
 57
57 -
 58
58 -
59
-
60
-
61
-
62
-
63
-
64
-
65
-
66
-
67
-
68
-
69
-
70
-
71
-
72
-
73
-
74
-
75
-
76
-
77
-
78
-
79
-
80
-
81
-
82
-
83
-
84
-
85
-
86
-
87
-
88
-
89
-
90
-
91
-
92
-
93
-
94
-
95
-
96
-
97
-
98
-
99
-
100
-
101
-
102
-
103
-
104
-
105
-
106
-
107
-
108
-
109
-
110
-
111
-
112
-
113
-
114
-
115
-
116
-
117
-
118
-
119
-
120
-
121
-
122
-
123
-
124
-
125
-
126
-
127
-
128
-
129
-
130
-
131
-
132
-
133
-
134
-
135
-
136
-
137
-
138
-
139
-
140
-
141
-
142
-
143
-
144
-
145
-
146
-
147
-
148
-
149
-
150
-
151
-
152
-
153
-
154
-
155
-
156
-
157
-
158
-
159
-
160
-
161
-
162
-
163
-
164
-
165
-
166
-
167
-
168
-
169
-
170
 |
 |