Lexmark T632 Service Manual - Page 63
Scheduled maintenance on Engine Code CRC - maintenance kit
 |
View all Lexmark T632 manuals
Add to My Manuals
Save this manual to your list of manuals |
Page 63 highlights
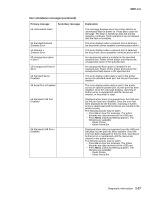
4060-xxx User attendance messages (continued) Primary message 59 Incompatible Tray x Secondary message 59 Incompatible Duplex 61 Defective Disk 62 Disk Full 63 Unformatted Disk 64 Unsupported Disk Format 80 Scheduled Maintenance 81 Engine Code CRC Failure 88 Toner Low Explanation An incompatible tray is installed. For Tray x, x= 2, 3, 4, or 5. Remove the incompatible tray and press Go to clear the message. Note: If the user installed the incompatible device to satisfy a Check Device Connections/reattach message, the user should reinstall an associated compatible option or hot unplug the option. An incompatible duplex option is installed. Remove the incompatible duplex option and press Go to clear the message. Note: If the user installed the incompatible device to satisfy a Check Device Connections/reattach message, the user should reinstall an associated compatible option or hot unplug the option. This error code displays when the printer detects a defective disk. This error may occur at power on or during disk format and write operations. While this message displays, press Go to clear the message. The disk is marked defective and normal printer operations continue. Disk operations are not allowed with a defective disk. The Format Disk menu is not shown. This error code displays when there is not enough free space on the disk to hold the resources that have been requested to be written to the disk. This message displays for both resource and PostScript Disk operators when the disk is full. This error code displays when the printer detects an unformatted disk at power on. Press Go to clear the message. The disk is marked as bad and normal operation continues. Disk operations are not allowed until the disk is formatted. The printer detects an unsupported disk format at POR. Press Go to clear the message. The disk is marked as bad and normal operation continues. Further disk operations are not allowed until the disk is formatted. The operator panel displays this message at each 300K page count interval. It is necessary to replace the fuser assembly, transfer roller, charge roll, and pick rolls at this interval to maintain the print quality and reliability of the printer. The parts are available as a maintenance kit. For more information, go to "Scheduled maintenance" on page 6-1. This error displays when the microcode to be programmed in the engine flash code module has failed a CRC check. Press Go to clear the message. The microcode data is discarded and must be retransmitted from the host computer. This message displays when toner low occurs and the toner low alarm is activated. Press Go to clear this message. Diagnostic information 2-29
-
 1
1 -
2
-
3
-
4
-
5
-
6
-
7
-
8
-
9
-
10
-
11
-
12
-
13
-
14
-
15
-
16
-
17
-
18
-
19
-
20
-
21
-
22
-
23
-
24
-
25
-
26
-
27
-
28
-
29
-
30
-
31
-
32
-
33
-
34
-
35
-
36
-
37
-
38
-
39
-
40
-
41
-
42
-
43
-
44
-
45
-
46
-
47
-
48
-
49
-
50
-
51
-
52
-
53
-
54
-
55
-
56
-
57
-
 58
58 -
 59
59 -
 60
60 -
 61
61 -
 62
62 -
 63
63 -
 64
64 -
 65
65 -
 66
66 -
 67
67 -
 68
68 -
69
-
70
-
71
-
72
-
73
-
74
-
75
-
76
-
77
-
78
-
79
-
80
-
81
-
82
-
83
-
84
-
85
-
86
-
87
-
88
-
89
-
90
-
91
-
92
-
93
-
94
-
95
-
96
-
97
-
98
-
99
-
100
-
101
-
102
-
103
-
104
-
105
-
106
-
107
-
108
-
109
-
110
-
111
-
112
-
113
-
114
-
115
-
116
-
117
-
118
-
119
-
120
-
121
-
122
-
123
-
124
-
125
-
126
-
127
-
128
-
129
-
130
-
131
-
132
-
133
-
134
-
135
-
136
-
137
-
138
-
139
-
140
-
141
-
142
-
143
-
144
-
145
-
146
-
147
-
148
-
149
-
150
-
151
-
152
-
153
-
154
-
155
-
156
-
157
-
158
-
159
-
160
-
161
-
162
-
163
-
164
-
165
-
166
-
167
-
168
-
169
-
170
-
171
-
172
-
173
-
174
-
175
-
176
-
177
-
178
-
179
-
180
-
181
-
182
-
183
-
184
-
185
-
186
-
187
-
188
-
189
-
190
-
191
-
192
-
193
-
194
-
195
-
196
-
197
-
198
-
199
-
200
-
201
-
202
-
203
-
204
-
205
-
206
-
207
-
208
-
209
-
210
-
211
-
212
-
213
-
214
-
215
-
216
-
217
-
218
-
219
-
220
-
221
-
222
-
223
-
224
-
225
-
226
-
227
-
228
-
229
-
230
-
231
-
232
-
233
-
234
-
235
-
236
-
237
-
238
-
239
-
240
-
241
-
242
-
243
-
244
-
245
-
246
-
247
-
248
-
249
-
250
-
251
-
252
-
253
-
254
-
255
-
256
-
257
-
258
-
259
-
260
-
261
-
262
-
263
-
264
-
265
-
266
-
267
-
268
-
269
-
270
-
271
-
272
-
273
-
274
-
275
-
276
-
277
-
278
-
279
-
280
-
281
-
282
-
283
-
284
-
285
-
286
-
287
-
288
-
289
-
290
-
291
-
292
-
293
-
294
-
295
-
296
-
297
-
298
-
299
-
300
-
301
-
302
-
303
-
304
-
305
-
306
-
307
-
308
-
309
-
310
-
311
-
312
-
313
-
314
-
315
-
316
-
317
-
318
-
319
-
320
-
321
-
322
-
323
-
324
-
325
-
326
-
327
-
328
-
329
-
330
-
331
-
332
-
333
-
334
-
335
-
336
-
337
-
338
-
339
-
340
-
341
-
342
-
343
-
344
-
345
 |
 |
