Lexmark T632 Service Manual - Page 86
Fuser service checks
 |
View all Lexmark T632 manuals
Add to My Manuals
Save this manual to your list of manuals |
Page 86 highlights
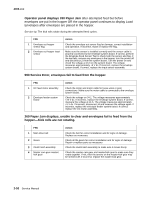
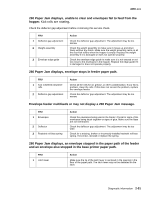
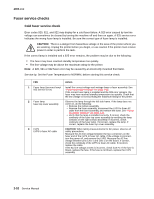
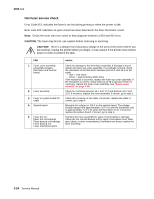
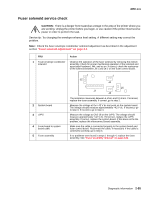
4060-xxx Fuser service checks Cold fuser service check Error codes 920, 921, and 922 may display for a cold fuser failure. A 920 error caused by low line voltage can sometimes be cleared by turning the machine off and then on again. A 925 service error indicates the wrong fuser lamp is installed. Be sure the correct type of fuser lamp is installed. CAUTION: There is a danger from hazardous voltage in the area of the printer where you are working. Unplug the printer before you begin, or use caution if the printer must receive power in order to perform the task. If the correct lamp is installed and a 925 error remains, the problem may be due to the following: • The fuser may have reached standby temperature too quickly. • The line voltage may be above the maximum rating for the printer. Note: A 920, 921 or 922 fuser error may be caused by an incorrectly mounted thermistor. Service tip: Set the Fuser Temperature to NORMAL before starting this service check. FRU Action 1 Fuser lamp (incorrect lamp/ Install the correct voltage and wattage lamp or fuser assembly. See 925 Service Error) "Fuser assembly removal" on page 4-23. If the correct fuser lamp is installed and the 925 error remains, the fuser may have reached standby temperature too quickly. Check that the line voltage is not exceeding the maximum rating for the printer. 2 Fuser lamp fuser top cover assembly Observe the lamp through the left side frame. If the lamp does not come on, do the following: • Remove the redrive assembly. • Remove the fuser assembly, disconnect the LVPS to fuser AC cable from the fuser assembly, and remove the fuser. See "Fuser assembly removal" on page 4-23. • Verify that the lamp is installed correctly. If correct, check the continuity of the fuser top cover assembly by verifying the lamp contacts on the right contact assembly. If incorrect, check continuity of the fuser lamp. If incorrect, replace the lamp. If correct, replace the fuser top cover assembly. 3 LVPS LVPS to fuser AC cable CAUTION: When taking measurements for AC power, observe all safety precautions. Measure the AC line voltage between the two connectors on the fuser end of the LVPS to fuser AC cable. If the voltage is incorrect, turn the power off, and remove the LVPS. Measure the AC line voltage between pins CN1-1 and CN1-3 on the board. If correct, check the continuity of the LVPS to fuser AC cable. If incorrect, replace the cable. If the AC line voltage at CN1 is incorrect, check fuse F2. If the fuse is blown, replace the fuse. If the fuse is not blown, replace the LVPS assembly. 2-52 Service Manual
-
 1
1 -
2
-
3
-
4
-
5
-
6
-
7
-
8
-
9
-
10
-
11
-
12
-
13
-
14
-
15
-
16
-
17
-
18
-
19
-
20
-
21
-
22
-
23
-
24
-
25
-
26
-
27
-
28
-
29
-
30
-
31
-
32
-
33
-
34
-
35
-
36
-
37
-
38
-
39
-
40
-
41
-
42
-
43
-
44
-
45
-
46
-
47
-
48
-
49
-
50
-
51
-
52
-
53
-
54
-
55
-
56
-
57
-
58
-
59
-
60
-
61
-
62
-
63
-
64
-
65
-
66
-
67
-
68
-
69
-
70
-
71
-
72
-
73
-
74
-
75
-
76
-
77
-
78
-
79
-
80
-
 81
81 -
 82
82 -
 83
83 -
 84
84 -
 85
85 -
 86
86 -
 87
87 -
 88
88 -
 89
89 -
 90
90 -
 91
91 -
92
-
93
-
94
-
95
-
96
-
97
-
98
-
99
-
100
-
101
-
102
-
103
-
104
-
105
-
106
-
107
-
108
-
109
-
110
-
111
-
112
-
113
-
114
-
115
-
116
-
117
-
118
-
119
-
120
-
121
-
122
-
123
-
124
-
125
-
126
-
127
-
128
-
129
-
130
-
131
-
132
-
133
-
134
-
135
-
136
-
137
-
138
-
139
-
140
-
141
-
142
-
143
-
144
-
145
-
146
-
147
-
148
-
149
-
150
-
151
-
152
-
153
-
154
-
155
-
156
-
157
-
158
-
159
-
160
-
161
-
162
-
163
-
164
-
165
-
166
-
167
-
168
-
169
-
170
-
171
-
172
-
173
-
174
-
175
-
176
-
177
-
178
-
179
-
180
-
181
-
182
-
183
-
184
-
185
-
186
-
187
-
188
-
189
-
190
-
191
-
192
-
193
-
194
-
195
-
196
-
197
-
198
-
199
-
200
-
201
-
202
-
203
-
204
-
205
-
206
-
207
-
208
-
209
-
210
-
211
-
212
-
213
-
214
-
215
-
216
-
217
-
218
-
219
-
220
-
221
-
222
-
223
-
224
-
225
-
226
-
227
-
228
-
229
-
230
-
231
-
232
-
233
-
234
-
235
-
236
-
237
-
238
-
239
-
240
-
241
-
242
-
243
-
244
-
245
-
246
-
247
-
248
-
249
-
250
-
251
-
252
-
253
-
254
-
255
-
256
-
257
-
258
-
259
-
260
-
261
-
262
-
263
-
264
-
265
-
266
-
267
-
268
-
269
-
270
-
271
-
272
-
273
-
274
-
275
-
276
-
277
-
278
-
279
-
280
-
281
-
282
-
283
-
284
-
285
-
286
-
287
-
288
-
289
-
290
-
291
-
292
-
293
-
294
-
295
-
296
-
297
-
298
-
299
-
300
-
301
-
302
-
303
-
304
-
305
-
306
-
307
-
308
-
309
-
310
-
311
-
312
-
313
-
314
-
315
-
316
-
317
-
318
-
319
-
320
-
321
-
322
-
323
-
324
-
325
-
326
-
327
-
328
-
329
-
330
-
331
-
332
-
333
-
334
-
335
-
336
-
337
-
338
-
339
-
340
-
341
-
342
-
343
-
344
-
345
 |
 |