Magnavox MDR868H Owners Manual - Page 12
Remote Control, Title, Replay, Audio, Display, Clear, Hdd/ext.hdd, Source, Pause Tv, Schedule Rec.
 |
View all Magnavox MDR868H manuals
Add to My Manuals
Save this manual to your list of manuals |
Page 12 highlights
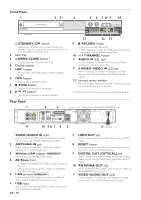
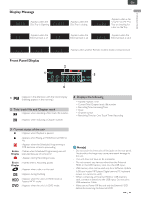
Remote Control 1 13* 14 2 15 3 16 4 5 6 7 17 18 19 20* 21 8 22 9 23 24 10 25 11 26 27 12 *( ) The unit can also be turned on by pressing these Buttons. 1 (Power-ON) button • Press to turn On the unit or to turn the unit into Standby mode. (To completely shut down the unit, you must unplug the AC power cord) 2 TITLE button • Press to Display the HDD/EXT HDD Title List. • Press to Display the DVD Disc Menu. Select "Top Menu" or "Menu". 3 K / L / 0 / 1 (Cursor) buttons • Press to Select items or settings. REPLAY (0 ) button SKIP ( 1) button • During Playback, press to Skip or rewind for a certain amount of Time as long as they are pressed. 4 BACK button • Press to return to the previously Displayed Menu or screen. 5 AUDIO button • Press to Switch to the Audio Language for TV. • Press to Display the Audio Menu during Playback. 6 DISPLAY button • Press to turn the Display Menu on or off. 7 E (Reverse) button • During Playback, press to Fast Reverse the Playback. EN - 12 8 H (Previous) button • During Playback, press H to return to the beginning of the current Chapter and then press H as needed to go back to previous Chapter(s). 9 C (Stop) button • Press to Stop Playback or Recording. 10 Number buttons • Press to Select Channel Numbers. • Press to enter the Numbers and the Letters. (Dot) button • Press the dot and minor number buttons to Select the minor part of the Digital Channel selection using number and dot buttons [e.g. 6 → . → 1 = Ch 6.1]. 11 CLEAR button • Press to Clear the information once entered. 12 HDD/EXT.HDD button • Press to Select the HDD mode or External HDD mode. 13 A (Open/Close) button * • Press to Open or Close the Disc Tray. 14 HOME button • Press to Display the Home Menu. 15 MENU button • Press to Display the Sub Menu. 16 OK button • Press to confirm or determine the Selected item in the Menu. 17 EXIT button • Press to Exit from the various Screen or Windows. 18 INFO button • Press to Display Information about the Current Program. 19 SOURCE button • Press to Select the TV or appropriate Input. 20 B (Play) button * • Press to Start Playback or Resume Playback. 21 D (Fast Forward) button • During Playback, press to Fast Forward the Playback. 22 G (Next) button • During Playback, press to Skip to the Next Chapter. 23 F (Pause) PAUSE TV button • Press to Pause Playback or Recording. • During watching Live TV, press to Start Recording, then press again to Play from the beginning of Recording. 24 CH +/− buttons • Press to change the Channel Up or Down. • Press to move Pages Up or Down. 25 SCHEDULE REC. button • Press to Display the Scheduled Programming List. 26 REC button • Press once to Start Recording. • Press repeatedly to Start the OTR (One-Touch Timer Recording) and set the Recording Time. 27 DVD button • Press to Select the DVD mode.
-
 1
1 -
2
-
3
-
4
-
5
-
6
-
 7
7 -
 8
8 -
 9
9 -
 10
10 -
 11
11 -
 12
12 -
 13
13 -
 14
14 -
 15
15 -
 16
16 -
 17
17 -
18
-
19
-
20
-
21
-
22
-
23
-
24
-
25
-
26
-
27
-
28
-
29
-
30
-
31
-
32
-
33
-
34
-
35
-
36
-
37
-
38
-
39
-
40
-
41
-
42
-
43
-
44
-
45
-
46
-
47
-
48
-
49
-
50
-
51
-
52
-
53
-
54
-
55
-
56
-
57
-
58
-
59
-
60
-
61
-
62
-
63
-
64
-
65
-
66
-
67
-
68
-
69
-
70
-
71
-
72
-
73
-
74
-
75
-
76
-
77
-
78
-
79
-
80
-
81
-
82
-
83
 |
 |
