Magnavox MDR868H Owners Manual - Page 32
Hints for Scheduled Recording, EN - 32
 |
View all Magnavox MDR868H manuals
Add to My Manuals
Save this manual to your list of manuals |
Page 32 highlights
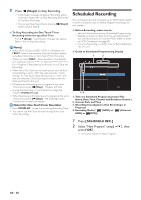
To Stop the Scheduled Recording in Progress 1. Press [ C (Stop) ] on the Remote Control. 2. Confirmation message will appear. Select "Yes", then press [ OK ]. Checking, Deleting or Correcting the Scheduled Programming information 1. Press [ SCHEDULE REC. ]. 2. Check the information. Skip the Scheduled Recording Period You can deactivate the Scheduled Recording period (Daily,TUESAT, MON-SAT, MON-FRI or Weekly) temporarily. 1. Press [ SCHEDULE REC. ]. 2. Select the periodical Scheduled Recording Program you wish to Skip using [ K/ L ], then press [ MENU ]. 3. Select "Skip" using [ K/ L ], then press [ OK ] to Activate the Setting. • "Skip" will appear on the left side of the Scheduled Program, if "Skip" is Activated. • The setting will go back to Off after the Program is Skipped once. If the Scheduled Program Did Not Complete Correctly, appears in the Scheduled Programming List. 3. A: To Delete a Scheduled Program: 1 Use [ K/ L ] to Select the Program you wish to Delete, then press [ CLEAR ]. • Confirmation message will appear. 2 Use [ K/ L ] to Select "Yes", then press [ OK ]. 3. B: To Delete Multiple Scheduled Programs: 1 Press [ MENU ] to move to Sub Menu then Select "Delete Multiprogram(s)" using [ K/ L ], then press [ OK ]. 2 Select the Program you wish to Delete using [ K/ L ], then press [ OK ]. • Check Icon will appear for the Scheduled Program Selected for Deletion. 3 Repeat step 2 until you Select all the Programs you wish to Delete. • To remove the Check Icon for Deletion, move the cursor to the Selected Program and press [ OK ]. 4 Press [ 1 (Cursor)] to Select [ OK ] on the screen, then press [ OK ]. • Confirmation message will appear. 5 Select "Yes" using [ K/ L ], then press .[ OK ] 3. C: To Correct the Scheduled Program: 1 Select the Program you wish to correct using [ K/ L ], then press [ MENU ]. 2 Select "Program Change" using [ K/ L ], then press [ OK ]. 3 Correct the Scheduled Program Information using [ K/ L/ 0 / 1 ], then press [ OK ]. Note(s) • With the Scheduled Recording in progress (which is shown in red in the Scheduled Program List), you can only Edit the End Time. • A Program that did not complete correctly is grayed in the Scheduled Programming List. • To check the Scheduled Programming error message, Select the Program that did not complete correctly and press [ OK ]. Hints for Scheduled Recording • If there is a Power failure or this unit has been unplugged the Clock Setting will be lost. The Scheduled Programming(s) will be kept. (If Manual Clock has been Selected then you must set the Clock in order for the saved Scheduled Recordings to be made.) • When Recording to an External HDD, if the External HDD is unregistered, the unit will perform Alternate Recording to the HDD (refer to page 31). • When Recording to a DVD, if an unrecordable disc is inserted into this unit, the unit will perform an Alternate Recording to the HDD (refer to page 31). • When the Programmed Starting and Ending Time are earlier than the current Time, the setting will not be accepted and the Date field will be highlighted. • If the Starting Time is earlier and the Ending Time is later than the current Time, the Recording will Start right after you press [ OK ] at step 9 on page 31. • It is prohibited to change the Channel from 2 minutes before the Programmed Starting Time.[MDR865H only] • [ REC ] does not work from 2 minutes before the Programmed Starting Time. If it comes to 2 minutes before the Starting Time during basic or One-Touch Timer Recording, the Recording in progress will be Stopped. EN - 32
-
 1
1 -
2
-
3
-
4
-
5
-
6
-
7
-
8
-
9
-
10
-
11
-
12
-
13
-
14
-
15
-
16
-
17
-
18
-
19
-
20
-
21
-
22
-
23
-
24
-
25
-
26
-
 27
27 -
 28
28 -
 29
29 -
 30
30 -
 31
31 -
 32
32 -
 33
33 -
 34
34 -
 35
35 -
 36
36 -
 37
37 -
38
-
39
-
40
-
41
-
42
-
43
-
44
-
45
-
46
-
47
-
48
-
49
-
50
-
51
-
52
-
53
-
54
-
55
-
56
-
57
-
58
-
59
-
60
-
61
-
62
-
63
-
64
-
65
-
66
-
67
-
68
-
69
-
70
-
71
-
72
-
73
-
74
-
75
-
76
-
77
-
78
-
79
-
80
-
81
-
82
-
83
 |
 |
