Magnavox MDR868H Owners Manual - Page 24
EN - 24
 |
View all Magnavox MDR868H manuals
Add to My Manuals
Save this manual to your list of manuals |
Page 24 highlights
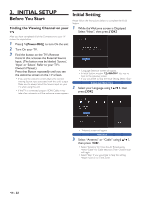
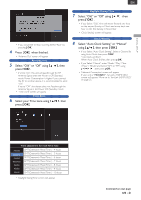
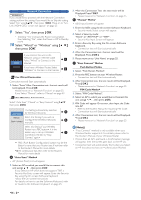
Network Connection MDR868/867H If you would like to proceed with the Network Connection setting, perform this setting. If you would like to Skip this setting, Select "No" using [ K/ L ], then press [ OK ]. Move on to ''funLink (HDMI CEC)' screen will appear.' on page 25. 9 Select "Yes", then press [ OK ]. • Selecting "Yes" increases the Power Consumption than Selecting "No", when the Power is Off in Standby 10 mode. Select "Wired" or "Wireless" using [ K/ L ], then press [ OK ]. If you connect this unit to the Network using an Ethernet Cable, Select "Wired" to Connect to the A Wired Internet. Wireless If you have a Wireless Router, Select "Wireless" to Connect to the Internet. B A For Wired Connection Connection test will Start automatically. 1. Select "Auto".After Connection test, the test result will be Displayed. Press [ OK ]. • Please move on to 'Network Function' on page 25. • If you Select "Manual", refer to 'Manual' on page 43. B For Wireless Connection Select "Auto Scan","Manual" or "Easy Connect" using [ K/ L ], then press [ OK ]. This Setting automatically searches Auto Scan for Wireless Networks. a Manual Select this Setting if you wish to Configure the Wireless Networks Easy Connect manually. b Select this Setting if your Wireless Router has a PBC button*1. It is the easiest way to set up a Wireless c Connection. If it fails, try "Easy Connect" again.*2 *1 PBC (Push Button Configuration) button may be the Button's name that your Router uses. If not then refer to the Router's Manual for more details. *2 If it continuously fails, then refer to the Router's Manual for more details. a "Auto Scan" Method • AP (Access Point) List will appear. 1. Select an AP to which you would like to connect this unit using [ K/ L ], then press [ OK ]. • If you Select an AP which does not support TKIP, a Security Key Entry screen will appear. Enter the Security Key using the On-screen Software Keyboard. • Follow the On-screen Instructions. • For details on how to use the Software Keyboard, refer to 'Guide to the Software Keyboard' on page 25. 2. After the Connection Test, the test result will be Displayed.Press [ OK ]. • Please move on to 'Network Function' on page 25. b "Manual" Method • SSID Input Screen will appear. 1. Enter the SSID using the On-screen Software Keyboard. • Security mode Select screen will appear. 2. Select a Security mode : "None" or "AES+TKIP" or "WEP" . • Security Key Input Screen will appear. 3. Enter a Security Key using the On-screen Software Keyboard. • Connection test will Start automatically. 4. After the Connection test, the test result will be Displayed. Press [ OK ]. 5. Please move on to 'Unit Name' on page 25. c "Easy Connect" Method Push Button Method 1. Select "Push Button Method". 2. Press the PBC button on your Wireless Router. • Connection test will Start automatically. 3. After Connection test, the test result will be Displayed. Press [ OK ]. • Please move on to 'Network Function' on page 25. PIN Code Method 1. Select "PIN Code Method". 2. Select an AP to which you would like to Connect this unit using [ K/ L ], then press [ OK ]. 3. PIN Code will appear On-screen, then Input the Code into AP. • Refer to the Router's Manual for Inputting PIN Code. • Connection test will Start automatically. 4. After Connection test, the test result will be Displayed. Press [ OK ]. • Please move on to 'Network Function' on page 25. Note(s) • "Easy Connect" method is only available when your Wireless Router supports it. For details, please refer to the Owner's Manual of your Wireless Router. • If more than 64 AP's are found, a Confirmation message will appear, then the Screen goes back to the AP List. • Connection test will automatically Start when you Select an AP that does not have an Authentication Method. EN - 24
-
 1
1 -
2
-
3
-
4
-
5
-
6
-
7
-
8
-
9
-
10
-
11
-
12
-
13
-
14
-
15
-
16
-
17
-
18
-
 19
19 -
 20
20 -
 21
21 -
 22
22 -
 23
23 -
 24
24 -
 25
25 -
 26
26 -
 27
27 -
 28
28 -
 29
29 -
30
-
31
-
32
-
33
-
34
-
35
-
36
-
37
-
38
-
39
-
40
-
41
-
42
-
43
-
44
-
45
-
46
-
47
-
48
-
49
-
50
-
51
-
52
-
53
-
54
-
55
-
56
-
57
-
58
-
59
-
60
-
61
-
62
-
63
-
64
-
65
-
66
-
67
-
68
-
69
-
70
-
71
-
72
-
73
-
74
-
75
-
76
-
77
-
78
-
79
-
80
-
81
-
82
-
83
 |
 |