Magnavox MDR868H Owners Manual - Page 23
EN - 23, Press, when finished., Select Old or Off using, Select your Time zone using
 |
View all Magnavox MDR868H manuals
Add to My Manuals
Save this manual to your list of manuals |
Page 23 highlights
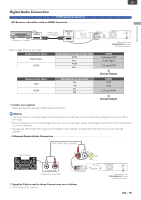
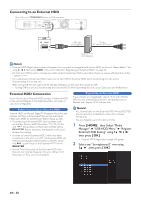
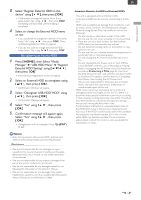
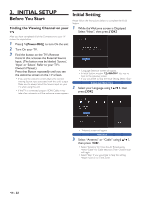
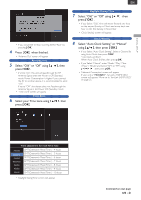
INITIAL SETUP EN • If you would like to Stop scanning, Select "Back" by pressing [ OK ]. 4 Press [ OK ] when finished. • 'Antenna Out' screen will appear. Antenna Out 5 Select "Old" or "Off" using [ K/ L ], then press [ OK ]. • If set to "On", this unit will passthrough the RF Antenna Signal when the Power is Off (Standby) mode. Power Consumption is higher. If you connect the RF to another device, it is recommended to set it "On". If set to "Off ", this device does not Passthrough the Antenna Signal in the Power Off (Standby) mode • 'Time Zone' screen will appear. Time Zone 6 Select your Time zone using [ K/ L ], then press [ OK ]. Daylight Saving Time 7 Select "Old" or "Off" using [ K/ L ], then press [ OK ] . • If you Select "Old", time will move forward one hour on the second Sunday in March and move back one hour on the first Sunday in November. • 'Clock Setting' screen will appear. Clock Setting 8 Select "Auto Clock Setting" or "Manual" using [ K/ L ], then press [ OK ] • If you Select "Auto Clock Setting", Select a Channel for using Auto Clock, then press [ OK ]. Auto Clock will Start. When Auto Clock finishes, then press [ OK ]. • If you Select "Manual", enter 'Month' / 'Day' / 'Year' / 'Hour' / 'Minute' and Select "AM" or "PM" using [ K/ L/ 0 / 1 ], then press [ OK ]. • 'Network Connection' screen will appear. If your unit is "MDR865H", 'fun-Link (HDMI CEC)' screen will appear. Move on to 'fun-Link (HDMI CEC)' on page 25. Time adjustment for each Time zone Atlantic Eastern Central Mountain Pacific Alaska Hawaii GMT(Greenwich Mean Time ) - 4 hours GMT(Greenwich Mean Time ) - 5 hours GMT(Greenwich Mean Time ) - 6 hours GMT(Greenwich Mean Time ) - 7 hours GMT(Greenwich Mean Time ) - 8 hours GMT(Greenwich Mean Time ) - 9 hours GMT(Greenwich Mean Time ) - 10 hours • 'Daylight Saving Time' screen will appear. Continued on next page. EN - 23
-
 1
1 -
2
-
3
-
4
-
5
-
6
-
7
-
8
-
9
-
10
-
11
-
12
-
13
-
14
-
15
-
16
-
17
-
 18
18 -
 19
19 -
 20
20 -
 21
21 -
 22
22 -
 23
23 -
 24
24 -
 25
25 -
 26
26 -
 27
27 -
 28
28 -
29
-
30
-
31
-
32
-
33
-
34
-
35
-
36
-
37
-
38
-
39
-
40
-
41
-
42
-
43
-
44
-
45
-
46
-
47
-
48
-
49
-
50
-
51
-
52
-
53
-
54
-
55
-
56
-
57
-
58
-
59
-
60
-
61
-
62
-
63
-
64
-
65
-
66
-
67
-
68
-
69
-
70
-
71
-
72
-
73
-
74
-
75
-
76
-
77
-
78
-
79
-
80
-
81
-
82
-
83
 |
 |
