Magnavox MDR868H Owners Manual - Page 55
Hdmi, En - 55
 |
View all Magnavox MDR868H manuals
Add to My Manuals
Save this manual to your list of manuals |
Page 55 highlights
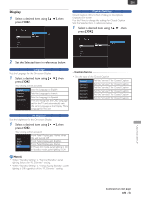
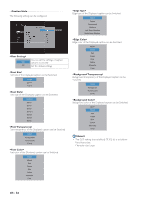
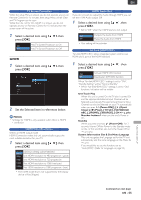
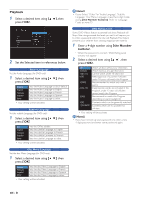
EN TV Screen Protection While the setup Menu is shown, you do not operate any key on Remote Control for 15 minutes, then setup Menu will be Clear and TV Program can be seen. While the Title List for CD-DA/JPEG is shown, you do not operate any key on Remote Control for 15 minutes, then the screen saver will be active. 1 Select a desired item using [ K/ L ], then press [ OK ]. Old Sets TV Screen Protection to On. Off Sets TV Screen Protection to Off. HDMI 1 Select a desired item using [ K/ L ], then press [ OK ]. 2 Set the Selected item in references below. Note(s) • Settings for HDMI is only available when there is HDMI Connection. HDMI Video Resolution Selects an HDMI output mode. HDMI Connection makes this unit automatically output the most suitable resolution for your TV. 1 Select a desired item using [ K/ L ], then press [ OK ]. Optimum setting will be Selected. Auto 480p Sets HDMI resolution to 480 progressive. (good) 720p Sets HDMI resolution to 720 progressive. 1080i Sets HDMI resolution to 1080 interlaced. 1080p Sets HDMI resolution to 1080 progressive. (best) • The HDMI mode that is not supported by the Display device will be Skipped. HDMI Audio Out If you do not wish to output the Audio through HDMI, you can set the HDMI Audio output Off. 1 Select a desired item using [ K/ L ], then press [ OK ]. • Set to "Off " when the HDMI Sound is not output. Old Outputs the Audio from HDMI. Off Mutes the Audio from HDMI. • Your setting will be activated. fun-Link (HDMI CEC) "fun-link(HDMI CEC)" allows integrated system control over HDMI and is part of the HDMI standard. 1 Select a desired item using [ K/ L ], then press [ OK ]. Old Activate HDMI CEC function. Off Deactivate HDMI CEC function. When "fun-link(HDMI CEC)" settings is set to "Old", "Standby Setting" will be "Normal Standby". • When "fun-link(HDMI CEC)" settings is set to "Old", functions List below will be avilable. One Touch Play When this unit is turned On, the TV also is turned On and the appropriate External Input Channel will be Selected automatically.The appropriate External Input Channel can also be Selected on your TV automatically, when you press [Q (Power-ON) ], [ A (Open/ Close) ], [ B (Play) ], [ TITLE ], [ SCHEDULE REC.], [ HOME ], [ SOURCE ], [ CH +/− ], [ the Number buttons ] when you the unit's Power is On. Standby When you press and hold [Q (Power-ON) ] for 2 seconds, it turns Off the Power to the Standby mode on the TV first and then also turns the Power Off on this unit also. System Information Get & Set Menu Language This unit recognizes the Language set for the TV and automatically sets the same Language on the Menu for this unit. If you would like to use this function, set to "Auto(XXX)" (Refer to 'Language' on page 53). FUNCTION SETUP Continued on next page. EN - 55
-
 1
1 -
2
-
3
-
4
-
5
-
6
-
7
-
8
-
9
-
10
-
11
-
12
-
13
-
14
-
15
-
16
-
17
-
18
-
19
-
20
-
21
-
22
-
23
-
24
-
25
-
26
-
27
-
28
-
29
-
30
-
31
-
32
-
33
-
34
-
35
-
36
-
37
-
38
-
39
-
40
-
41
-
42
-
43
-
44
-
45
-
46
-
47
-
48
-
49
-
 50
50 -
 51
51 -
 52
52 -
 53
53 -
 54
54 -
 55
55 -
 56
56 -
 57
57 -
 58
58 -
 59
59 -
 60
60 -
61
-
62
-
63
-
64
-
65
-
66
-
67
-
68
-
69
-
70
-
71
-
72
-
73
-
74
-
75
-
76
-
77
-
78
-
79
-
80
-
81
-
82
-
83
 |
 |
