Magnavox MDR868H Owners Manual - Page 59
Minute' and Select AM or PM using, Select Old using
 |
View all Magnavox MDR868H manuals
Add to My Manuals
Save this manual to your list of manuals |
Page 59 highlights
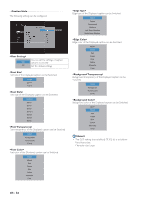
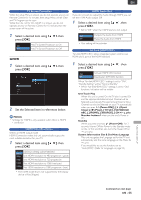
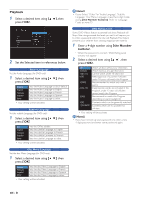
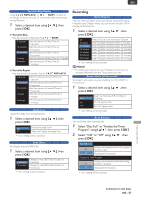
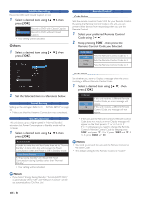
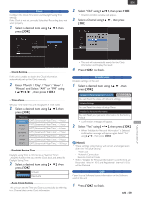
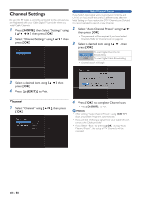
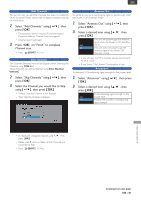
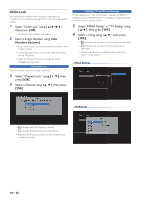
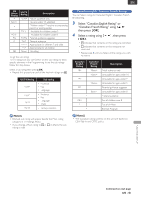
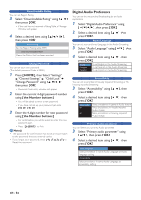
Clock Configure the Clock,Time zone and Daylight Saving Time settings. If the Clock is not set correctly, Scheduled Recording does not work properly. 1 Select a desired item using [ K/ L ], then press [ OK ]. EN 2 Select "Old" using [K/L], then press [OK]. • Channel selection window will appear. 3 Select a Channel using [K/L], then press [ OK ]. FUNCTION SETUP Clock Setting If this unit is unable to obtain the Clock information automatically, set up the Clock manually. 2 Enter 'Month' / 'Day' / 'Year' / 'Hour' / 'Minute' and Select "AM" or "PM" using [ K/ L/ 0 / 1 ], then press [ OK ]. Time Zone Set your Time zone.This unit recognaizes 7 Time zones. 2 Select a desired item using [ K/ L ], then press [ OK ]. Time Zone Atlantic Eastern Central Mountain GMT(Greenwich Mean Time ) - 4 hours GMT(Greenwich Mean Time ) - 5 hours GMT(Greenwich Mean Time ) - 6 hours GMT(Greenwich Mean Time ) - 7 hours Pacific GMT(Greenwich Mean Time ) - 8 hours Alaska GMT(Greenwich Mean Time ) - 9 hours Hawaii GMT(Greenwich Mean Time ) - 10 hours Daylight Saving Time Daylight saving Time is referred to as "Summer Time". Using this function lets you set the Clock back and ahead for Daylight Saving Time. 2 Select a desired item using [ K/ L ], then press [ OK ]. Old Activate. Off Deactivate. Auto Clock Setting This unit can set the Time and Date automatically by referring to a Channel that carries Clock information. • This unit will automatically search for the Clock information and Display the result. 4 Press [ OK ] to finish. Initialization Initializes settings on the unit. 1 Select a desired item using [ K/ L ], then press [ OK ]. Initialize for Network Setting MDR868/867H You can Reset the status of Network settings. Initialize SettingT You can Reset the status of setup Menu. Initialize for Personal Information You can Reset your personal information to the factory default. • Confirmation message will appear. 2 Select "Yes" using [ K/ L ], then press [ OK ]. • When "Initialize for Personal Information" is Selected, confirmation message will appear again. Select "Yes" using [ K/ L ], then press [ OK ]. Note(s) • These settings Listed below will remain unchanged even after the "Initialize Setting". - Child Lock - Network Connection - Remote Control Code • When "Initialize for Personal Information" is performed, all Recorded Titles in HDD and Registered External HDDs will be Deleted. OSS Open Source Software license information on the Software used in this unit. 1 Press [ OK ] to finish. EN - 59
-
 1
1 -
2
-
3
-
4
-
5
-
6
-
7
-
8
-
9
-
10
-
11
-
12
-
13
-
14
-
15
-
16
-
17
-
18
-
19
-
20
-
21
-
22
-
23
-
24
-
25
-
26
-
27
-
28
-
29
-
30
-
31
-
32
-
33
-
34
-
35
-
36
-
37
-
38
-
39
-
40
-
41
-
42
-
43
-
44
-
45
-
46
-
47
-
48
-
49
-
50
-
51
-
52
-
53
-
 54
54 -
 55
55 -
 56
56 -
 57
57 -
 58
58 -
 59
59 -
 60
60 -
 61
61 -
 62
62 -
 63
63 -
 64
64 -
65
-
66
-
67
-
68
-
69
-
70
-
71
-
72
-
73
-
74
-
75
-
76
-
77
-
78
-
79
-
80
-
81
-
82
-
83
 |
 |
