Magnavox MDR868H Owners Manual - Page 22
INITIAL SETUP, Before You Start, Finding the Viewing Channel on yourTV - review
 |
View all Magnavox MDR868H manuals
Add to My Manuals
Save this manual to your list of manuals |
Page 22 highlights
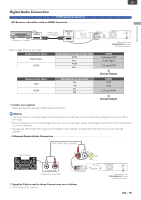
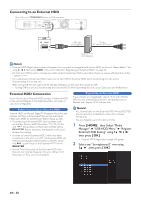
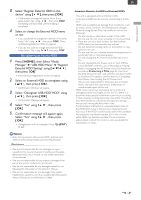
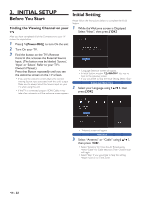
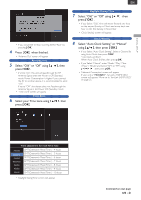
3. INITIAL SETUP Before You Start Finding the Viewing Channel on your TV After you have completed all of the Connections to your TV, review the steps below. 1 Press [Q (Power-ON) ] to turn On the unit. 2 Turn On your TV. 3 Find the button on the TV's Remote Control that accesses the External Source Input. (The button may be labeled 'Source', 'Input' or 'Select'. Refer to your TV's Owner's Manual.) Press that Button repeatedly until you see the welcome screen on the TV screen. • If you see the welcome screen, that is the correct viewing Source input associated with this unit's output. Make sure to always Select this Source input on your TV when using this unit. • If the TV is connected using an HDMI Cable, it may take a few moments until the welcome screen appears. Initial Setting Please follow the Instructions below to complete the Initial Setting. 1 While the Welcome screen is Displayed, Select "Next", then press [ OK ]. • 'Language Selection' screen will appear. • In Initial Setting, pressing [ (BACK) ] lets you go back to the previous screen. • If you would like to Skip the Initial Setting, Select "Skip". Language Selection 2 Select your Language using [ K/ L ], then press [ OK ]. EN - 22 • 'Antenna' screen will appear. Antenna 3 Select "Antenna" or "Cable" using [ K/ L ], then press [ OK ]. • Select "Antenna" for Over-the-Air Broadcasting. Select "Cable" for Cable television.Then, Channel scan will begin. • Select "Skip" if you would like to Skip this setting. Please move on to 'Time Zone'.
-
 1
1 -
2
-
3
-
4
-
5
-
6
-
7
-
8
-
9
-
10
-
11
-
12
-
13
-
14
-
15
-
16
-
 17
17 -
 18
18 -
 19
19 -
 20
20 -
 21
21 -
 22
22 -
 23
23 -
 24
24 -
 25
25 -
 26
26 -
 27
27 -
28
-
29
-
30
-
31
-
32
-
33
-
34
-
35
-
36
-
37
-
38
-
39
-
40
-
41
-
42
-
43
-
44
-
45
-
46
-
47
-
48
-
49
-
50
-
51
-
52
-
53
-
54
-
55
-
56
-
57
-
58
-
59
-
60
-
61
-
62
-
63
-
64
-
65
-
66
-
67
-
68
-
69
-
70
-
71
-
72
-
73
-
74
-
75
-
76
-
77
-
78
-
79
-
80
-
81
-
82
-
83
 |
 |
