Magnavox MDR868H Owners Manual - Page 45
Enter an SSID using the Software Keyboard., Enter the Security Key using the Software
 |
View all Magnavox MDR868H manuals
Add to My Manuals
Save this manual to your list of manuals |
Page 45 highlights
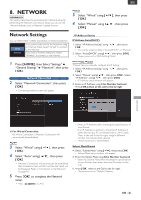
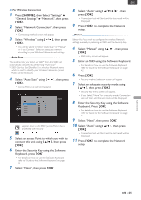
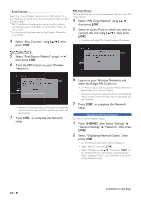
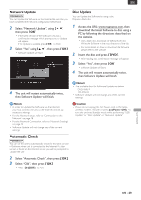
EN ■ For Wireless Connection 1 Press [ HOME ], then Select "Settings" "General Settings" "Network", then press [ OK ]. 2 Select "Network Connection", then press [ OK ]. • Connecting method screen will appear. 3 Select "Wireless" using [ K/ L ], then press [ OK ]. • You will be asked to Select "Auto Scan" or "Manual", or "Easy Connect". Select an adequate method according to your Wireless Networks and settings. Auto Scan This method lets you Select an SSID* from the SSID List automatically obtained by performing "Auto Scan". * SSID (Service Set IDentifier) is a wireless Network name which is used to identify your Wireless Networks (access Point) on the Network. 4 Select "Auto Scan" using [ K/ L ], then press [ OK ]. • Access Points List will be Displayed. appears next to the SSID (access Point) that is protected with security. 5 Select an access Point to which you wish to connect this unit using [ K/ L ], then press [ OK ]. 6 Enter the Security Key using the Software Keyboard. press [ OK ]. • For details on how to use the Software Keyboard, refer to 'Guide to the Software Keyboard' on page 42 7 Select "Next", then press [ OK ]. 8 Select "Auto" using [ K/ L/ 0 / 1 ], then press [ OK ]. • Connection test will Start and the test result will be Displayed. 9 Press [ OK ] to complete the Network setup. Manual Select this if you wish to configure the wireless Network settings manually by entering an SSID and the Security Key. 4 Select "Manual" using [ K/ L ], then press [ OK ]. • SSID entry screen will appear. 5 Enter an SSID using the Software Keyboard. • For details on how to use the Software Keyboard, refer to 'Guide to the Software Keyboard' on page 42. 6 Press [ OK ]. • Security method selection screen will appear. 7 Select an adequate security mode using [ K/ L ], then press [ OK ]. • Security Key entry screen will appear. • If you Select "None" for a security mode, Connection test will Start and the test result will be Displayed. 8 Enter the Security Key using the Software Keyboard. Press [ OK ]. • For details on how to use the Software Keyboard, refer to 'Guide to the Software Keyboard' on page 42. 9 Select "Next", then press [ OK ]. 10 Select "Auto" using [ K/ L ], then press [ OK ]. • Connection test will Start and the test result will be Displayed. 11 Press [ OK ] to complete the Network setup. NETWORK EN - 45
-
 1
1 -
2
-
3
-
4
-
5
-
6
-
7
-
8
-
9
-
10
-
11
-
12
-
13
-
14
-
15
-
16
-
17
-
18
-
19
-
20
-
21
-
22
-
23
-
24
-
25
-
26
-
27
-
28
-
29
-
30
-
31
-
32
-
33
-
34
-
35
-
36
-
37
-
38
-
39
-
 40
40 -
 41
41 -
 42
42 -
 43
43 -
 44
44 -
 45
45 -
 46
46 -
 47
47 -
 48
48 -
 49
49 -
 50
50 -
51
-
52
-
53
-
54
-
55
-
56
-
57
-
58
-
59
-
60
-
61
-
62
-
63
-
64
-
65
-
66
-
67
-
68
-
69
-
70
-
71
-
72
-
73
-
74
-
75
-
76
-
77
-
78
-
79
-
80
-
81
-
82
-
83
 |
 |
