Magnavox MDR868H Owners Manual - Page 29
Before Recording, Registering an External HDD, How to Insert a Disc
 |
View all Magnavox MDR868H manuals
Add to My Manuals
Save this manual to your list of manuals |
Page 29 highlights
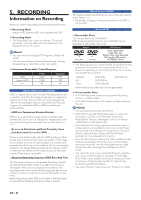
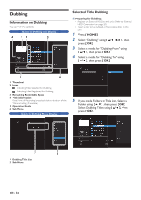
RECORDING EN Before Recording Registering an External HDD If you would like to make a Recording to an External HDD, you need to Register the External HDD with this unit beforehand. (Refer to 'External HDD Connection' on page 20.) How to Insert a Disc 1 Press [ A (Open/Close) ] to Open the Disc Tray. 2 Replace the disc on the Disc Tray with its labal side facing up. Align the disc to the disc tray guide. 3 Press [ A (Open/Close) ] to Close the Disc Tray. • It may take a while to load the disc Data after the Disc Tray Closes. To eject the disc: • Press [ A (Open/Close) ] to Open the Disc Tray, then remove the disc. Note(s) • When inserting a brand-new DVD-RW disc, confirmation window will appear. If you Select "Yes" twice, the unit will Start to Initialize the disc. DVD-RW disc will be formatted Video mode. Basic Recording & One-Touch Timer Recording Follow the steps below to Record a TV Program. Note(s) • When Playback of a Recorded Program is blocked by the Child Lock, a message appears on the TV screen. In such Cases, check the Child Lock (V-Chip) Setting. (Please refer to page 62 for more details.) 1 Select a Media to Record . - If you would like to make a Recording to on HDD, press [ HDD/EXT.HDD ] repeatedly to set in HDD mode. - If you would like to make a Recording to an External HDD, Then, press [ HDD/EXT.HDD ] repeatedly to set the External HDD mode. - If you would like to make a Recording to a DVD, you need to insert a Recordable disc. Then, press [ DVD ] to set the DVD mode. 2 Select a Channel to Record using [ CH +/− ], or [ the Number buttons ]. - If you would like to make a Recording from an External Input Source, press [ SOURCE ] repeatedly to Select the desired Input Source. 3 Press [ MENU ], then Select "Rec Mode" using [ K/ L ], then press [ OK ]. Then Select a Recording mode using [ K/ L ], then press [ OK ]. Refer to 'Rec Mode' on page 27. 4 Press [ REC ] to Start the Recording. " " will be Displayed for 2 seconds. Press [ F (Pause) ] to Pause Recording. Press [ F (Pause) ] again to Restart Recording. To Set One-Touch Timer Recording (OTR) This is a simple way to set the Recording Time in blocks of 15 minutes. Press [ REC ] repeatedly until the desired Recording Time (15 minutes to 4 hours) appears on the TV screen. One-Touch Timer Recording will Start. 0:15 0:15 (normal Recording) 0:30 4:00 3:45 ■ To change the Recording Length during the One-Touch Timer Recording: Press [ REC ] repeatedly until the desired length appears. Continued on next page. EN - 29
-
 1
1 -
2
-
3
-
4
-
5
-
6
-
7
-
8
-
9
-
10
-
11
-
12
-
13
-
14
-
15
-
16
-
17
-
18
-
19
-
20
-
21
-
22
-
23
-
 24
24 -
 25
25 -
 26
26 -
 27
27 -
 28
28 -
 29
29 -
 30
30 -
 31
31 -
 32
32 -
 33
33 -
 34
34 -
35
-
36
-
37
-
38
-
39
-
40
-
41
-
42
-
43
-
44
-
45
-
46
-
47
-
48
-
49
-
50
-
51
-
52
-
53
-
54
-
55
-
56
-
57
-
58
-
59
-
60
-
61
-
62
-
63
-
64
-
65
-
66
-
67
-
68
-
69
-
70
-
71
-
72
-
73
-
74
-
75
-
76
-
77
-
78
-
79
-
80
-
81
-
82
-
83
 |
 |
