Motorola MOTORAZR V9m Sprint User Guide - Page 110
Assigning a Ringer or Picture to an Entry, Assigning an Email Address or Web Address, Assign Picture
 |
View all Motorola MOTORAZR V9m manuals
Add to My Manuals
Save this manual to your list of manuals |
Page 110 highlights
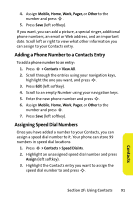
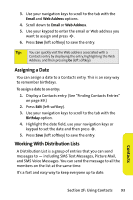
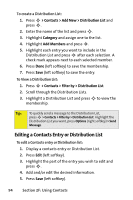
Note: If you attempt to assign an already in-use speed dial number to a new phone number, a dialog appears asking if you wish to replace the existing speed dial number. Press OK (left softkey) to assign the location to the new phone number and move the old number to the next available speed dial number. Assigning a Ringer or Picture to an Entry You can assign a ringer to a Contacts entry so you can identify the caller by the ring. (See "Ringer Types" on page 47.) When you assign a picture to an entry, your phone displays it whenever you receive calls from that number. To assign a ringer or picture to an entry: 1. Display a Contacts entry. (See "Finding Contacts Entries" on page 89.) 2. Press Edit (left softkey). 3. Use your navigation keys to scroll to the tab with the Assign Picture and Assign Ringer options. 4. Scroll down to Assign Picture or Assign Ringer and press S. 5. Select a source for the assigned file (for example, In Phone, Assigned Media, or Take New Picture). 6. Use your navigation keys to scroll through the available files. To hear a ringer, press Listen (left softkey). 7. Highlight your desired picture or ringer and press S. 8. Press Save (left softkey) to save the entry. Assigning an Email Address or Web Address To assign an email address or Web address to an entry: 1. Display a Contacts entry. (See "Finding Contacts Entries" on page 89.) 2. Press Edit (left softkey). 92 Section 2F: Using Contacts
-
 1
1 -
2
-
3
-
4
-
5
-
6
-
7
-
8
-
9
-
10
-
11
-
12
-
13
-
14
-
15
-
16
-
17
-
18
-
19
-
20
-
21
-
22
-
23
-
24
-
25
-
26
-
27
-
28
-
29
-
30
-
31
-
32
-
33
-
34
-
35
-
36
-
37
-
38
-
39
-
40
-
41
-
42
-
43
-
44
-
45
-
46
-
47
-
48
-
49
-
50
-
51
-
52
-
53
-
54
-
55
-
56
-
57
-
58
-
59
-
60
-
61
-
62
-
63
-
64
-
65
-
66
-
67
-
68
-
69
-
70
-
71
-
72
-
73
-
74
-
75
-
76
-
77
-
78
-
79
-
80
-
81
-
82
-
83
-
84
-
85
-
86
-
87
-
88
-
89
-
90
-
91
-
92
-
93
-
94
-
95
-
96
-
97
-
98
-
99
-
100
-
101
-
102
-
103
-
104
-
 105
105 -
 106
106 -
 107
107 -
 108
108 -
 109
109 -
 110
110 -
 111
111 -
 112
112 -
 113
113 -
 114
114 -
 115
115 -
116
-
117
-
118
-
119
-
120
-
121
-
122
-
123
-
124
-
125
-
126
-
127
-
128
-
129
-
130
-
131
-
132
-
133
-
134
-
135
-
136
-
137
-
138
-
139
-
140
-
141
-
142
-
143
-
144
-
145
-
146
-
147
-
148
-
149
-
150
-
151
-
152
-
153
-
154
-
155
-
156
-
157
-
158
-
159
-
160
-
161
-
162
-
163
-
164
-
165
-
166
-
167
-
168
-
169
-
170
-
171
-
172
-
173
-
174
-
175
-
176
-
177
-
178
-
179
-
180
-
181
-
182
-
183
-
184
-
185
-
186
-
187
-
188
-
189
-
190
-
191
-
192
-
193
-
194
-
195
-
196
-
197
-
198
-
199
-
200
-
201
-
202
-
203
-
204
-
205
-
206
-
207
-
208
-
209
-
210
-
211
-
212
-
213
-
214
-
215
-
216
-
217
-
218
-
219
-
220
-
221
-
222
-
223
-
224
-
225
-
226
-
227
-
228
-
229
-
230
-
231
-
232
-
233
-
234
-
235
-
236
-
237
-
238
-
239
-
240
-
241
-
242
-
243
-
244
-
245
-
246
-
247
-
248
-
249
-
250
 |
 |