Motorola MOTORAZR V9m Sprint User Guide - Page 156
After Picture Options, Options, Send to Contacts, Print, Post To Service, Upload, Review/Send Media
 |
View all Motorola MOTORAZR V9m manuals
Add to My Manuals
Save this manual to your list of manuals |
Page 156 highlights
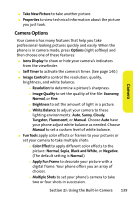
Ⅲ To take another picture, press B. Tip: To take a picture of yourself, activate the camera and then close the flip to view yourself in the external display. Then press the Camera Key on the right side of the phone to capture the picture. After Picture Options After you take picture, press Options (right softkey) to do any of the following: ⅷ Send to Contacts to transmit the picture to recipients in your Contacts. ⅷ Print to send the picture to a printing service, using Sprint Picture Mail. ⅷ Post To Service to send the picture to a variety of services, using Sprint Picture Mail. ⅷ Upload to save the picture you just took to the Sprint Picture Mail Web site (www.sprint.com/picturemail). Depending on your settings, you may be prompted to accept a data connection. Note: If this is the first time you have accessed your Sprint Picture Mail account, you will be prompted to create a password. See the Experience Sprint Power Vision guide that came with your phone for information about Picture Mail. ⅷ Review/Send Media to display your In Phone album. See "My Albums" on page 141 for more details and options. ⅷ Assign to use the picture as a screensaver, an identifier for calls with or without ID, and as a Picture ID for Contacts entries. ⅷ Add Text Caption to enter and attach a brief text note to the picture. ⅷ Delete to delete the picture you just took. 138 Section 2J: Using the Built-in Camera
-
 1
1 -
2
-
3
-
4
-
5
-
6
-
7
-
8
-
9
-
10
-
11
-
12
-
13
-
14
-
15
-
16
-
17
-
18
-
19
-
20
-
21
-
22
-
23
-
24
-
25
-
26
-
27
-
28
-
29
-
30
-
31
-
32
-
33
-
34
-
35
-
36
-
37
-
38
-
39
-
40
-
41
-
42
-
43
-
44
-
45
-
46
-
47
-
48
-
49
-
50
-
51
-
52
-
53
-
54
-
55
-
56
-
57
-
58
-
59
-
60
-
61
-
62
-
63
-
64
-
65
-
66
-
67
-
68
-
69
-
70
-
71
-
72
-
73
-
74
-
75
-
76
-
77
-
78
-
79
-
80
-
81
-
82
-
83
-
84
-
85
-
86
-
87
-
88
-
89
-
90
-
91
-
92
-
93
-
94
-
95
-
96
-
97
-
98
-
99
-
100
-
101
-
102
-
103
-
104
-
105
-
106
-
107
-
108
-
109
-
110
-
111
-
112
-
113
-
114
-
115
-
116
-
117
-
118
-
119
-
120
-
121
-
122
-
123
-
124
-
125
-
126
-
127
-
128
-
129
-
130
-
131
-
132
-
133
-
134
-
135
-
136
-
137
-
138
-
139
-
140
-
141
-
142
-
143
-
144
-
145
-
146
-
147
-
148
-
149
-
150
-
 151
151 -
 152
152 -
 153
153 -
 154
154 -
 155
155 -
 156
156 -
 157
157 -
 158
158 -
 159
159 -
 160
160 -
 161
161 -
162
-
163
-
164
-
165
-
166
-
167
-
168
-
169
-
170
-
171
-
172
-
173
-
174
-
175
-
176
-
177
-
178
-
179
-
180
-
181
-
182
-
183
-
184
-
185
-
186
-
187
-
188
-
189
-
190
-
191
-
192
-
193
-
194
-
195
-
196
-
197
-
198
-
199
-
200
-
201
-
202
-
203
-
204
-
205
-
206
-
207
-
208
-
209
-
210
-
211
-
212
-
213
-
214
-
215
-
216
-
217
-
218
-
219
-
220
-
221
-
222
-
223
-
224
-
225
-
226
-
227
-
228
-
229
-
230
-
231
-
232
-
233
-
234
-
235
-
236
-
237
-
238
-
239
-
240
-
241
-
242
-
243
-
244
-
245
-
246
-
247
-
248
-
249
-
250
 |
 |