Netgear FVS336G FVS336G Reference Manual - Page 125
Configuring Keepalives and Dead Peer Detection, Configuring Keepalive
 |
UPC - 606449052015
View all Netgear FVS336G manuals
Add to My Manuals
Save this manual to your list of manuals |
Page 125 highlights
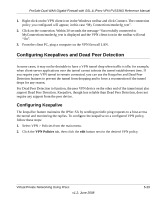
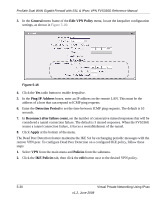
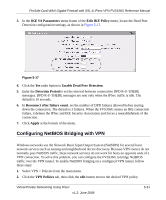
ProSafe Dual WAN Gigabit Firewall with SSL & IPsec VPN FVS336G Reference Manual 1. Right-click on the VPN client icon in the Windows toolbar and click Connect. The connection policy you configured will appear; in this case "My Connections\modecfg_test". 2. Click on the connection. Within 30 seconds the message "Successfully connected to MyConnections/modecfg_test is displayed and the VPN client icon in the toolbar will read "On". 3. From the client PC, ping a computer on the VPN firewall LAN. Configuring Keepalives and Dead Peer Detection In some cases, it may not be desirable to have a VPN tunnel drop when traffic is idle; for example, when client-server applications over the tunnel cannot tolerate the tunnel establishment time. If you require your VPN tunnel to remain connected, you can use the Keepalive and Dead Peer Detection features to prevent the tunnel from dropping and to force a reconnection if the tunnel drops for any reason. For Dead Peer Detection to function, the peer VPN device on the other end of the tunnel must also support Dead Peer Detection. Keepalive, though less reliable than Dead Peer Detection, does not require any support from the peer device. Configuring Keepalive The keepalive feature maintains the IPSec SA by sending periodic ping requests to a host across the tunnel and monitoring the replies. To configure the keepalive on a configured VPN policy, follow these steps: 1. Select VPN > Policies from the main menu. 2. Click the VPN Policies tab, then click the edit button next to the desired VPN policy. Virtual Private Networking Using IPsec v1.2, June 2008 5-29
-
 1
1 -
2
-
3
-
4
-
5
-
6
-
7
-
8
-
9
-
10
-
11
-
12
-
13
-
14
-
15
-
16
-
17
-
18
-
19
-
20
-
21
-
22
-
23
-
24
-
25
-
26
-
27
-
28
-
29
-
30
-
31
-
32
-
33
-
34
-
35
-
36
-
37
-
38
-
39
-
40
-
41
-
42
-
43
-
44
-
45
-
46
-
47
-
48
-
49
-
50
-
51
-
52
-
53
-
54
-
55
-
56
-
57
-
58
-
59
-
60
-
61
-
62
-
63
-
64
-
65
-
66
-
67
-
68
-
69
-
70
-
71
-
72
-
73
-
74
-
75
-
76
-
77
-
78
-
79
-
80
-
81
-
82
-
83
-
84
-
85
-
86
-
87
-
88
-
89
-
90
-
91
-
92
-
93
-
94
-
95
-
96
-
97
-
98
-
99
-
100
-
101
-
102
-
103
-
104
-
105
-
106
-
107
-
108
-
109
-
110
-
111
-
112
-
113
-
114
-
115
-
116
-
117
-
118
-
119
-
 120
120 -
 121
121 -
 122
122 -
 123
123 -
 124
124 -
 125
125 -
 126
126 -
 127
127 -
 128
128 -
 129
129 -
 130
130 -
131
-
132
-
133
-
134
-
135
-
136
-
137
-
138
-
139
-
140
-
141
-
142
-
143
-
144
-
145
-
146
-
147
-
148
-
149
-
150
-
151
-
152
-
153
-
154
-
155
-
156
-
157
-
158
-
159
-
160
-
161
-
162
-
163
-
164
-
165
-
166
-
167
-
168
-
169
-
170
-
171
-
172
-
173
-
174
-
175
-
176
-
177
-
178
-
179
-
180
-
181
-
182
-
183
-
184
-
185
-
186
-
187
-
188
-
189
-
190
-
191
-
192
-
193
-
194
-
195
-
196
-
197
-
198
-
199
-
200
-
201
-
202
-
203
-
204
-
205
-
206
-
207
-
208
-
209
-
210
-
211
-
212
-
213
-
214
-
215
-
216
-
217
-
218
-
219
-
220
-
221
-
222
-
223
-
224
-
225
-
226
-
227
-
228
-
229
-
230
-
231
-
232
-
233
-
234
-
235
-
236
-
237
-
238
-
239
-
240
-
241
-
242
-
243
-
244
-
245
 |
 |
