Netgear FVS336G FVS336G Reference Manual - Page 142
Service, Add Resource Addresses, Object Type, Address/Name, Network Address, Mask Length
 |
UPC - 606449052015
View all Netgear FVS336G manuals
Add to My Manuals
Save this manual to your list of manuals |
Page 142 highlights
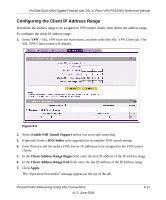
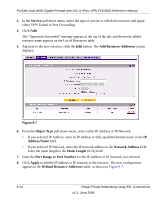
ProSafe Dual WAN Gigabit Firewall with SSL & IPsec VPN FVS336G Reference Manual 3. In the Service pull-down menu, select the type of service to which the resource will apply: either VPN Tunnel or Port Forwarding. 4. Click Add. The "Operation Successful" message appears at the top of the tab, and the newly-added resource name appears on the List of Resources table. 5. Adjacent to the new resource, click the Edit button. The Add Resource Addresses screen displays. Figure 6-7 6. From the Object Type pull-down menu, select either IP Address or IP Network: • If you selected IP Address, enter an IP address or fully qualified domain name in the IP Address/Name field. • If you selected IP Network, enter the IP network address in the Network Address field. Enter the mask length in the Mask Length (0-31) field. 7. Enter the Port Range or Port Number for the IP Address or IP Network you selected. 8. Click Apply to add the IP address or IP network to the resource. The new configuration appears in the Defined Resource Addresses table, as shown in Figure 6-7. 6-14 Virtual Private Networking Using SSL Connections v1.2, June 2008
-
 1
1 -
2
-
3
-
4
-
5
-
6
-
7
-
8
-
9
-
10
-
11
-
12
-
13
-
14
-
15
-
16
-
17
-
18
-
19
-
20
-
21
-
22
-
23
-
24
-
25
-
26
-
27
-
28
-
29
-
30
-
31
-
32
-
33
-
34
-
35
-
36
-
37
-
38
-
39
-
40
-
41
-
42
-
43
-
44
-
45
-
46
-
47
-
48
-
49
-
50
-
51
-
52
-
53
-
54
-
55
-
56
-
57
-
58
-
59
-
60
-
61
-
62
-
63
-
64
-
65
-
66
-
67
-
68
-
69
-
70
-
71
-
72
-
73
-
74
-
75
-
76
-
77
-
78
-
79
-
80
-
81
-
82
-
83
-
84
-
85
-
86
-
87
-
88
-
89
-
90
-
91
-
92
-
93
-
94
-
95
-
96
-
97
-
98
-
99
-
100
-
101
-
102
-
103
-
104
-
105
-
106
-
107
-
108
-
109
-
110
-
111
-
112
-
113
-
114
-
115
-
116
-
117
-
118
-
119
-
120
-
121
-
122
-
123
-
124
-
125
-
126
-
127
-
128
-
129
-
130
-
131
-
132
-
133
-
134
-
135
-
136
-
 137
137 -
 138
138 -
 139
139 -
 140
140 -
 141
141 -
 142
142 -
 143
143 -
 144
144 -
 145
145 -
 146
146 -
 147
147 -
148
-
149
-
150
-
151
-
152
-
153
-
154
-
155
-
156
-
157
-
158
-
159
-
160
-
161
-
162
-
163
-
164
-
165
-
166
-
167
-
168
-
169
-
170
-
171
-
172
-
173
-
174
-
175
-
176
-
177
-
178
-
179
-
180
-
181
-
182
-
183
-
184
-
185
-
186
-
187
-
188
-
189
-
190
-
191
-
192
-
193
-
194
-
195
-
196
-
197
-
198
-
199
-
200
-
201
-
202
-
203
-
204
-
205
-
206
-
207
-
208
-
209
-
210
-
211
-
212
-
213
-
214
-
215
-
216
-
217
-
218
-
219
-
220
-
221
-
222
-
223
-
224
-
225
-
226
-
227
-
228
-
229
-
230
-
231
-
232
-
233
-
234
-
235
-
236
-
237
-
238
-
239
-
240
-
241
-
242
-
243
-
244
-
245
 |
 |
