Netgear FVS336G FVS336G Reference Manual - Page 91
Setting a Schedule to Block or Allow Specific Traffic, Start Port, End Port, Port Triggering Rules
 |
UPC - 606449052015
View all Netgear FVS336G manuals
Add to My Manuals
Save this manual to your list of manuals |
Page 91 highlights
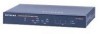
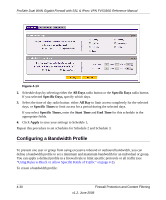
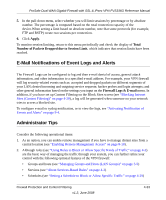
ProSafe Dual WAN Gigabit Firewall with SSL & IPsec VPN FVS336G Reference Manual a. Enter the Start Port range (1 - 65534). b. Enter the End Port range (1 - 65534). 7. Click Add. The port triggering rule will be added to the Port Triggering Rules table. To check the status of the port triggering rules, click the Status option arrow to the right of the tab on the Port Triggering screen. The following data is displayed: • Rule - The name of the port triggering rule. • LAN IP Address - The IP address of the PC currently using this rule. • Open Ports - The incoming ports associated with this rule. Incoming traffic using these ports will be sent to the LAN IP address above. • Time Remaining - The time remaining before this rule is released, and thus available for other PCs. The timer is reset whenever incoming or outgoing traffic is received. Setting a Schedule to Block or Allow Specific Traffic If you defined an outbound or inbound rule to use a schedule, you can set up a schedule for when blocking occurs or when access is restricted. The firewall allows you to specify when blocking will be enforced by configuring one of the Schedules-Schedule 1, Schedule 2 or Schedule 3. The VPN firewall uses the Network Time Protocol (NTP) to obtain the current time and date from one of several Network Time Servers on the Internet. To invoke rules and block keywords or Internet domains based on a schedule: 1. Select Security > Schedule from the main menu. The Schedule 1 screen is displayed. Firewall Protection and Content Filtering v1.2, June 2008 4-29
-
 1
1 -
2
-
3
-
4
-
5
-
6
-
7
-
8
-
9
-
10
-
11
-
12
-
13
-
14
-
15
-
16
-
17
-
18
-
19
-
20
-
21
-
22
-
23
-
24
-
25
-
26
-
27
-
28
-
29
-
30
-
31
-
32
-
33
-
34
-
35
-
36
-
37
-
38
-
39
-
40
-
41
-
42
-
43
-
44
-
45
-
46
-
47
-
48
-
49
-
50
-
51
-
52
-
53
-
54
-
55
-
56
-
57
-
58
-
59
-
60
-
61
-
62
-
63
-
64
-
65
-
66
-
67
-
68
-
69
-
70
-
71
-
72
-
73
-
74
-
75
-
76
-
77
-
78
-
79
-
80
-
81
-
82
-
83
-
84
-
85
-
 86
86 -
 87
87 -
 88
88 -
 89
89 -
 90
90 -
 91
91 -
 92
92 -
 93
93 -
 94
94 -
 95
95 -
 96
96 -
97
-
98
-
99
-
100
-
101
-
102
-
103
-
104
-
105
-
106
-
107
-
108
-
109
-
110
-
111
-
112
-
113
-
114
-
115
-
116
-
117
-
118
-
119
-
120
-
121
-
122
-
123
-
124
-
125
-
126
-
127
-
128
-
129
-
130
-
131
-
132
-
133
-
134
-
135
-
136
-
137
-
138
-
139
-
140
-
141
-
142
-
143
-
144
-
145
-
146
-
147
-
148
-
149
-
150
-
151
-
152
-
153
-
154
-
155
-
156
-
157
-
158
-
159
-
160
-
161
-
162
-
163
-
164
-
165
-
166
-
167
-
168
-
169
-
170
-
171
-
172
-
173
-
174
-
175
-
176
-
177
-
178
-
179
-
180
-
181
-
182
-
183
-
184
-
185
-
186
-
187
-
188
-
189
-
190
-
191
-
192
-
193
-
194
-
195
-
196
-
197
-
198
-
199
-
200
-
201
-
202
-
203
-
204
-
205
-
206
-
207
-
208
-
209
-
210
-
211
-
212
-
213
-
214
-
215
-
216
-
217
-
218
-
219
-
220
-
221
-
222
-
223
-
224
-
225
-
226
-
227
-
228
-
229
-
230
-
231
-
232
-
233
-
234
-
235
-
236
-
237
-
238
-
239
-
240
-
241
-
242
-
243
-
244
-
245
 |
 |
