Netgear FVS338 FVS338 Reference Manual - Page 118
Add IKE Policy, Mode Config, View selected, General, Edge Device, Authentication Type, IPsec Host
 |
UPC - 606449037197
View all Netgear FVS338 manuals
Add to My Manuals
Save this manual to your list of manuals |
Page 118 highlights
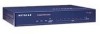
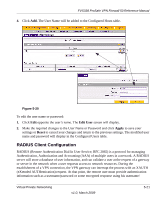
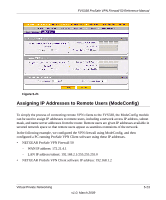
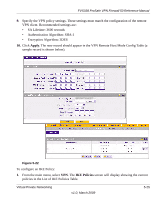
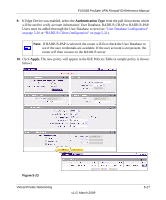
FVS338 ProSafe VPN Firewall 50 Reference Manual 2. Click Add to configure a new IKE Policy. The Add IKE Policy screen will display. 3. Enable Mode Config by checking the Yes radio box and selecting the Mode Config record you just created from the pull-down menu. (You can view the parameters of the selected record by clicking the View selected radio box.) Mode Config works only in Aggressive Mode, and Aggressive Mode requires that both ends of the tunnel be defined by a FQDN. 4. In the General section: a. Enter a description name in the Policy Name Field such as "salesperson". This name will be used as part of the remote identifier in the VPN client configuration. b. Set Direction/Type to Responder. c. By default, the Exchange Mode is set to Aggressive. 5. For Local information: d. Select Fully Qualified Domain Name for the Local Identity Type. e. Enter an identifier in the Remote Identity Data field that is not used by any other IKE policies. This identifier will be used as part of the local identifier in the VPN client configuration. 6. Specify the IKE SA parameters. These settings must be matched in the configuration of the remote VPN client. Recommended settings are: • Encryption Algorithm: 3DES • Authentication Algorithm: SHA-1 • Diffie-Hellman: Group 2 • SA Lifetime: 3600 seconds 7. Enter a Pre-Shared Key that will also be configured in the VPN client. 8. XAUTH is disabled by default. To enable XAUTH, select: • the Edge Device radio button to use this router as a VPN concentrator where one or more gateway tunnels terminate. (If selected, you must specify the Authentication Type to be used in verifying credentials of the remote VPN gateways.) • the IPsec Host radio button if you want this gateway to be authenticated by the remote gateway. Enter a Username and Password to be associated with the IKE policy. When this option is chosen, you will need to specify the user name and password to be used in authenticating this gateway (by the remote gateway). 5-26 v1.0, March 2009 Virtual Private Networking
-
 1
1 -
2
-
3
-
4
-
5
-
6
-
7
-
8
-
9
-
10
-
11
-
12
-
13
-
14
-
15
-
16
-
17
-
18
-
19
-
20
-
21
-
22
-
23
-
24
-
25
-
26
-
27
-
28
-
29
-
30
-
31
-
32
-
33
-
34
-
35
-
36
-
37
-
38
-
39
-
40
-
41
-
42
-
43
-
44
-
45
-
46
-
47
-
48
-
49
-
50
-
51
-
52
-
53
-
54
-
55
-
56
-
57
-
58
-
59
-
60
-
61
-
62
-
63
-
64
-
65
-
66
-
67
-
68
-
69
-
70
-
71
-
72
-
73
-
74
-
75
-
76
-
77
-
78
-
79
-
80
-
81
-
82
-
83
-
84
-
85
-
86
-
87
-
88
-
89
-
90
-
91
-
92
-
93
-
94
-
95
-
96
-
97
-
98
-
99
-
100
-
101
-
102
-
103
-
104
-
105
-
106
-
107
-
108
-
109
-
110
-
111
-
112
-
 113
113 -
 114
114 -
 115
115 -
 116
116 -
 117
117 -
 118
118 -
 119
119 -
 120
120 -
 121
121 -
 122
122 -
 123
123 -
124
-
125
-
126
-
127
-
128
-
129
-
130
-
131
-
132
-
133
-
134
-
135
-
136
-
137
-
138
-
139
-
140
-
141
-
142
-
143
-
144
-
145
-
146
-
147
-
148
-
149
-
150
-
151
-
152
-
153
-
154
-
155
-
156
-
157
-
158
-
159
-
160
-
161
-
162
-
163
-
164
-
165
-
166
-
167
-
168
-
169
-
170
-
171
-
172
-
173
-
174
-
175
-
176
-
177
-
178
-
179
-
180
-
181
-
182
-
183
-
184
-
185
-
186
-
187
-
188
-
189
-
190
-
191
-
192
-
193
-
194
-
195
-
196
-
197
-
198
-
199
-
200
 |
 |