Netgear FVS338 FVS338 Reference Manual - Page 74
Setting a Schedule to Block or Allow Specific Traffic, Setting Block Sites (Content Filtering)
 |
UPC - 606449037197
View all Netgear FVS338 manuals
Add to My Manuals
Save this manual to your list of manuals |
Page 74 highlights
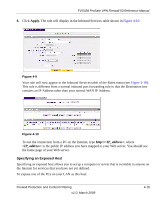
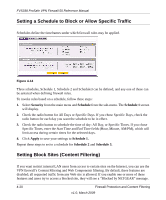
FVS338 ProSafe VPN Firewall 50 Reference Manual Setting a Schedule to Block or Allow Specific Traffic Schedules define the timeframes under which firewall rules may be applied. Figure 4-14 Three schedules, Schedule 1, Schedule 2 and Schedule3 can be defined, and any one of these can be selected when defining firewall rules. To invoke rules based on a schedule, follow these steps: 1. Select Security from the main menu and Schedule from the sub-menu. The Schedule 1 screen will display. 2. Check the radio button for All Days or Specific Days. If you chose Specific Days, check the radio button for each day you want the schedule to be in effect. 3. Check the radio button to schedule the time of day: All Day, or Specific Times. If you chose Specific Times, enter the Start Time and End Time fields (Hour, Minute, AM/PM), which will limit access during certain times for the selected days. 4. Click Apply to save your settings to Schedule 1. Repeat these steps to set to a schedule for Schedule 2 and Schedule 3. Setting Block Sites (Content Filtering) If you want restrict internal LAN users from access to certain sites on the Internet, you can use the VPN firewall's Content Filtering and Web Components filtering. By default, these features are disabled; all requested traffic from any Web site is allowed. If you enable one or more of these features and users try to access a blocked site, they will see a "Blocked by NETGEAR" message. 4-20 Firewall Protection and Content Filtering v1.0, March 2009
-
 1
1 -
2
-
3
-
4
-
5
-
6
-
7
-
8
-
9
-
10
-
11
-
12
-
13
-
14
-
15
-
16
-
17
-
18
-
19
-
20
-
21
-
22
-
23
-
24
-
25
-
26
-
27
-
28
-
29
-
30
-
31
-
32
-
33
-
34
-
35
-
36
-
37
-
38
-
39
-
40
-
41
-
42
-
43
-
44
-
45
-
46
-
47
-
48
-
49
-
50
-
51
-
52
-
53
-
54
-
55
-
56
-
57
-
58
-
59
-
60
-
61
-
62
-
63
-
64
-
65
-
66
-
67
-
68
-
 69
69 -
 70
70 -
 71
71 -
 72
72 -
 73
73 -
 74
74 -
 75
75 -
 76
76 -
 77
77 -
 78
78 -
 79
79 -
80
-
81
-
82
-
83
-
84
-
85
-
86
-
87
-
88
-
89
-
90
-
91
-
92
-
93
-
94
-
95
-
96
-
97
-
98
-
99
-
100
-
101
-
102
-
103
-
104
-
105
-
106
-
107
-
108
-
109
-
110
-
111
-
112
-
113
-
114
-
115
-
116
-
117
-
118
-
119
-
120
-
121
-
122
-
123
-
124
-
125
-
126
-
127
-
128
-
129
-
130
-
131
-
132
-
133
-
134
-
135
-
136
-
137
-
138
-
139
-
140
-
141
-
142
-
143
-
144
-
145
-
146
-
147
-
148
-
149
-
150
-
151
-
152
-
153
-
154
-
155
-
156
-
157
-
158
-
159
-
160
-
161
-
162
-
163
-
164
-
165
-
166
-
167
-
168
-
169
-
170
-
171
-
172
-
173
-
174
-
175
-
176
-
177
-
178
-
179
-
180
-
181
-
182
-
183
-
184
-
185
-
186
-
187
-
188
-
189
-
190
-
191
-
192
-
193
-
194
-
195
-
196
-
197
-
198
-
199
-
200
 |
 |
