Netgear FVS338 FVS338 Reference Manual - Page 44
Starting IP Address, Primary DNS Server, WINS Server, Lease Time., Enable DNS Proxy, LAN TCP/IP, Setup - windows 7 vpn client
 |
UPC - 606449037197
View all Netgear FVS338 manuals
Add to My Manuals
Save this manual to your list of manuals |
Page 44 highlights
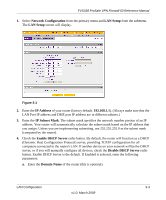
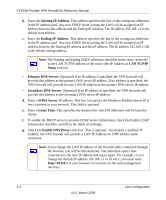
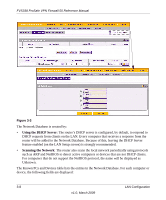
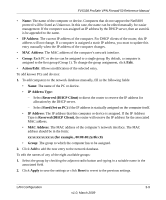
FVS338 ProSafe VPN Firewall 50 Reference Manual b. Enter the Starting IP Address. This address specifies the first of the contiguous addresses in the IP address pool. Any new DHCP client joining the LAN will be assigned an IP address between this address and the Ending IP Address. The IP address 192.168.1.2 is the default start address. c. Enter the Ending IP Address. This address specifies the last of the contiguous addresses in the IP address pool. Any new DHCP client joining the LAN will be assigned an IP address between the Starting IP address and this IP address. The IP address 192.168.1.100 is the default ending address. Note: The Starting and Ending DHCP addresses should be in the same "network" as the LAN TCP/IP address of the router (the IP Address in LAN TCP/IP Setup section). • Primary DNS Server. (Optional) If an IP address is specified, the VPN firewall will provide this address as the primary DNS server IP address. If no address is specified, the VPN firewall will provide its own LAN IP address as the primary DNS server IP address. • Secondary DNS Server. (Optional) If an IP address is specified, the VPN firewall will provide this address as the secondary DNS server IP address. d. Enter a WINS Server IP address. This box can specify the Windows NetBios Server IP if one is present in your network. This field is optional. e. Enter a Lease Time. This specifies the duration for which IP addresses will be leased to clients. f. To enable the DHCP server to provide LDAP server information, check the Enable LDAP Information checkbox and fill in the fields accordingly. g. Check the Enable DNS Proxy radio box. This is optional-the default is enabled. If enabled, the VPN firewall will provide a LAN IP Address for DNS address name resolution. Note: If you change the LAN IP address of the firewall while connected through the browser, you will be disconnected. You must then open a new connection to the new IP address and log in again. For example, if you change the default IP address 192.168.1.1 to 10.0.0.1, you must enter http://10.0.0.1 in your browser to reconnect to the web management interface. 3-4 LAN Configuration v1.0, March 2009
-
 1
1 -
2
-
3
-
4
-
5
-
6
-
7
-
8
-
9
-
10
-
11
-
12
-
13
-
14
-
15
-
16
-
17
-
18
-
19
-
20
-
21
-
22
-
23
-
24
-
25
-
26
-
27
-
28
-
29
-
30
-
31
-
32
-
33
-
34
-
35
-
36
-
37
-
38
-
 39
39 -
 40
40 -
 41
41 -
 42
42 -
 43
43 -
 44
44 -
 45
45 -
 46
46 -
 47
47 -
 48
48 -
 49
49 -
50
-
51
-
52
-
53
-
54
-
55
-
56
-
57
-
58
-
59
-
60
-
61
-
62
-
63
-
64
-
65
-
66
-
67
-
68
-
69
-
70
-
71
-
72
-
73
-
74
-
75
-
76
-
77
-
78
-
79
-
80
-
81
-
82
-
83
-
84
-
85
-
86
-
87
-
88
-
89
-
90
-
91
-
92
-
93
-
94
-
95
-
96
-
97
-
98
-
99
-
100
-
101
-
102
-
103
-
104
-
105
-
106
-
107
-
108
-
109
-
110
-
111
-
112
-
113
-
114
-
115
-
116
-
117
-
118
-
119
-
120
-
121
-
122
-
123
-
124
-
125
-
126
-
127
-
128
-
129
-
130
-
131
-
132
-
133
-
134
-
135
-
136
-
137
-
138
-
139
-
140
-
141
-
142
-
143
-
144
-
145
-
146
-
147
-
148
-
149
-
150
-
151
-
152
-
153
-
154
-
155
-
156
-
157
-
158
-
159
-
160
-
161
-
162
-
163
-
164
-
165
-
166
-
167
-
168
-
169
-
170
-
171
-
172
-
173
-
174
-
175
-
176
-
177
-
178
-
179
-
180
-
181
-
182
-
183
-
184
-
185
-
186
-
187
-
188
-
189
-
190
-
191
-
192
-
193
-
194
-
195
-
196
-
197
-
198
-
199
-
200
 |
 |