Netgear RBKE963 User Manual - Page 29
Specify an Internet connection that uses a login, Vendor Class Identifier String option 60
 |
View all Netgear RBKE963 manuals
Add to My Manuals
Save this manual to your list of manuals |
Page 29 highlights
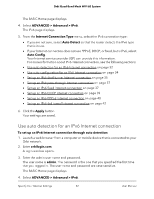
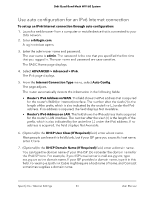
Orbi Quad-Band Mesh WiFi 6E System 9. Select a Domain Name Server (DNS) Address radio button: • Get Automatically from ISP. Your ISP uses DHCP to assign your DNS servers. Your ISP automatically assigns this address. • Use These DNS Servers. If you know that your ISP requires specific servers, select this option. Enter the IP address of your ISP's primary DNS server. If a secondary DNS server address is available, enter it also. 10. Select a Router MAC Address radio button: • Use Default Address. Use the default MAC address. • Use Computer MAC Address. The router captures and uses the MAC address of the computer that you are now using. You must use the one computer that the ISP allows. • Use This MAC Address. Enter the MAC address that you want to use. 11. In the Vendor Class Identifier String (option 60) field, enter the enter the vendor class identifier (VCI) string, as indicated by your ISP. If your ISP did not provide you with a VCI string, leave this field blank. 12. In the Client Identifier String (option 61) field, enter the client identifier (client ID) string, as indicated by your ISP. If your ISP did not provide you with a client ID string, leave this field blank. 13. Click the Apply button. Your settings are saved. 14. Click the Test button to test your Internet connection. Specify an Internet connection that uses a login Note: For information about WAN port aggregation, see Manage the WAN preference on page 70. To view or change the basic Internet setup: 1. Launch a web browser from a computer or mobile device that is connected to your Orbi network. 2. Enter orbilogin.com. A login window opens. 3. Enter the admin user name and password. Specify Your Internet Settings 29 User Manual
-
 1
1 -
2
-
3
-
4
-
5
-
6
-
7
-
8
-
9
-
10
-
11
-
12
-
13
-
14
-
15
-
16
-
17
-
18
-
19
-
20
-
21
-
22
-
23
-
 24
24 -
 25
25 -
 26
26 -
 27
27 -
 28
28 -
 29
29 -
 30
30 -
 31
31 -
 32
32 -
 33
33 -
 34
34 -
35
-
36
-
37
-
38
-
39
-
40
-
41
-
42
-
43
-
44
-
45
-
46
-
47
-
48
-
49
-
50
-
51
-
52
-
53
-
54
-
55
-
56
-
57
-
58
-
59
-
60
-
61
-
62
-
63
-
64
-
65
-
66
-
67
-
68
-
69
-
70
-
71
-
72
-
73
-
74
-
75
-
76
-
77
-
78
-
79
-
80
-
81
-
82
-
83
-
84
-
85
-
86
-
87
-
88
-
89
-
90
-
91
-
92
-
93
-
94
-
95
-
96
-
97
-
98
-
99
-
100
-
101
-
102
-
103
-
104
-
105
-
106
-
107
-
108
-
109
-
110
-
111
-
112
-
113
-
114
-
115
-
116
-
117
-
118
-
119
-
120
-
121
-
122
-
123
-
124
-
125
-
126
-
127
-
128
-
129
-
130
-
131
-
132
-
133
-
134
-
135
-
136
-
137
-
138
-
139
-
140
-
141
-
142
-
143
-
144
-
145
-
146
-
147
-
148
-
149
-
150
-
151
-
152
-
153
-
154
-
155
-
156
-
157
-
158
-
159
-
160
 |
 |