Samsung SGH-I527 User Manual At&t Wireless Sgh-i527 Galaxy Mega Jb English - Page 64
Unlinking a Contact, Contacts, Link contact, Connection
 |
View all Samsung SGH-I527 manuals
Add to My Manuals
Save this manual to your list of manuals |
Page 64 highlights
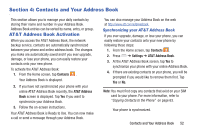
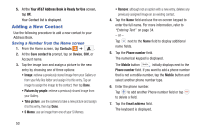
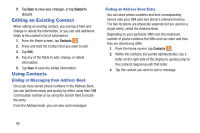
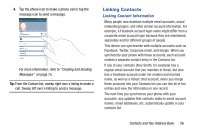
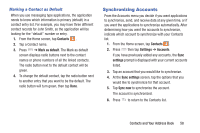
For more information about synchronizing accounts, see "Synchronizing Accounts" on page 58. 1. From the Home screen, tap Contacts . 2. Tap a contact name (the name you want to link to another entry). Typically this is the same contact with a different name or account information. 3. Press ➔ Link contact. The contact list is displayed. Note: Only contacts stored on your device can be linked. 4. Tap the second contact entry (the entry in which to link). The second contact is now linked with the first and the account information is merged into one screen. Note: The information is still maintained in both entries, but displays in one record for easier viewing when you link the contacts. 5. Tap area under the Connection bar to view the contact information you linked. The contacts and information displays with an icon next to the contact name to indicate what type of account information is contained in the entry. Unlinking a Contact 1. From the Home screen, tap Contacts . 2. Tap a contact name (the account name from which you want to unlink an entry). Note: typically this is the same contact with a different name or account information. 3. Tap the link icon under the Connection bar. 4. Tap the minus sign next to entry in which you want to unlink. 5. At the Separate contact prompt, tap OK. The contact is now separated and no longer displays in the merged record screen. 57
-
 1
1 -
2
-
3
-
4
-
5
-
6
-
7
-
8
-
9
-
10
-
11
-
12
-
13
-
14
-
15
-
16
-
17
-
18
-
19
-
20
-
21
-
22
-
23
-
24
-
25
-
26
-
27
-
28
-
29
-
30
-
31
-
32
-
33
-
34
-
35
-
36
-
37
-
38
-
39
-
40
-
41
-
42
-
43
-
44
-
45
-
46
-
47
-
48
-
49
-
50
-
51
-
52
-
53
-
54
-
55
-
56
-
57
-
58
-
 59
59 -
 60
60 -
 61
61 -
 62
62 -
 63
63 -
 64
64 -
 65
65 -
 66
66 -
 67
67 -
 68
68 -
 69
69 -
70
-
71
-
72
-
73
-
74
-
75
-
76
-
77
-
78
-
79
-
80
-
81
-
82
-
83
-
84
-
85
-
86
-
87
-
88
-
89
-
90
-
91
-
92
-
93
-
94
-
95
-
96
-
97
-
98
-
99
-
100
-
101
-
102
-
103
-
104
-
105
-
106
-
107
-
108
-
109
-
110
-
111
-
112
-
113
-
114
-
115
-
116
-
117
-
118
-
119
-
120
-
121
-
122
-
123
-
124
-
125
-
126
-
127
-
128
-
129
-
130
-
131
-
132
-
133
-
134
-
135
-
136
-
137
-
138
-
139
-
140
-
141
-
142
-
143
-
144
-
145
-
146
-
147
-
148
-
149
-
150
-
151
-
152
-
153
-
154
-
155
-
156
-
157
-
158
-
159
-
160
-
161
-
162
-
163
-
164
-
165
-
166
-
167
-
168
-
169
-
170
-
171
-
172
-
173
-
174
-
175
-
176
-
177
-
178
-
179
-
180
-
181
-
182
-
183
-
184
-
185
-
186
-
187
-
188
-
189
-
190
-
191
-
192
-
193
-
194
-
195
-
196
-
197
-
198
-
199
-
200
-
201
-
202
-
203
-
204
-
205
-
206
-
207
-
208
-
209
-
210
-
211
-
212
-
213
-
214
-
215
-
216
-
217
-
218
-
219
-
220
-
221
-
222
-
223
-
224
-
225
-
226
-
227
-
228
-
229
-
230
-
231
-
232
-
233
-
234
-
235
-
236
-
237
 |
 |
