Samsung SGH-I527 User Manual At&t Wireless Sgh-i527 Galaxy Mega Jb English - Page 76
Editing a Photo, Viewing your Pictures
 |
View all Samsung SGH-I527 manuals
Add to My Manuals
Save this manual to your list of manuals |
Page 76 highlights
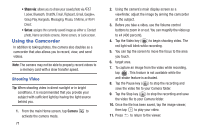
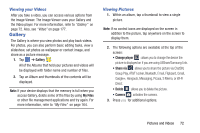
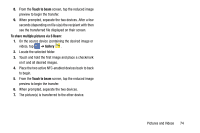
• Volume key: assigns a function to the volume key. Choose from The zoom key, The camera key, or The record key. • Timer: Use this for delayed-time shots. You can set the timer to Off, 2 sec, 5 sec, or 10 sec. • White balance: Select an appropriate white balance, so images have a true-to-life colour range. The settings are designed for specific lighting situations. These settings are similar to the heat range for white-balance exposure in professional cameras. • Exposure value: allows you to adjust the brightness level by moving the slider. • Guidelines: Display viewfinder guides to help composition when selecting subjects. • Flash: activate or deactivate the flash. • Voice control: activates/deactivates voice control feature that allows you to verbally take a photo. • Contextual filename: allows you to have your location added as part of the filename. You must first activate GPS tag described above. • Storage: Select the memory location for storage. • Shutter sound: Turn the shutter sound on or off. 69 • Reset: Reset the camera settings. Viewing your Pictures After you take a photo, you can access various options from the Image Viewer. The Image Viewer uses your Gallery. For more information, refer to "Gallery" on page 72. Editing a Photo You can edit your photos using the built-in Photo editor application on your device. The photo editor application provides basic editing functions for pictures that you take on your phone. Along with basic image tuning like brightness, contrast, and color it also provides a wide variety of effects used for editing the picture. 1. From the Home screen, tap ➔ Gallery . 2. Select a folder location and tap a file to open it. 3. With the image displayed, press ➔ Edit to launch the Photo editor. Note: To select the picture area, touch and hold the current picture. 4. Select an image area by touching and holding the image and then selecting an available option:
-
 1
1 -
2
-
3
-
4
-
5
-
6
-
7
-
8
-
9
-
10
-
11
-
12
-
13
-
14
-
15
-
16
-
17
-
18
-
19
-
20
-
21
-
22
-
23
-
24
-
25
-
26
-
27
-
28
-
29
-
30
-
31
-
32
-
33
-
34
-
35
-
36
-
37
-
38
-
39
-
40
-
41
-
42
-
43
-
44
-
45
-
46
-
47
-
48
-
49
-
50
-
51
-
52
-
53
-
54
-
55
-
56
-
57
-
58
-
59
-
60
-
61
-
62
-
63
-
64
-
65
-
66
-
67
-
68
-
69
-
70
-
 71
71 -
 72
72 -
 73
73 -
 74
74 -
 75
75 -
 76
76 -
 77
77 -
 78
78 -
 79
79 -
 80
80 -
 81
81 -
82
-
83
-
84
-
85
-
86
-
87
-
88
-
89
-
90
-
91
-
92
-
93
-
94
-
95
-
96
-
97
-
98
-
99
-
100
-
101
-
102
-
103
-
104
-
105
-
106
-
107
-
108
-
109
-
110
-
111
-
112
-
113
-
114
-
115
-
116
-
117
-
118
-
119
-
120
-
121
-
122
-
123
-
124
-
125
-
126
-
127
-
128
-
129
-
130
-
131
-
132
-
133
-
134
-
135
-
136
-
137
-
138
-
139
-
140
-
141
-
142
-
143
-
144
-
145
-
146
-
147
-
148
-
149
-
150
-
151
-
152
-
153
-
154
-
155
-
156
-
157
-
158
-
159
-
160
-
161
-
162
-
163
-
164
-
165
-
166
-
167
-
168
-
169
-
170
-
171
-
172
-
173
-
174
-
175
-
176
-
177
-
178
-
179
-
180
-
181
-
182
-
183
-
184
-
185
-
186
-
187
-
188
-
189
-
190
-
191
-
192
-
193
-
194
-
195
-
196
-
197
-
198
-
199
-
200
-
201
-
202
-
203
-
204
-
205
-
206
-
207
-
208
-
209
-
210
-
211
-
212
-
213
-
214
-
215
-
216
-
217
-
218
-
219
-
220
-
221
-
222
-
223
-
224
-
225
-
226
-
227
-
228
-
229
-
230
-
231
-
232
-
233
-
234
-
235
-
236
-
237
 |
 |
