Sharp AR M550N Installation Manual - Page 10
Tray 3 or tray 4 paper size change, Tab paper setting, Setting the paper type and paper size
 |
View all Sharp AR M550N manuals
Add to My Manuals
Save this manual to your list of manuals |
Page 10 highlights
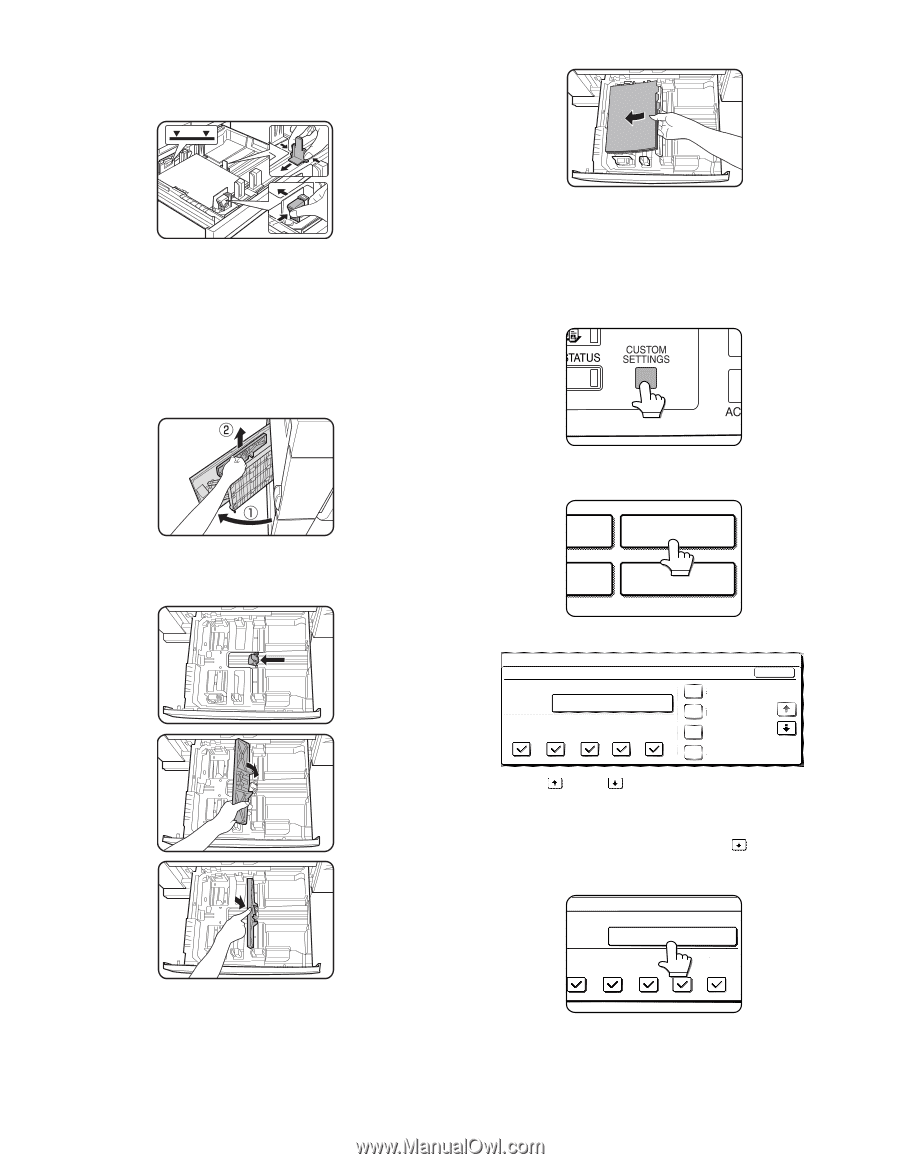
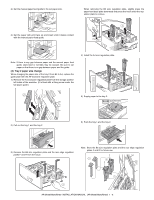
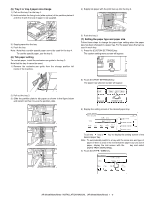
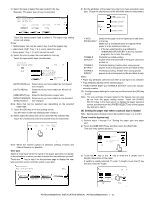
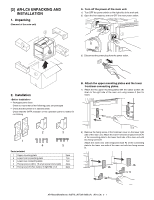
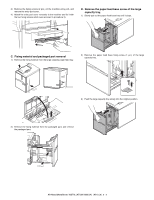
(5) Tray 3 or tray 4 paper size change 1) Pull out the tray 3 or the tray 4. 2) Hold and slide the fixing knob (slide system) of the partition plates A and B to fit with the size of paper to be supplied. 4) Supply tab paper with the print face up into the tray 3. 3) Supply paper into the tray. 4) Push the tray. Note: Note that a certain special paper cannot be used for the tray 4. To use the special paper, use the tray 3. (6) Tab paper setting To use tab paper, install the exclusive-use guide to the tray 3. Note that the tray 4 cannot be used. 1) Remove the exclusive-use guide from the storage position left inside of the machine. 5) Push the tray 3. (7) Setting the paper type and paper size Follow these steps to change the paper type setting when the paper type has been changed in a paper tray. For the paper types that can be used in each tray. 1) Press the [CUSTOM SETTINGS] key. The custom setting menu screen will appear. 2) Touch the [TRAY SETTINGS] key. The paper tray selection screen will appear. 2) Pull out the tray 3. 3) Slide the partition plate to tab paper as shown in the figure below and install it so that it covers the partition plate. RINT TRAY SETTINGS TA ORWARD PRINTER CONDITION 3) Display the setting screen of the desired paper tray. CUSTOM SETTINGS TRAY SETTINGS TRAY1 PRINT COPY TYPE / SIZE PLAIN / 81/2x11 DOC. FAX I-FAX FILING OK FIXED PAPER 1/8 DISABLE DUPLEX DISABLE STAPLE DISABLE PUNCH Touch the key or desired paper tray. key to display the setting screen of the Note: To automatically switch to a tray with the same size and type of paper (if there is one) in the event that the paper tray runs out of paper, display the last screen with the [AUTO TRAY SWITCHING]. key and select 4) Touch the [TYPE / SIZE] key. TRAY SETTINGS TRAY3 TYPE / SIZE PLAIN / 81/2x11 PRINT COPY DOC. FAX I-FAX FILING AR-M550/M620/M700 INSTALLATION MANUAL (AR-M550/M620/M700) 1 - 9
-
 1
1 -
2
-
3
-
4
-
 5
5 -
 6
6 -
 7
7 -
 8
8 -
 9
9 -
 10
10 -
 11
11 -
 12
12 -
 13
13 -
 14
14 -
 15
15 -
16
-
17
-
18
-
19
-
20
-
21
-
22
-
23
-
24
-
25
-
26
-
27
-
28
-
29
-
30
-
31
-
32
-
33
-
34
-
35
-
36
-
37
-
38
-
39
-
40
-
41
-
42
-
43
-
44
-
45
-
46
-
47
-
48
-
49
-
50
-
51
-
52
-
53
-
54
-
55
-
56
-
57
-
58
-
59
-
60
 |
 |