Sharp AR M550N Installation Manual - Page 51
Country Code Table
 |
View all Sharp AR M550N manuals
Add to My Manuals
Save this manual to your list of manuals |
Page 51 highlights
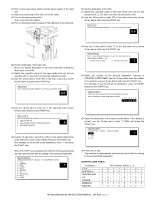
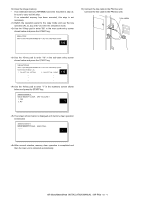
11) Turn on the main power switch and the power switch of the main unit. Insert the power plug of the main unit to the outlet. Turn on the main power switch. Then, close the front cabinet. Turn on the power switch located on the right side of the main unit. 13) Set the destination of the FAX. Switch the operation panel to the copy mode and use the key operation [P], [*], [C], and [*] to enter the simulation mode. Use the 10-key pad to enter "66" in the main code entry screen shown below and press the START key. 2 3 Use the 10-key pad to enter "2" in the sub-code entry screen shown below and press the START key. 12) Set the destination of the main unit. * Be sure to set the destination of the main unit before setting the destination of the FAX. Switch the operation panel to the copy mode and use the key operation [P], [*], [C], and [*] to enter the simulation mode. Use the 10-key pad to enter "26" in the main code entry screen shown below and press the START key. Select the number of the desired destination referring to COUNTRY CODE TABLE, use the 10-key pad to enter the number in the submenu screen shown below and press the START key. (For example, to set the UK as the destination, enter "10110100" and press the START key.) Use the 10-key pad to enter "6" in the sub-code entry screen shown below and press the START key. Check the destination in the screen shown below. If the display is correct, use the 10-key pad to enter "1"(YES) and press the START key. Use the 10-key pad to enter the number of the desired destination in the submenu screen shown below and press the START key. (For example, to set the UK as the destination, enter "7" and press the START key.) * When the START key is pressed, the machine will be automatically rebooted and will start with the setting of the selected destination. Press the CA key. * The machine is automatically rebooted and starts with the setting of the selected FAX destination. COUNTRY CODE TABLE Destination U.S.A AUSTRALIA NEWZEALAND U.K. FRANCE GERMANY SWEDEN FAX Software SW No.1 - 8 10110101 00001001 01111110 10110100 00111101 00000100 10100101 AR-M550/M620/M700 INSTALLATION MANUAL (AR-FX8) 10 - 3
-
 1
1 -
2
-
3
-
4
-
5
-
6
-
7
-
8
-
9
-
10
-
11
-
12
-
13
-
14
-
15
-
16
-
17
-
18
-
19
-
20
-
21
-
22
-
23
-
24
-
25
-
26
-
27
-
28
-
29
-
30
-
31
-
32
-
33
-
34
-
35
-
36
-
37
-
38
-
39
-
40
-
41
-
42
-
43
-
44
-
45
-
 46
46 -
 47
47 -
 48
48 -
 49
49 -
 50
50 -
 51
51 -
 52
52 -
 53
53 -
 54
54 -
 55
55 -
 56
56 -
57
-
58
-
59
-
60
 |
 |
