Sharp AR M550N Installation Manual - Page 26
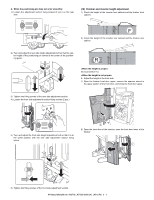
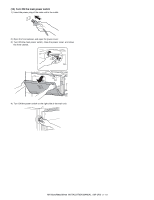
Fix the extension guide of the tray
 |
View all Sharp AR M550N manuals
Add to My Manuals
Save this manual to your list of manuals |
Page 26 highlights
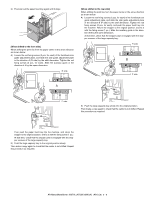
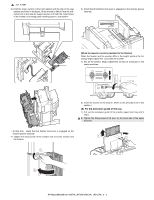
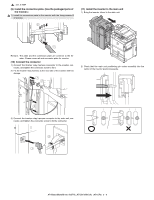
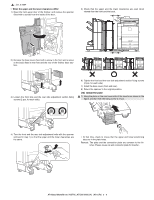
1 : Jan. 9 2004 3) Hold the lower section of the front cabinet and the grip of the rear cabinet as shown in the figure, tilt the inserter a little so that the indication hole in the inserter support section is fit with the metal fixture of the finisher connecting plate installing section, and install it. 5) Check that the finisher lock lever is engaged on the inserter groove securely. [When the inserter cannot be installed to the finisher] When the finisher and the inserter differ in the height, perform the following height adjustment, and insert the inserter. 1) Set all the finisher height adjustment screws (4 positions) to the center positions. 2) Insert the inserter to the finisher. (Refer to the procedure (7) in this section.) (8) Fix the extension guide of the tray 1) Pull out the extension guide of the inserter paper feed tray until it stops. 1 2) Tighten the fixing screws F (2 pcs.) on the back side of the paper feed tray. ∗ At that time, check that the finisher lock lever is engaged on the inserter groove securely. 4) Tighten the fixing screw of the inserter lock to fix the inserter and the finisher. AR-M550/M620/M700 INSTALLATION MANUAL (AR-CF2) 3 - 5
-
 1
1 -
2
-
3
-
4
-
5
-
6
-
7
-
8
-
9
-
10
-
11
-
12
-
13
-
14
-
15
-
16
-
17
-
18
-
19
-
20
-
 21
21 -
 22
22 -
 23
23 -
 24
24 -
 25
25 -
 26
26 -
 27
27 -
 28
28 -
 29
29 -
 30
30 -
 31
31 -
32
-
33
-
34
-
35
-
36
-
37
-
38
-
39
-
40
-
41
-
42
-
43
-
44
-
45
-
46
-
47
-
48
-
49
-
50
-
51
-
52
-
53
-
54
-
55
-
56
-
57
-
58
-
59
-
60
 |
 |
