Sharp AR M550N Installation Manual - Page 5
Adjuster cover installation, Remove the fixing tape and the reinforcing, material - drivers
 |
View all Sharp AR M550N manuals
Add to My Manuals
Save this manual to your list of manuals |
Page 5 highlights
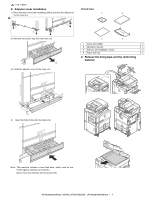
2 : Feb. 9 2004 B. Adjuster cover installation Packed items 1) Move the main unit to the installing position, and turn the adjuster to fix the main unit. 1 2 2 2) Remove the bottom tray from the main unit. 3) Install the adjuster cover to the main unit. 3 4 1 Driver (CD-ROM) x 1 2 Operation manual x 1 3 Delivery and installation report x 1 4 Paper exit tray x 1 C. Remove the fixing tape and the reinforcing material 4) Insert the bottom tray into the main unit. Note: This machine includes a hard disk drive, which must be protected against vibrations and shocks. Never move the machine with the power ON. AR-M550/M620/M700 INSTALLATION MANUAL (AR-M550/M620/M700) 1 - 4
-
 1
1 -
 2
2 -
 3
3 -
 4
4 -
 5
5 -
 6
6 -
 7
7 -
 8
8 -
 9
9 -
 10
10 -
 11
11 -
12
-
13
-
14
-
15
-
16
-
17
-
18
-
19
-
20
-
21
-
22
-
23
-
24
-
25
-
26
-
27
-
28
-
29
-
30
-
31
-
32
-
33
-
34
-
35
-
36
-
37
-
38
-
39
-
40
-
41
-
42
-
43
-
44
-
45
-
46
-
47
-
48
-
49
-
50
-
51
-
52
-
53
-
54
-
55
-
56
-
57
-
58
-
59
-
60
 |
 |
: Feb. 9 2004
2
AR-M550/M620/M700
INSTALLATION MANUAL
(AR-M550/M620/M700)
1 - 4
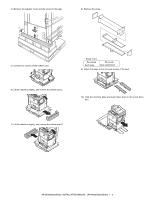
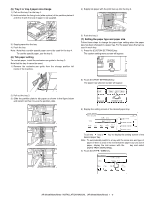
B.
Adjuster cover installation
1)
Move the main unit to the installing position, and turn the adjuster to
fix the main unit.
2)
Remove the bottom tray from the main unit.
3)
Install the adjuster cover to the main unit.
4)
Insert the bottom tray into the main unit.
Note: This machine includes a hard disk drive, which must be pro-
tected against vibrations and shocks.
Never move the machine with the power ON.
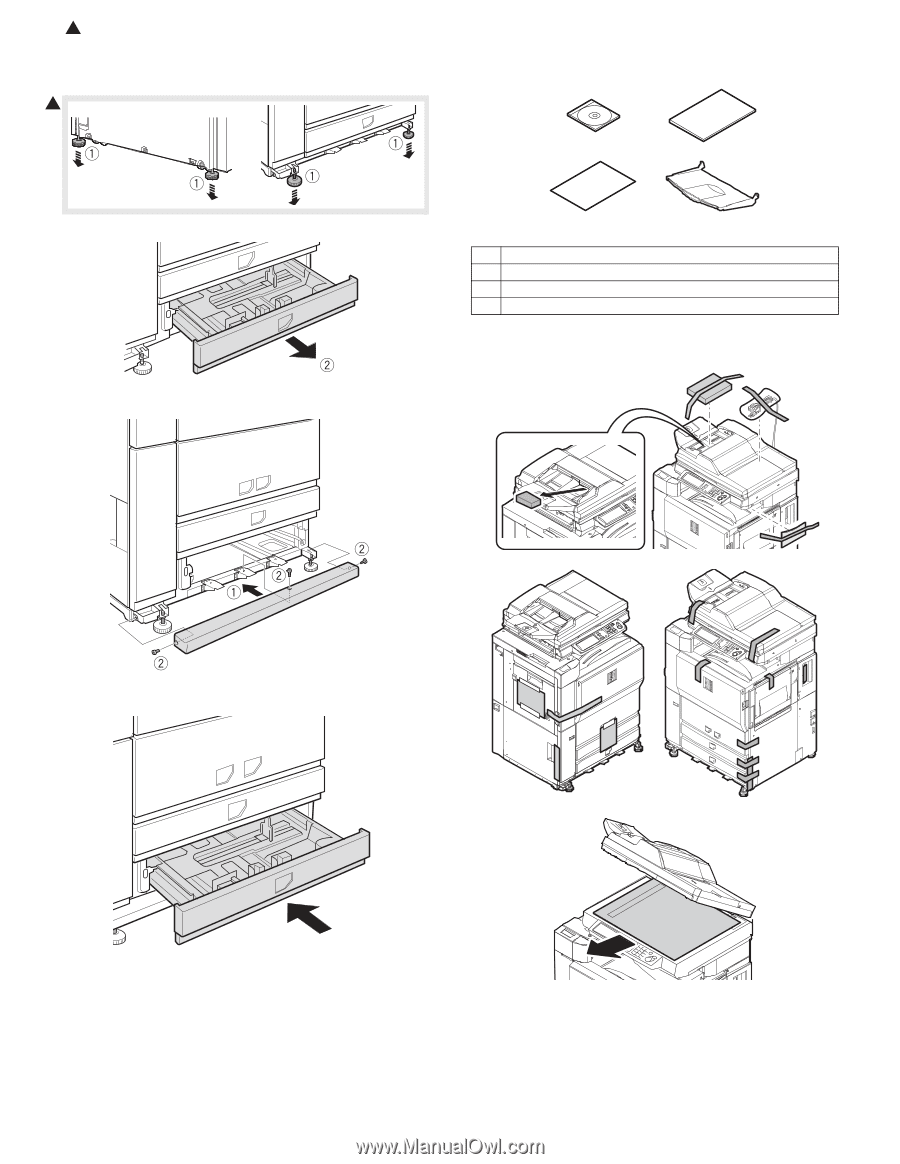
Packed items
C.
Remove the fixing tape and the reinforcing
material
2
1
Driver (CD-ROM)
x 1
2
Operation manual
x 1
3
Delivery and installation report
x 1
4
Paper exit tray
x 1
1
2
3
4