Sony DCR-IP220 Operating Instructions - Page 123
Recording a still image from other equipment, Recording an image from a tape as a still image
 |
View all Sony DCR-IP220 manuals
Add to My Manuals
Save this manual to your list of manuals |
Page 123 highlights
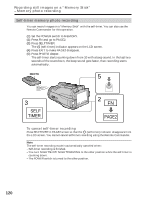
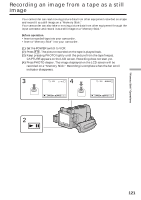
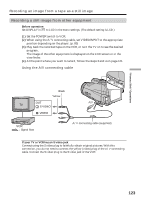
"Memory Stick" Operations Recording an image from a tape as a still image Recording a still image from other equipment Before operation Set DISPLAY in to LCD in the menu settings. (The default setting is LCD.) (1) Set the POWER switch to VCR. (2) When using the A/V connecting cable, set VIDEOINPUT to the appropriate position depending on the player. (p. 83) (3) Play back the recorded tape on the VCR, or turn the TV on to see the desired program. The image of the other equipment is displayed on the LCD screen or in the viewfinder. (4) At the point where you want to record, follow the steps 3 and 4 on page 121. Using the A/V connecting cable Black Yellow OUT A/V S VIDEO VIDEO VCR : Signal flow A/V connecting cable (supplied) If your TV or VCR has an S video jack Connect using the S video plug to faithfully obtain original pictures. With this connection, you do not need to connect the yellow (video) plug of the A/V connecting cable. Connect the S video plug to the S video jack of the VCR. 123
-
 1
1 -
2
-
3
-
4
-
5
-
6
-
7
-
8
-
9
-
10
-
11
-
12
-
13
-
14
-
15
-
16
-
17
-
18
-
19
-
20
-
21
-
22
-
23
-
24
-
25
-
26
-
27
-
28
-
29
-
30
-
31
-
32
-
33
-
34
-
35
-
36
-
37
-
38
-
39
-
40
-
41
-
42
-
43
-
44
-
45
-
46
-
47
-
48
-
49
-
50
-
51
-
52
-
53
-
54
-
55
-
56
-
57
-
58
-
59
-
60
-
61
-
62
-
63
-
64
-
65
-
66
-
67
-
68
-
69
-
70
-
71
-
72
-
73
-
74
-
75
-
76
-
77
-
78
-
79
-
80
-
81
-
82
-
83
-
84
-
85
-
86
-
87
-
88
-
89
-
90
-
91
-
92
-
93
-
94
-
95
-
96
-
97
-
98
-
99
-
100
-
101
-
102
-
103
-
104
-
105
-
106
-
107
-
108
-
109
-
110
-
111
-
112
-
113
-
114
-
115
-
116
-
117
-
 118
118 -
 119
119 -
 120
120 -
 121
121 -
 122
122 -
 123
123 -
 124
124 -
 125
125 -
 126
126 -
 127
127 -
 128
128 -
129
-
130
-
131
-
132
-
133
-
134
-
135
-
136
-
137
-
138
-
139
-
140
-
141
-
142
-
143
-
144
-
145
-
146
-
147
-
148
-
149
-
150
-
151
-
152
-
153
-
154
-
155
-
156
-
157
-
158
-
159
-
160
-
161
-
162
-
163
-
164
-
165
-
166
-
167
-
168
-
169
-
170
-
171
-
172
-
173
-
174
-
175
-
176
-
177
-
178
-
179
-
180
-
181
-
182
-
183
-
184
-
185
-
186
-
187
-
188
-
189
-
190
-
191
-
192
-
193
-
194
-
195
-
196
-
197
-
198
-
199
-
200
-
201
-
202
-
203
-
204
-
205
-
206
-
207
-
208
-
209
-
210
-
211
-
212
-
213
-
214
-
215
-
216
-
217
-
218
-
219
-
220
 |
 |
