Sony DCR-IP220 Operating Instructions - Page 173
Installing the USB driver, Connecting your camcorder to your computer using the USB cable, For Macintosh users
 |
View all Sony DCR-IP220 manuals
Add to My Manuals
Save this manual to your list of manuals |
Page 173 highlights
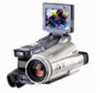
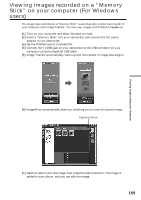
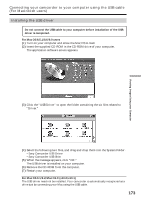
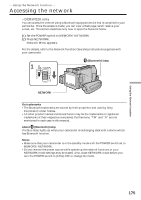
Viewing Images Using your Computer Connecting your camcorder to your computer using the USB cable (For Macintosh users) Installing the USB driver Do not connect the USB cable to your computer before installation of the USB driver is completed. For Mac OS 8.5.1/8.6/9.0 users (1) Turn on your computer and allow the Mac OS to load. (2) Insert the supplied CD-ROM in the CD-ROM drive of your computer. The application software screen appears. (3) Click the "USB Driver" to open the folder containing the six files related to "Driver." (4) Select the following two files, and drag and drop them into the System Folder. •Sony Camcorder USB Driver •Sony Camcorder USB Shim (5) When the message appears, click "OK." The USB driver is installed on your computer. (6) Remove the CD-ROM from the computer. (7) Restart your computer. For Mac OS 9.1/9.2/Mac OS X (v10.0/v10.1) The USB driver need not be installed. Your camcorder is automatically recognized as a drive just by connecting your Mac using the USB cable. 173
-
 1
1 -
2
-
3
-
4
-
5
-
6
-
7
-
8
-
9
-
10
-
11
-
12
-
13
-
14
-
15
-
16
-
17
-
18
-
19
-
20
-
21
-
22
-
23
-
24
-
25
-
26
-
27
-
28
-
29
-
30
-
31
-
32
-
33
-
34
-
35
-
36
-
37
-
38
-
39
-
40
-
41
-
42
-
43
-
44
-
45
-
46
-
47
-
48
-
49
-
50
-
51
-
52
-
53
-
54
-
55
-
56
-
57
-
58
-
59
-
60
-
61
-
62
-
63
-
64
-
65
-
66
-
67
-
68
-
69
-
70
-
71
-
72
-
73
-
74
-
75
-
76
-
77
-
78
-
79
-
80
-
81
-
82
-
83
-
84
-
85
-
86
-
87
-
88
-
89
-
90
-
91
-
92
-
93
-
94
-
95
-
96
-
97
-
98
-
99
-
100
-
101
-
102
-
103
-
104
-
105
-
106
-
107
-
108
-
109
-
110
-
111
-
112
-
113
-
114
-
115
-
116
-
117
-
118
-
119
-
120
-
121
-
122
-
123
-
124
-
125
-
126
-
127
-
128
-
129
-
130
-
131
-
132
-
133
-
134
-
135
-
136
-
137
-
138
-
139
-
140
-
141
-
142
-
143
-
144
-
145
-
146
-
147
-
148
-
149
-
150
-
151
-
152
-
153
-
154
-
155
-
156
-
157
-
158
-
159
-
160
-
161
-
162
-
163
-
164
-
165
-
166
-
167
-
 168
168 -
 169
169 -
 170
170 -
 171
171 -
 172
172 -
 173
173 -
 174
174 -
 175
175 -
 176
176 -
 177
177 -
 178
178 -
179
-
180
-
181
-
182
-
183
-
184
-
185
-
186
-
187
-
188
-
189
-
190
-
191
-
192
-
193
-
194
-
195
-
196
-
197
-
198
-
199
-
200
-
201
-
202
-
203
-
204
-
205
-
206
-
207
-
208
-
209
-
210
-
211
-
212
-
213
-
214
-
215
-
216
-
217
-
218
-
219
-
220
 |
 |