Sony DCR-IP220 Operating Instructions - Page 87
Using the Remote Commandaer, Notes, Note on playback pause pictures, Before recording
 |
View all Sony DCR-IP220 manuals
Add to My Manuals
Save this manual to your list of manuals |
Page 87 highlights
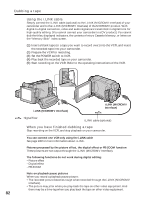
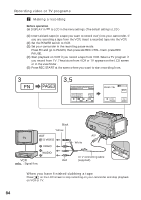
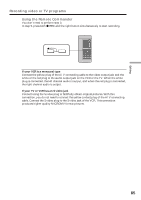
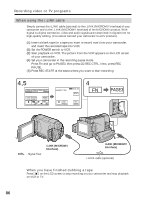
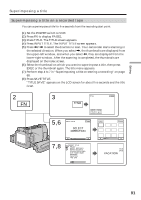
Editing Recording video or TV programs Using the Remote Commandaer You don't need to perform step 4. In step 5, press both z REC and the right button simultaneously to start recording. REC Notes • When an incompatible picture (such as one recorded with the DV format) is input, the message "INPUT ERROR" appears. • You can connect one VCR only using the i.LINK cable. • First, start playback or turn to the playback pause mode before your camcorder starts recording or turns to the recording pause mode. If no signal is input into your camcorder, the message "NO INPUT" appears and the camcorder cannot start recording. Note on playback pause pictures When you record a playback pause picture: • The recorded picture becomes rough when recorded through the i.LINK (MICROMV Interface). • The picture may jitter when you play back the tape on other video equipment. And there may be a time-lag when you play back the tape on other video equipment. Before recording Make sure if the MPEG IN indicator appears on the LCD screen. The MPEG IN indicator may appear on both equipment. 87
-
 1
1 -
2
-
3
-
4
-
5
-
6
-
7
-
8
-
9
-
10
-
11
-
12
-
13
-
14
-
15
-
16
-
17
-
18
-
19
-
20
-
21
-
22
-
23
-
24
-
25
-
26
-
27
-
28
-
29
-
30
-
31
-
32
-
33
-
34
-
35
-
36
-
37
-
38
-
39
-
40
-
41
-
42
-
43
-
44
-
45
-
46
-
47
-
48
-
49
-
50
-
51
-
52
-
53
-
54
-
55
-
56
-
57
-
58
-
59
-
60
-
61
-
62
-
63
-
64
-
65
-
66
-
67
-
68
-
69
-
70
-
71
-
72
-
73
-
74
-
75
-
76
-
77
-
78
-
79
-
80
-
81
-
 82
82 -
 83
83 -
 84
84 -
 85
85 -
 86
86 -
 87
87 -
 88
88 -
 89
89 -
 90
90 -
 91
91 -
 92
92 -
93
-
94
-
95
-
96
-
97
-
98
-
99
-
100
-
101
-
102
-
103
-
104
-
105
-
106
-
107
-
108
-
109
-
110
-
111
-
112
-
113
-
114
-
115
-
116
-
117
-
118
-
119
-
120
-
121
-
122
-
123
-
124
-
125
-
126
-
127
-
128
-
129
-
130
-
131
-
132
-
133
-
134
-
135
-
136
-
137
-
138
-
139
-
140
-
141
-
142
-
143
-
144
-
145
-
146
-
147
-
148
-
149
-
150
-
151
-
152
-
153
-
154
-
155
-
156
-
157
-
158
-
159
-
160
-
161
-
162
-
163
-
164
-
165
-
166
-
167
-
168
-
169
-
170
-
171
-
172
-
173
-
174
-
175
-
176
-
177
-
178
-
179
-
180
-
181
-
182
-
183
-
184
-
185
-
186
-
187
-
188
-
189
-
190
-
191
-
192
-
193
-
194
-
195
-
196
-
197
-
198
-
199
-
200
-
201
-
202
-
203
-
204
-
205
-
206
-
207
-
208
-
209
-
210
-
211
-
212
-
213
-
214
-
215
-
216
-
217
-
218
-
219
-
220
 |
 |
