Sony HVR Z1U Operating Instructions - Page 102
To cancel the time code setting, To reset the time code, Drop frame mode, Setting the user bits value
 |
UPC - 027242668799
View all Sony HVR Z1U manuals
Add to My Manuals
Save this manual to your list of manuals |
Page 102 highlights
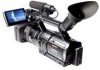
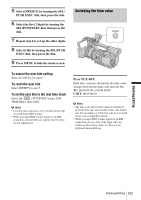
Setting FREE RUN To advance the time code freely regardless of the camcorder's current operation mode. The time code starts running once this setting is selected. 9 Press MENU to hide the menu screen. To cancel the time code setting Select [CANCEL] in step 5 in step 6, or press TC RESET on the Remote Commander. In case of operating the Remote Commander, make sure that the time code is 00:00:00:00, and then set [REMOTE CTRL] to [OFF]. To reset the time code Select [RESET] in step 2 in step 6. Drop frame mode In the NTSC standard, the time code value is based on 30 frames per second, but the exact video frame frequency is in fact 29.97 frames per second. Consequently the time code value will deviate from the real time when recording for long time. Drop frame mode corrects for this by skipping 2 frame counts at the beginning of every minute which is not a multiple of 10. In non-drop frame mode, however, no frame counts are omitted, and there is a gradual deviation of the time code from the real time. b Note • In case of the i.LINK connection, if you start recording when there is no video input signal, the time code may not continue correctly. • If you record HDV and DVCAM (DV) mixed, the time code may be initialized at the backspace editing. • If you play back the tape recorded in HDV and DVCAM (DV) mixed, the time code may not match the picture at the backspace editing. • If you set [TC MAKE] to [REGENERATE] in the menu, [TC RUN] is automatically set to [REC RUN]. • When [50i/60i SEL] on the (OTHERS) menu is set to 50i, the non-drop frame mode is selected automatically. You cannot change the frame mode. • When recording in the HDV format, discrepancy of 3 frames at the maximum may occur. • If you set [TC MAKE] to [REGENERATE], TC PRESET on the Remote Commander does not work. Setting the user bits value Shooting information (date, time, scene number, etc.) can be superimposed on a tape using up to 8 hexadecimal digit. POWER switch 1 Set the POWER switch to VCR or CAMERA. 2 Press MENU. 3 Select the (TC/UB SET) menu by turning the SEL/PUSH EXEC dial, then press the dial. 4 Select [UB PRESET] by turning the SEL/PUSH EXEC dial, then press the dial. 102 Dubbing/Editing
-
 1
1 -
2
-
3
-
4
-
5
-
6
-
7
-
8
-
9
-
10
-
11
-
12
-
13
-
14
-
15
-
16
-
17
-
18
-
19
-
20
-
21
-
22
-
23
-
24
-
25
-
26
-
27
-
28
-
29
-
30
-
31
-
32
-
33
-
34
-
35
-
36
-
37
-
38
-
39
-
40
-
41
-
42
-
43
-
44
-
45
-
46
-
47
-
48
-
49
-
50
-
51
-
52
-
53
-
54
-
55
-
56
-
57
-
58
-
59
-
60
-
61
-
62
-
63
-
64
-
65
-
66
-
67
-
68
-
69
-
70
-
71
-
72
-
73
-
74
-
75
-
76
-
77
-
78
-
79
-
80
-
81
-
82
-
83
-
84
-
85
-
86
-
87
-
88
-
89
-
90
-
91
-
92
-
93
-
94
-
95
-
96
-
 97
97 -
 98
98 -
 99
99 -
 100
100 -
 101
101 -
 102
102 -
 103
103 -
 104
104 -
 105
105 -
 106
106 -
 107
107 -
108
-
109
-
110
-
111
-
112
-
113
-
114
-
115
-
116
-
117
-
118
-
119
-
120
-
121
-
122
-
123
-
124
-
125
-
126
-
127
-
128
-
129
-
130
-
131
-
132
-
133
-
134
-
135
-
136
 |
 |